2
RTE® EL-BAY-O-NET FUSE
RE-FUSING INSTRUCTIONS MN132024EN November 2016
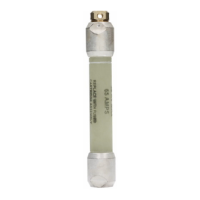
Fuse Fuse Holder
Fuse Follower
Fuse Cap
Hook Eye
Figure 3. EL Bay-O-Net Fuse
4. Then hold for approximately 30 seconds to allow
transformer oil to drain from the fuse unit. Slowly
withdraw the fuse unit and pull it all the way out.
5. Using a rag, wipe the fuse assembly free of oil.
6. Remove the fuse follower (White Arc Follower at the
bottom end of the assembly) by unscrewing it in a
counterclockwise direction.
7. Remove the fuseholder tube by unscrewing it in a
counterclockwise direction.
8. Check the catalog number of the replacement fuse
to assure the proper size fuse is installed. The catalog
number is stamped on the side of the fuse. Numbers
are of the following format: P/N 3534030M11. This
example is a 15.5 kV 30 A fuse. The three numbers
immediately preceding the “M” indicate continuous
current rating.
9. With the proper fuse selected, carefully mate the
threads of the fuseholder to those at one end of the
fuse and turn it in a clockwise direction until the mating
surfaces are firmly seated. Hand tightening is sufficient.
DO NOT OVERTIGHTEN.
10. Install the Fuse Arc Follower in similar manner. DO
NOT OVERTIGHTEN.
11. Using a shotgun type switchstick, insert the Bay-O-Net
into the housing and slide it approximately halfway in.
With a sudden fast motion, slam the Bay-O-Net all the
way into the housing. The Bay-O-Net is properly seated
if the housing cover is tight against the housing.
12. Rotate the locking hook eye until the locking hook is
pointing downward. Push the locking hook downward
and inward (toward the transformer) locking the cover in
place. Re-fusing is now complete.
 Loading...


