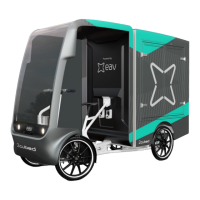
The EAV 2cubed is an electric assisted vehicle designed for urban logistics and cargo delivery. It combines the agility of a bicycle with the carrying capacity of a small van, making it suitable for last-mile deliveries in congested areas. The vehicle is powered by an electric motor and features a cargo box for secure transportation of goods.
Function Description:
The EAV 2cubed is primarily designed for urban cargo delivery, offering an environmentally friendly and efficient alternative to traditional vans. It is pedal-assisted, meaning the rider's pedaling efforts are augmented by an electric motor, allowing for easier transport of heavy loads and navigation of inclines. The enclosed cargo box provides secure storage for goods, protecting them from weather and theft. The vehicle is engineered for ease of use and maneuverability in urban environments, including cycle lanes and pedestrianized areas where larger vehicles may be restricted.
Important Technical Specifications:
- Kerb Weight: 170kg
- Max Load Capacity: 150kg
- Frame Material: Steel
- Maximum Rider Weight: 100kg
- Maximum Speed: Assistance up to 15.5mph / 25kmph
- Recharge Time: 6-8 hours
- System Voltage: 48V battery, 12V electrics
- Battery Charger: Manufacturer Charger Supplied
- Battery Features: Removable battery for easy charging
- Brakes: Magura Hydraulic Disc-brake
- Maximum Range: 45 miles / 70km
- Motor Type: Heinzmann Cargopower 250W
- Mudguards: Yes
- Removable Battery: Yes
- Saddle: Gel saddle
- Seatpost: Sprung, 350mm with clamp
- Tyre Pressure: 45 PSI front, 70PSI rear
- Tyres: Apollo Vredestein
- Inner Tube: 20" No7 Schwalbe AV7
Dimensions:
- Overall Length: Approximately 3175mm
- Overall Width: Approximately 1055mm
- Overall Height: Approximately 1930mm
- Cargo Box Length: Approximately 1500mm
- Cargo Box Width: Approximately 900mm
- Cargo Box Height: Approximately 1200mm
Usage Features:
- Pre-ride Checks: Riders are advised to check tyre pressure (45PSI front, 70PSI rear), brakes, lights, windows, and mirrors before each ride. The vehicle should not be loaded with more than 150kg.
- Seat Adjustment: The seat height can be adjusted by pulling out a lever under the seat and raising or lowering it. For tilt and slide adjustment, a 6mm Allen key is required to loosen two bolts on the underside of the seat.
- Controls: The handlebar features controls for toggle display, display, lights, horn, assistance level, indicators, and walk assist/hill start throttle.
- Locking and Unlocking: The brake levers are equipped with a small rotating catch. Engaging this catch by pulling the brake lever and using the index finger to pull the catch locks the brakes. A key can permanently lock the catch. When not seated, the rider must always engage the catches for both front and rear brakes.
- Battery Charging and Removal: The bike should be placed on level ground with brakes engaged and locked. To remove the battery, turn the key anticlockwise to open the battery box lid, unplug the battery, and lift it out. The battery can be charged on or off the bike using the domestic 3-pin socket. The charger is not water-proof.
- 12 Volt Electrics: The EAV Cargo has a 12-volt fused outlet in the front light box. The main 40amp fuse is located near the steering column.
- Safety Recommendations: Riders must wear a suitable helmet and high-visibility clothing. When maneuvering in tight spaces, the display should be set to low assistance, preferably using the throttle. Riders should have knowledge of the highway code and have undergone a bike induction. Caution is advised in icy, high wind conditions, or during yellow, amber, or red weather warnings.
- Cargo Box Operation: With the battery on, the electric solenoid fob opens the rear cargo box. The secondary door can be opened using handles inside the box. The cargo box closes firmly and operates with an electric 'slam lock' for security, which automatically locks the door.
- Cargo Box Manual Lock Override: In case of battery failure or door opening lock failure, a manual override key can be used on both the top and bottom locks. Turning the top and bottom manual override locks clockwise and anticlockwise respectively will open them.
- Riding Best Practices: Ensure pre-ride checks are carried out. Avoid hitting kerbs and other hazardous objects, and riding down large kerbs. Avoid riding through potholes where possible; if unavoidable, slow down. Use cycle lanes where possible; if not, joining regular traffic is acceptable. Continuous riding on poor quality roads necessitates increased frequency of checks and maintenance.
Maintenance Features:
- Daily Checks:
- Check tyre pressure (45 PSI front, 70 PSI rear).
- Check all lights are working correctly (lock brakes individually to check brake lights and reflectors).
- Check mirrors are clean and secure.
- Check windscreen is clear (use Rain-X if needed).
- Check the entire cargo bike visually for defects and report to the fleet manager.
- Weekly Checks:
- Check condition of wheels.
- Check tyre condition (minimum 1mm tread).
- Check condition of saddle and seat post lock.
- Check conditions of mudguards.
- Check all reflective side mark stickers are visible.
- Check main chain (from front pedal set to rear motor, grease if needed).
- Visually inspect brake pads on front and rear of cargo (using a torch if needed).
- Check bottom bracket and pedal set.
- Visually check underneath of cargo bike to ensure all electrical cables are secure.
- Check handlebar and components, check handle grips and wear.
- Monthly Checks:
- Remove wheels and tires to inspect.
- Remove cargo box.
- Check rear drivetrain: adjust motor chain if needed and apply chain lube (training can be provided).
- Check main chain from front pedal set to rear motor (apply chain lube if needed).
- Remove front and rear brake callipers to inspect brake pads (replace if needed).
- Check bottom bracket and pedal set.
- Check handlebars and all components, check hand grips for wear (replace if needed).
- Check windscreen for any damage (report any damage to fleet manager).
- Visual inspection check of lower steering assembly.
- Check all electrical cables are secure behind front bumper.
- Wheel socket size 11/16.
- Wheel Nut torque 30lbs.
- 40AMP maxi fuse in main power loom located in fuse holder behind front bumper.
- Main fuse box located in the rear of light box containing fuse holder and 2 x3AMP fuses and 1x 10AMP fuse.
- Full visual inspection of the whole cargo bike is necessary while the cargo box is off.
- Replace any broken cable ties on the chassis that supports any brake lines or electrical cables.
- Recommended Maintenance Intervals (based on 27,360 km/year or 95 km/day, 6 days/week, 48 weeks/year):
- Every 3 months (6,840 km): Track rod ends, front discs, front disc pads, front wheel bearings, steering bearing, battery, steering column bearings, handle bars, handle bar grips, brake fluid, crank bearings, pedals, front sprocket, motor sprocket, differential sprocket, front chain, chain guide roller, rear chain (HZM YBN chain), rear differential, half shaft, half shaft bearings (inboard and outboard), rear discs, rear disc pads, panhard rod end, tyres. (All these components require monitoring and repair/replacement when necessary, with specific checks at 3 months for some).
- Every 6 months (13,680 km): Specific checks for track rod ends, front discs, front disc pads, front wheel bearings, steering bearing, battery, steering column bearings, handle bars, handle bar grips, brake fluid, crank bearings, pedals, front sprocket, motor sprocket, differential sprocket, front chain, chain guide roller, rear chain (HZM YBN chain), rear differential, half shaft, half shaft bearings (inboard and outboard), rear discs, rear disc pads, panhard rod end, tyres.
- Every 9 months (20,520 km): Specific checks for track rod ends, front discs, front disc pads, front wheel bearings, steering bearing, battery, steering column bearings, handle bars, handle bar grips, brake fluid, crank bearings, pedals, front sprocket, motor sprocket, differential sprocket, front chain, chain guide roller, rear chain (HZM YBN chain), rear differential, half shaft, half shaft bearings (inboard and outboard), rear discs, rear disc pads, panhard rod end, tyres.
- Every 12 months (27,360 km): Specific checks for track rod ends, front discs, front disc pads, front wheel bearings, steering bearing, battery, steering column bearings, handle bars, handle bar grips, brake fluid, crank bearings, pedals, front sprocket, motor sprocket, differential sprocket, front chain, chain guide roller, rear chain (HZM YBN chain), rear differential, half shaft, half shaft bearings (inboard and outboard), rear discs, rear disc pads, panhard rod end, tyres.
- Every 24 months (54,720 km): Specific checks for track rod ends, front discs, front disc pads, front wheel bearings, steering bearing, battery, steering column bearings, handle bars, handle bar grips, brake fluid, crank bearings, pedals, front sprocket, motor sprocket, differential sprocket, front chain, chain guide roller, rear chain (HZM YBN chain), rear differential, half shaft, half shaft bearings (inboard and outboard), rear discs, rear disc pads, panhard rod end, tyres.
- Reporting: Test ride by a technician followed by a visual inspection. Report any service tickets to the fleet manager for repair. Any major concerns should be reported to EAV Customer Service or an approved mechanic; a Service Technician will be dispatched.
- Storage: The EAV should be stored in a warm and dry environment. It should be wiped dry before storage, especially if used in salty conditions, or for long periods.
- Cleaning:
- Windscreen: Clean with ‘Rain-X 2-in1 Glass Cleaner + Rain Repellent' and a soft cloth. Treat the inside to avoid fogging.
- Body: Clean with soapy water and rinse with a hose or watering can. Avoid getting mechanical or electrical components wet. Do not use pressure washers as high-pressure water can damage the vehicle and cause water ingress.
- Changing a Wheel:
- Position the vehicle on smooth, level ground.
- Apply the brakes.
- Loosen wheel studs with a 17mm long reach socket.
- Raise vehicle safely and securely.
- Remove wheel.
- Repair/Replace wheel.
- Tighten using 17mm long reach socket to 30ftlbs/40NM.
- Brakes:
- Instructions for changing pads and bleeding the hydraulic system are available via YouTube links provided in the manual.
- When brake pads are removed, check wear; minimum thickness is 0.8mm.
- Chain:
- Rear chain adjustment: Undo the M10 bolt with an 8mm Allen key and 17mm spanner until the eccentric is just loose. Rotate the eccentric idler anticlockwise until the longest chain run (bottom) has 5mm up and down free play. Tighten the 17mm nut to 43Ftlbs/58Nm and recheck chain free play.
- Warranty and Servicing:
- EAV provides a 24-month warranty covering electrical system, battery, motor, chassis, mechanicals, and bodywork. It does not cover fair wear and tear and is non-transferable. Changing factory settings will void the warranty.
- EAV recommends quarterly service intervals for brake pads and tyres. Daily and weekly bike checks are also required.
- Any maintenance must be carried out by a qualified, EAV approved technician, or by contacting Electric Assisted Vehicles Limited.