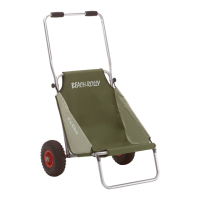
ECKLA-ROLLY
Bedienungsanleitung / User Manual
Herzlichen Glückwunsch zum Kauf des Eckla-Rolly. Wir sind sicher, dass Ihnen dieses Qualitätsprodukt viel
Freude bereitet.
Bitte lesen Sie aufmerksam die Bedienungsanleitung. Sollten Sie noch Fragen haben, so kontaktieren Sie
Ihren Händler oder senden Sie uns eine e-mail unter info@eckla.de.
Congratulations on your purchase of the ECKLA Eckla-Rolly. You now own a high-quality product that will add
to your pleasure and fun for years to come. Please review the user manual to gain valuable information about
this product, and be sure to follow all safety recommendations. For additional information, please contact your
dealer or send an e-mail to info@eckla.de.
Schritt 1 / Step 1 Montage der Achse / assemble the axle
Führen sie die Achse in den Rahmen ein, danach ziehen Sie die Schraube des Achsverbinders mittels mitgeliefertem Werkzeug (dieses
ist mit Klebeband auf der Achse befestigt) fest an.
Put the axle into the frame right to the end of the axle connector.
Fasten the screw tied with the included tool (you will find the tool taped on the axle ).
Schritt 2 / Step 2 Montage des Bügels / assemble the handle
Führen Sie den Bügel vorsichtig über den Rahmen. Danach stecken Sie die Schraube von innen durch. Jetzt wird von außen erst der
Haltegurt, danach die Scheibe aufgesteckt und zuletzt die Sterngriffmutter angeschraubt.
Slide the handle carefully down over the frame. Now put the screw from the inner side through the aluminum tubes. Put the strap
connector on the screw, now the washer and finally fasten the hand grip.
Schritt 3 / Step 3 Montage der Räder / assemble the wheels
Hinweis infolge einer Reifenpanne / Please note following information about
Den Klappslint zum einstecken
nur leicht öffnen
Do not open the linch pin
completely to plug in.
Wichtig!
ab und zu sollte der
Klappmechanismus des
Klappsplintes geölt werden
Important!
it is necessary to use from time
to time some oil on the
folding mechanism of the linch
pin.
Die gerade Seite des
Stiftes muss zum Rad und
die “Nase” vom Rad weg
zeigen. Der Ring muss auf
der Nasenseite sein!
The vertical part of the pin
should be placed to the
rim and the “nose” of the
pin should face outwards.
The Ring should be
placed
on the “nose” side.