Living
Tu
Day
Sleeping
Living
Airflow %
COOL
Schedule
AUTO
FANMENU MODE
Cool
Set To
SYSTEM
AM
eControls
WIFI
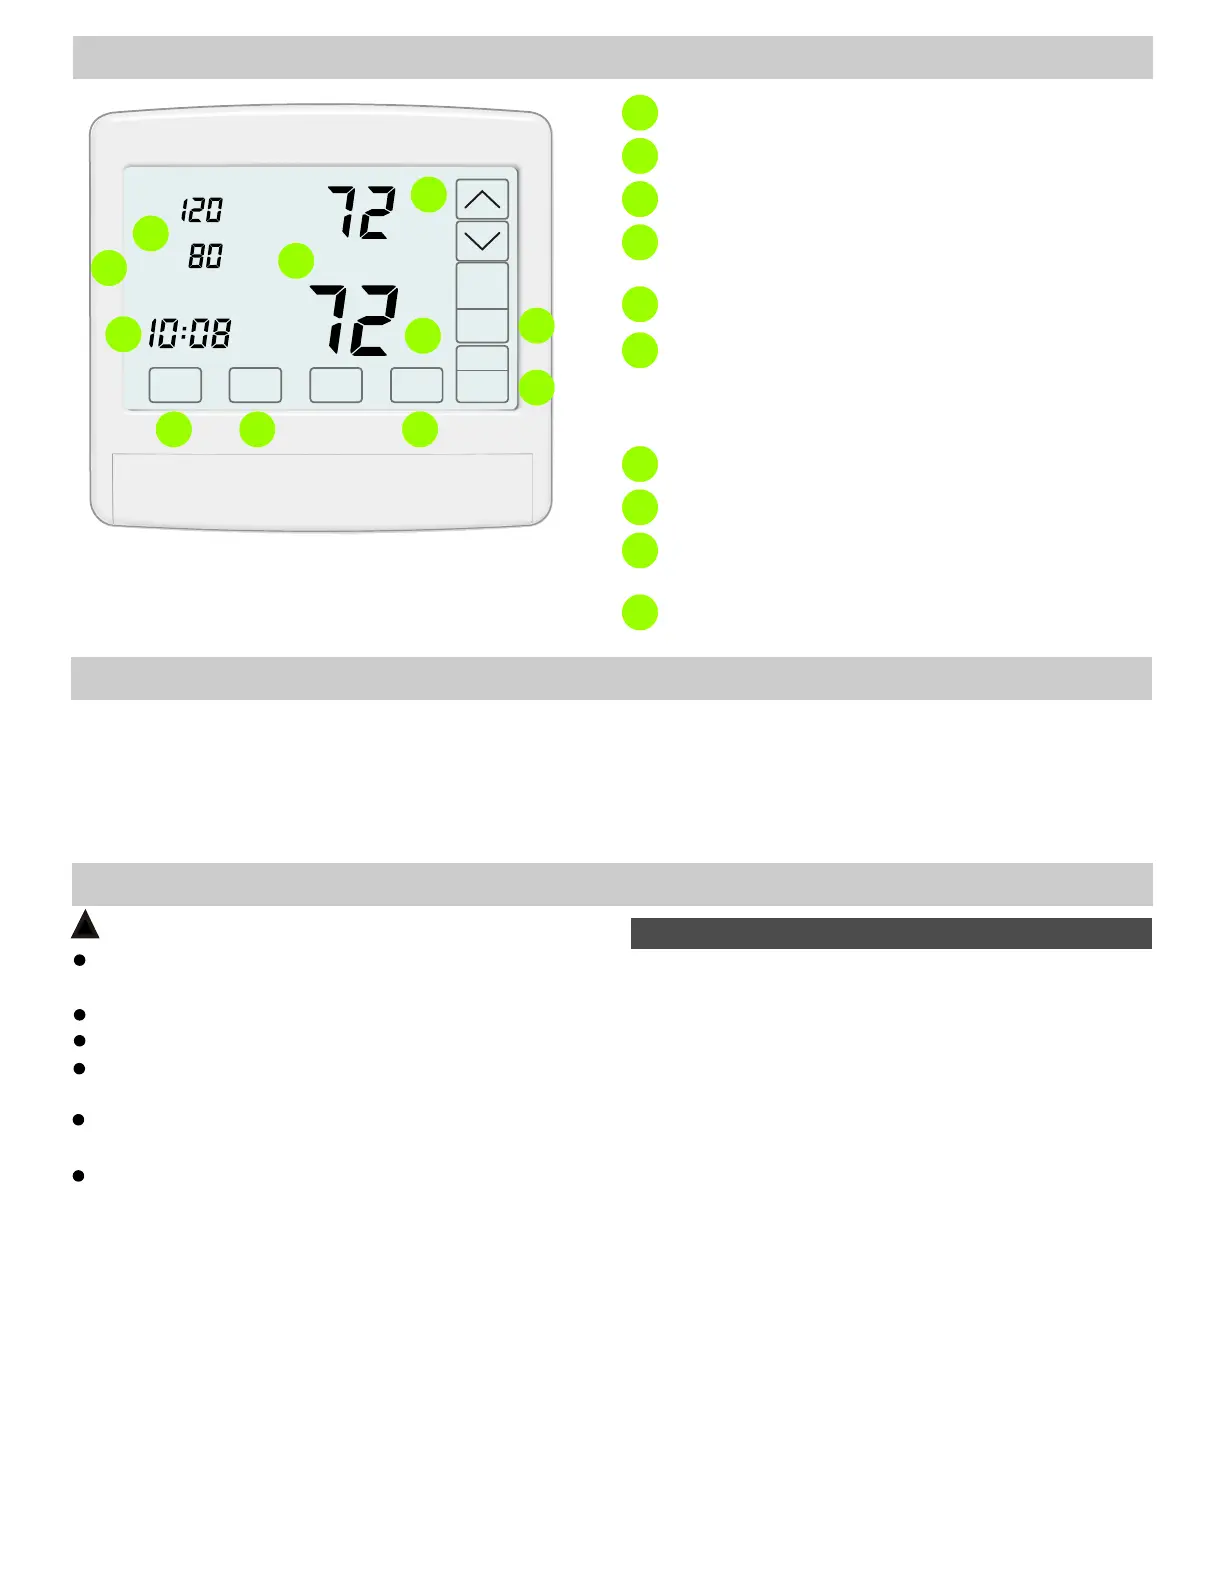
THERMOSTAT OVERVIEW
1
2
3
7
6
5
4
58
Displays the heating or cooling setpoint temperature.
1
SYSTEM Mode - OFF, HEAT, COOL
2
FAN Mode - AUTO or ON.
3
Displays the room temperature for the Living or
Sleeping zones. Press to display the temperature.
4
Displays the Thermostat Mode - Hold or Schedule.
5
Displays the amount of heating or cooling being
directed to the downstairs living zone and upstairs
sleeping zone. Press to select Uniform Comfort,
Upstairs Comfort Focus or Downstairs Comfort Focus.
6
Displays the time and day of the week.
7
MENU - Used to access homeowner options.
8
INSTALLER Options - Press and hold for about 7
seconds to access installer options.
9
9
THINGS TO KNOW
Most installations require no changes to factory settings.
Factory Settings
Airflow Comfort Selection
Accessed by touching where Airflow % is displayed.
If there is a large differential between the upstairs and
downstairs temperatures, the thermostat will make a larger
initial adjustment to airflow. Thereafter, the airflow will
dynamically adjust in 2% increments every 2 minutes.
Airflow Adjustments
INSTALLATION
CAUTIONS
!
Before installing the ZTWD system, turn off all power to
the HVAC system.
Read and follow all instructions carefully.
Follow all local electrical codes during installation. All
wiring must conform to local and national electrical codes.
Read entire manual before installing products.
Use cautions when mounting components to surfaces
that may have concealed wiring beneath the surface.
When servicing products or accessing products, turn
off all power to these items.
WiFi displays as solid when linked.
10
10
1. Rough-In Wiring
3. Install Thermostat Subbase
2. Install and Wire Dampers
4. Wire Subbase
5. Install and Wire Sensor(s)
6. Install Thermostat and Set Options
INSTALLATION STEPS
7. Commission Installation
Rough-In HVAC Equipment Wiring
Rough-In Damper Wiring
Rough-In Temperature Sensor Wiring
Install a 6-conductor thermostat cable from the thermostat
location to the HVAC equipment. The thermostat location
should be on a downstairs wall in the living space, about 5
feet off the floor, where it will best detect the temperature
for the downstairs space.
Install a 6-conductor cable or two 3-conductor
thermostat cables from the thermostat location to the
damper locations. When two 3-conductor cables are used
be sure to mark the cable with the damper name–Upstairs
Damper or Downstairs Damper.
Install a 2-conductor thermostat cable from the thermostat
location to the sensor location.
The sensor fits in a standard single gang
switch box or can be mounted directly to the wall.
The temperature sensor
location is on an upstairs wall, about 5 feet off the floor, in
a space that will best detect the temperature for the
upstairs space.
1. ROUGH IN WIRING
Use 18 or 20 gage thermostat cable.
7. Install Batteries and Set the Time
2
 Loading...