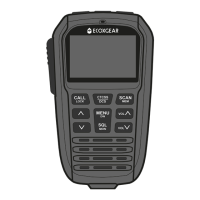
To talk, press and hold the PTT (Push to Talk) key.
Hold the radio 5 to 7 cm away from your mouth and speak
towards the micophone located just above the display.
When you are nished speaking, release PTT to listen.
Always listen on a channel, or check the LiveRSSI, to ensure it
is not already being used before transmitting.
Press CALL to initiate a calling tone. Call Tone transmits
a short tune intended to catch the attention of others on
the channel.
NOTE: Call Tone can only be used once per minute by
regulation.
Making Contact Using Call
TX and the full signal level will display while PTT is held.
To communicate, all radios in your group must be set to the
same Channel and, if it is set, the same CTCSS / DCS Code.
6
TALKING: Transmit (TX) Basics
Press and hold MON to enable Monitor mode.
Press and hold MON to disable Monitor mode.
The Monitor mode bypasses the Squelch, CTCSS and
DCS so that you can listen to the open channel.
In Monitor mode, RX is always on and always at the
left side.
Press CTCSS/DCS and use UP or DOWN to select a
CTCSS (01-50) or DCS (001-104) code. CTCSS/DCS
cannot be set on Emergency channels 05 and 35.
Press CTCSS/DCS again to set.
Make sure, when you set a CTCSS or DCS squelch code, to
share the code with others you want to communicate with.
CTCSS (CTC) and DCS are Squelch codes. When a
Squelch code is set, a signal must have that Squelch
code to un-mute the radio’s speaker - even if the signal
strength is strong enough to pass the squelch point.
Press SQL and use UP or DOWN to adjust the squelch point.
Press SQL again to save the new setting.
is Squelch. The squelch keeps the radio’s speaker muted.
is the squelch point, the threshold allowing signals to un-mute the radio’s speaker.
is the signal level on the current channel. The signal point
indicates the strength of the signal, increasing from left to right.
means no signal activity or no signal strong enough to
open the squelch.
means a receive signal strong enough to pass the squelch
point. You should hear something through the radio’s speaker
when RX is showing - adjust the volume if necessary.
The Live RSSI graphic (Patent Pending) shows the signal activity on the current channel.
5
LISTENING: Receive (RX) Basics
Monitor Mode
Adding CTCSS & DCS to the Squelch
Live RSSI (Receive Signal Strength Indicator)
01 02 03 04 05 06 07 08 09 10 11 12 13 14 15 16 17 18 19 20 21 22 23 24 25 26 27 28 29 30 31 32 33 34 35 36 37 38 39 40
41 42 43 44 45 46 47 48 49 50 51 52 53 54 55 56 57 58 59 60 61 62 63 64 65 66 67 68 69 70 71 72 73 74 75 76 77 78 79 80
CH:
CH:
Channels 01-08 and 41-48 are repeater output channels.
Channels 31-38 and 71-78 are the matching repeater input channels.
Channels 05 and 35 are for Emergency communications only.
CH.11 Call Channel. Once contact is made, switch to another channel.
Designated Channels
CH.61, 62, 63
Reserved for future use.
CH.22, 23 No voice (talk) is
permitted on these channels.
Limited Use Channels
CH.10 4WD Clubs, Convoys & National Parks
CH.40 Road Safety (Truckies) Australia Wide
CH.29 Road Safety (Pacic Hwy NSW-QLD)
CH.18 Caravan & Campers, Convoys
Commonly used for...
All other channels are for general use.
The EXG3000 has 80 UHF-CB Channels to select from.
Visit the ACMA website for deatils of citzen band radio usage.
4
Channel Usage
There are three ways to navigate to a channel.
Main Method:
Press UP or DOWN to change channel one step at a time.
(Press and hold to change channels rapidly.)
One-Touch Shortcut Keys:
Press PRI to recall the Priority Channel (Default is CH11).
To store any current channel as the Priority Channel,
press and hold PRI.
Press EMG to recall Emergency Channels 05 and 35.
3
Selecting a Channel
No activity
(~8sec)
Activity
Active Mode Display
Simple Mode Display
After the ECOXGEAR logo appears, the display will change to the Active mode,
indicating the current channel and settings, and Live RSSI graphic.
If there is no signal activity for 8 seconds the display will change to the Simple
mode display.
Press and hold to turn Power On or O.
When power is on, adjust the Volume
using vol UP and vol DOWN.
2
Power ON/OFF | Volume
Base Connections:
Connect DC power plug to +12V DC.
Connect antenna connector to an
external UHF-CB antenna.
1
Radio Installation
Microphone Connection:
Connect microphone cable
to RJ45 jack at the base unit.
Quick Release Mounting
Bracket (Base Mount):
Install the Quick Release
Mounting Bracket to a
desired location.
Magnetic Mic
Hanger (Mic Mount):
Install the Mic Hanger
within cable extention
range of the Microphone.
For full instructions on the EXG3000 radio installation, visit the website for the online user guide.
5 Watt Remote Multi-Colour LCD Speaker Mic
Super Compact UHF CB Fixed Mount Radio
EXG3000 USER GUIDE