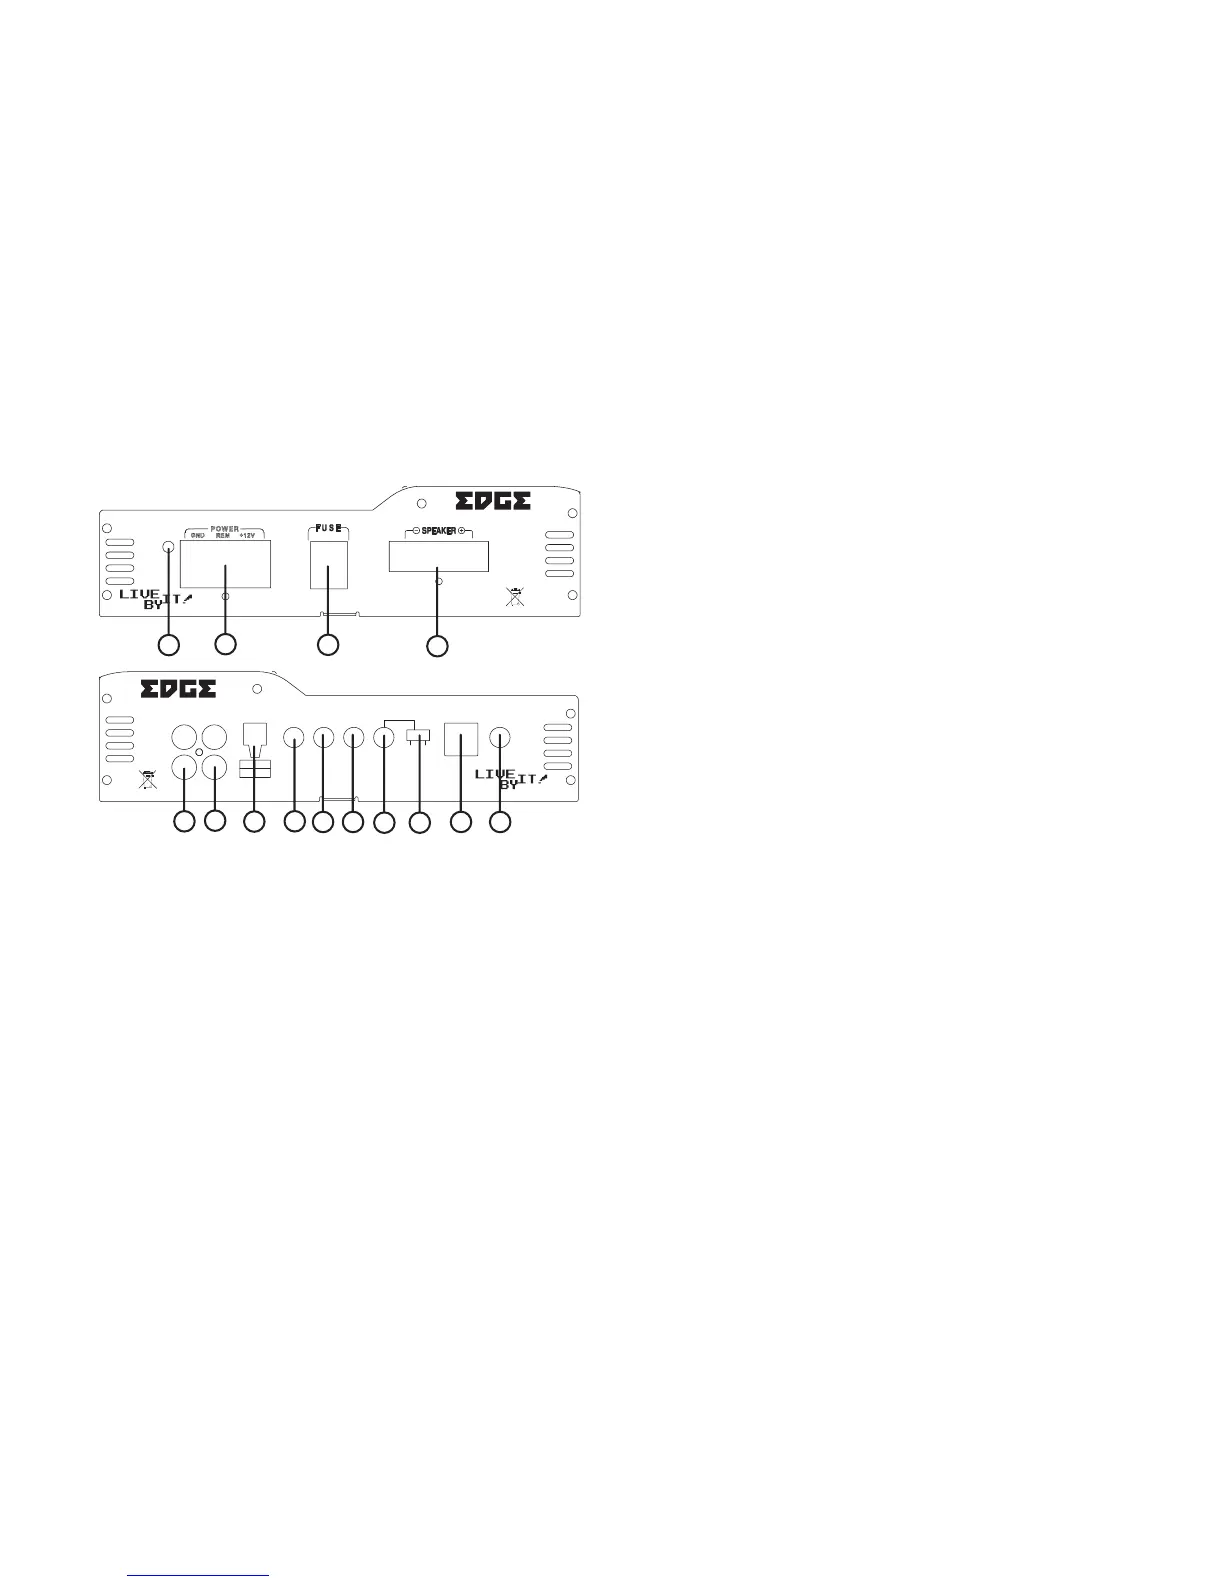
1. Low Level Input
For connection to any source (head unit) with a low level output. This is your RCA output from
the source (headunit).
2. High Level Input
To be used when no RCA’s are available. Use the provided loom to connect to closest
speakers. The loom connector will only t one way around. Once plugged in you should
connect the wires as below:
Left Positive - Brown Right Positive - Black Left Negative - Blue Right Negative - Green
3. Gain Control
Used to match the input signal of the source to the amplier. See the setup section for more
details.
4. Low Pass Filter Control
Low pass frequency control. The frequency ranges from 35 Hz to 250 Hz.
5. Phase Control
Can be used to alter the phase of the subwoofer from 0 - 180 degrees.
IE: the speaker output can be In phase or out of phase with the other speakers in the vehicle.
For best results rotate the dial between the two settings to determine the best sound.
6. Subsonic Filter Control
This is used to lter out unwanted amplier output to the subwoofer. Effectively this will lter
out all the frequencies up to the crossover point set with the control. The range is from 16 Hz to
80 Hz.Frequencies of 80 Hz and below cause the subwoofer to work hard, some subwoofers
can easily be damaged when playing very low frequencies. Using the subsonic lter allows
less distortion, delivers frequencies better suited to the subwoofer prolonging its life.
7. Subsonic Filter Switch
Used to turn the lter on or off.
8. Bass Boost Switch
To provide up to an extra +18 dB of bass boost at 45 Hz. Use this boost to increase bass
output from the amplier.
9. Bass Remote Input Jack
Use to plug in the remote bass controller.
10. Indicator LED
When the amplier is operating correctly the LED will show as greeb. When the amplier is in
protection mode the LED will show as red.
11. Fuses
Please ensure the following fuse rating is used when replacing fuses:
20 amp x 2
12. Speaker Terminal Output
For connection to the speakers. See Application section for wiring examples.
13. Power Connections
Power connections. See Connections section for details on correct connections.
14. Low Level Output
Daisy chain RCA connection to allow easy addition of another amplier.
Terminals and Controls ED71200
P o w e r
P r o t e c t
S P - S P - S P + S P +
R
I n p u t
L +
R +
L - R -
R
L L
H i L e v e l L i n e O u t L i n e I n
O F F O N
S u b s o n i c
P h a s e
L P F G a i n
M i n M a x 3 5 H z 2 5 0 H z 0 ° 1 8 0 ° 8 0 H z 1 6 H z
2 4 d B 0 d B
R e m o t e
B a s s
B o o s t
ED72500
ED71200
ED71200
ED7800
ED7800
ED72500
MONOBLOCK AMPLIFIER 1 X 1250 WATTS RMS
ED71600
ED71600
4 CHANNEL AMPLIFIER 4 X 200 WATTS RMS
ED7400
ED7400
2 CHANNEL AMPLIFIER 2 X 100 WATTS RMS
MONOBLOCK AMPLIFIER 1 X 600 WATTS RMS
4 CHANNEL AMPLIFIER 4 X 100 WATTS RMS
4 x 35 AMP
3 x 35 AMP
INPUT
2 x 15 AMP
2 x 25 AMP
2 x 20 AMP
1
2
5
7
8
3
4
6
9
10
11
12
13
1
2
3
5
7
86
4
9
10
11 12
1
2
3
4
9
5
6 7
14
8
10
11
12
13
1
1
2
3
4 5
6
8
9
10
11
12
13
7
2
3
4
5
6
7
8
9
10
11
12
13 14
 Loading...