Let’s get your device connected
Thank you for choosing Osprey 2 Mini
from EE
Here’s a quick guide to get you up and running
and making the most of your new device straight
away.
If you’re a devil for the detail, then visit ee.co.uk/
help/phones-and-device where you will find more
information about your Osprey 2 Mini.
2. Lift the flap and insert the Micro-SIM into the
slot with the gold contacts facing upwards.
For more help
setting up, visit
http://ee.co.uk/
simstart
3. Choose the coloured band to suit your mood
and pop it back on.
Make sure you line the holes up, you’re going
to need to be able to insert the charger.
4. Give your device some juice, connect up the
cable to charge it.
Osprey 2 Mini will work with any standard UK
charging head or powered USB port.
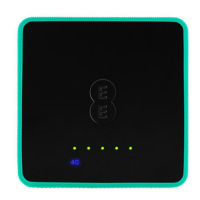
Getting to know your Osprey 2 Mini
from EE
ON/OFF&
Battery level
Signal
strength
SMS
Network type
4G / 3G
1. Pop the coloured band off.
5. Once charged, you’re ready to go. Press down
on the power button for a few seconds and
your Osprey 2 Mini will turn on.
Battery level is shown on the button.
0-25% 26-50% 51-75% 76-100%