21 22
Take your child out of the CRS as often as possible in
order to relieve pressure on his/her spine.
The CRS is not suitable for sleeping for long periods of
time, please use a suitable lie-flat bed instead.
Please contact your retailer or the manufacturer to
replace or supplement any parts or components if they
are missing or damaged
IMPORTANT: KEEP FOR FUTURE REFERENCE
Handle Adjustment: To adjust the carrying handle,
simultaneously press the left and right buttons 1 (picture
4). You can lock the carrying handle in pace in one of
three positions A,B or C see picture 4.
A: Vehicle position in the car or carry position outside of
the car.
B: Free standing rocking position or locked position when
used on a stroller.
C: Stable position, non-rocking or the position to place the
child into the CRS
Adjusting the harness and placing the child in the
CRS: Loosen the shoulder belts (picture 5) by
pressing the adjustment button (1) on the
central adjuster and pulling both shoulder belts forwards
(2)
Press the button under the rear central belt guide to open
the manual compartment (picture 6). Lift up the lever
(1) (picture 7) and simultaneously slide up and down to
adjust the headrest and shoulder belts to the desired
position. The harness shoulder belts should be
adjusted to fit as shown in picture 8.
Separate the extended shoulder belts (picture 9) and place
the child in the CRS. Guide the harness belts directly over
the child's shoulders and ensure they are not twisted. Place
both buckle tongues together and lock them in place in the
belt buckle, you should hear an audible
'CLICK' (picture 10). Pull carefully but firmly on the central
adjustment to tighten the the harness until they fith the
child's body (picture 11)
Adjusting the canopy: The canopy can be gradually
extended forwards by pulling on the plastic cover. To fold;
push back on the same plastic cover.
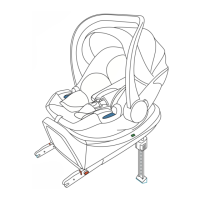
Fitting the ISOFIX base into the vehicle: Lift the lever (1)
and simultaneously push forwards the top cover (2) of the
supporting leg until it stops, this extends the rear legs
(picture 12)
With the base sat on top of the vehicle seat; push the base
back to connect the extended rear legs with the car ISOFIX
anchor points. The indicator colour of the ISOFIX connector
turns to green from orange when the legs are connected
correctly (picture 13/14)
Push the whole ISOFIX base so that it touches the car seat
backrest.
On the front support leg; push in the adjuster (1)as indicated
by the arrow (picture 15) and lower the support leg until it
firmly touched the floor of the vehicle. The colour of the
indicator in the support leg should turn from orange to green
when correctly fitted (picture 16).
WARNING: If there is any under-floor storage in the area
where the support leg touches down; Do Not use the
ISOFIX base in this position. Lower the carrier with the
child onto the base (picture 17), if the CRS is fitted correctly
the indicator colour will change from orange to green
(picture 18).