56 VOLT MULTI-TOOL POWER HEAD — PH1400E
7
ASSEMBLY
WARNING: If any parts are damaged or missing,
do not operate this product until the parts are replaced.
Use of this product with damaged or missing parts could
result in serious personal injury.
WARNING: Always remove the battery pack from
the product when you are assembling parts, making
adjustments, cleaning, or when the product is not in use.
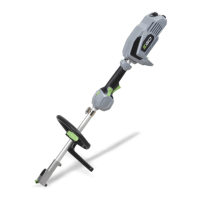
INSTALLING AN ATTACHMENT TO THE POWER HEAD
WARNING: Read and understand entire Operator’s
Manual for each optional attachment used on this power
head and follow all warnings and instructions. Failure to
follow all instruc tions could result in electric shock, re
and/or serious personal injury.
WARNING: This 56V power head PH1400E is
designed to be used only with the EGO attachment
models that are specied in this Operator’s Manual or
subsequently introduced by EGO for use with this power
head. Use of other, unauthorised attachments could cause
serious personal injuries or property damage.
WARNING: Never install, remove, or adjust any
attachment while the power head is running or with the
battery installed. Failure to stop the motor and remove the
battery can cause serious personal injury.
NEVER OPERATE THE POWER HEAD WITHOUT AN
ATTACHMENT.
The attachment connects to the power head by means of
a coupler device.
1. Stop the motor and remove the battery pack.
2. Loosen the wing knob.
3. Remove the end cap from the attachment. Align the
arrow on the attachment shaft with the arrow on
the coupler and push the attachment shaft into the
coupler until you hear a clear “click” sound, which
indicates that the attachment shaft is mounted into
place (Fig. B).
4. Pull the shaft of the attachment to verify it is securely
locked into the coupler. If not, rotate the attachment shaft
from side to side in the coupler until it snaps into place.
5. Tighten the wing knob securely.
WARNING: Be certain the wing knob is fully
tightened before operating equipment; check it
periodically for tightness during use to avoid serious
personal injury.
REMOVING THE ATTACHMENT FROM THE POWER
HEAD
1. Stop the motor and remove the battery pack.
2. Loosen the wing knob.
3. Press the shaft-release button, with the button
depressed, pull or twist the attachment shift out of
the coupler.
MOUNTING AND ADJUSTING THE FRONT-ASSIST
HANDLE
1. Stop the motor and remove the battery pack, if installed.
2. Loosen the four screws in the front-assist handle with
the supplied hex wrench and remove the screws and
lower clamp from the front-assist handle (Fig. C).
3. Attach the front-assist handle and lower clamp on the
power-head shaft between the threshold ring and the
coupler (Fig. D).Secure them by pretightening the four
screws. Turn the front-assist handle upwards so that it
points toward the top of the rear handle.
4. Adjust the front-assist handle position between the rear
handle housing and the coupler on the power-head shaft.
5. Tighten the four screws so that the handle cannot be
rotated on the shaft.
WARNING: Never operate the tool without the front-
assist handle rmly in place.
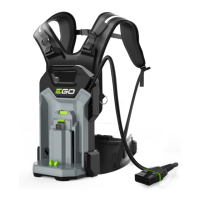
MOUNTING THE SHOULDER STRAP
Depress the strap hook to open it and attach it onto
shoulder-strap mount hanger on the power head (Fig. E).
OPERATION
WARNING: Do not allow familiarity with this product
to make you careless. Remember that a careless fraction
of a second is sufcient to inict serious injury.
WARNING: Always wear eye protection. Failure to do
so could result in objects being thrown into your eyes and
other possible serious injuries.
WARNING: Do not use any attachments or
accessories not recommended by the manufacturer of
this product. The use of attachments or accessories not
recommended can result in serious personal injury.
 Loading...