25
English
CAUTION! Material damage.
▶ Do not insert the plug of the power supply unit into the mains socket. When
installing the magnetic valve or pH sensor, there is the danger that a reset may be
accidentally triggered via the touch eld ⑩. When this happens, a WLAN connec-
tion with the specied SSID and network security key, as well as the QR codes, is
no longer possible.
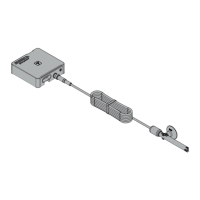
Installing the pH sensor
1. Connect the suction device to the clamping bracket (⌦C).
2. Connect the clamping bracket to the pH sensor.
CAUTION! Material damage.
▶ The protective cap
⑦
of the pH sensor contains a storage solution that protects
the sensor against drying out. Do not bring into contact with clothes! The storage
solution can be easily disposed of in a drain. Use a lot of water to ush it down the
drain.
▶ The sensor’s tip is made of glass. Danger of breakage!
3. Carefully unscrew the protective cap from the pH sensor (⌦D).
4. Remove the sealing nut
⑥
from the pH sensor.
Set the protective cap and sealing nut aside for the later storage of the pH sensor.
5. Rinse the sensor tip under cold tap water to remove the storage solution.
6. Attach the pH sensor below water level on the inside of your aquarium (⌦ E).
Take the minimum water level into account.
‧ Do not place the pH sensor in the immediate vicinity of the CO
2
diusor or in a
low-ow area of the aquarium.
‧ Choose as dark an area of the aquarium as possible so that the sensor tip is not
exposed to algae growth. Algae growth may cause incorrect measurements.
7. Insert the BNC plug of the pH sensor into the BNC connector of the pH controller
(⌦F).