mechanical installation
GENERAL
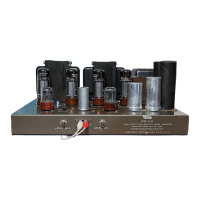
a) HEAT DISSIPATION (VENTILATION): In common with
other electronic equipment
, the HF-Sl produces consider-
able heat in normal operation. Unless continuous and
ade-
quate air flow is
obtained around the heat producing ele-
ments, these elements will over-
heat and their useful life
will be greatly curtailed.
It is useful to understand the process of convection where-
by heat is removed in judging the
suitability of a location.
Air heated by the heat-
producing elements expands and
rises; cool air is drawn from beneath to take the place of
the heated air. In
this manner, a
stream of air is set in
motion which continually
removes heat from the ampli-
fier. (In particular,
we are mainly
concerned with the
major heat-
producing elements; the four EL84 output tubes
and the two EZSl rectifier tubes.
) If there is any impedi-
ment to or constriction of the airflow, the essential
process
of heat removal will be adversely affected.
Adequate ventilation will be
provided if the amplifier is
installed in an open-
back console provided that the top
of the amplifier is spaced at least
two inches below any
shelf mounted above it.
If the cabinet is enclosed at the
rear, provide several large holes or
slots as low down and
as high up in the cabinet back
as possible. As an alter-
nate, holes
may be provided in the sides, bottom, or top
of the cabinet.
The important thing to
remember is that
effective ventilation requires provision for cool air
to en-
ter at the bottom and hot air to leave at the top.
If the amplifier is not
installed in a console, it
may be
situated on an open surface or on a shelf of a
boakcase~
Four rubber feet are also provided so that the amplifier will
not mar the surface of furniture on which it is placed.
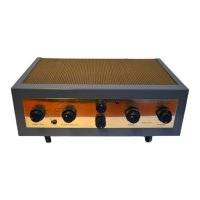
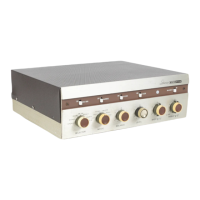
b) EASY ACCESS TO CONTROLS: Mount the amplifier
at a height which will permit easy manipulation of the
con-
trols. Tuner controls should be located nearby.
c) ACCESSIBILITY TO PARTS: . Tubes are the most fre-
quently replaced items in electronic equipment. If
the
amplifier is installed in a console, sufficient space should
be alloted to reach and
remove any tube in the amplifier.
Furthermore, input and output
terminals of the ampl ifier
should be accessible to permit easy
interchanging of sys-
tem components for
comparison, and connection or dis-
connection of a portable tape recorder which is
stored a-
way when not in use.
If antennas are strung around the
back of the console in which the amplifier is
installed,
arrange them so they will not
interfere with access to the
amplifier.
d)
ACOUSTICAL ISOLATION:
If amplifier and speaker
are installed in the
same cabinet (not recommended))' pro-
vide sufficient separation to minimize mechanical speaker
vibration reaching the amplifier. The
minimum separation
is about one foat.
CONSOLE MOUNTING
a) 0 erationsonconsolefront anel
reliminar to am li-
fier mounting:
Tape the panel template provided to
the face of the console so that the top of the mounting sur-
face line on the template
is level with the top of the
amplifier mounting shelf. Note:
When shelf is not avail-
able, tape the template atanyconvenientspot on the face
of the console. (2) Use an awl
or a nai I to pierce the
centers of the four extreme outer
holes for mounting the
control plate, to transfer their locations to the console
panel beneath. (3) Trace out the rectangular cutout with
an awl or nail and then pierce the centers of the
four 1/2"
holes)' one in each corner of the cutout.
(4) Remove the
panel template. (5) Drill the
four 1/2" holes in the con-
sole panel, one in each corner of
the rectangular cutout
area. Cut out the rectangular piece with a keyhole sawl
using the four 1/2" holes as starting holes.
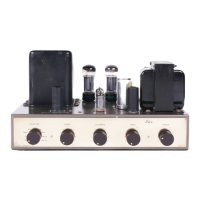
b) Am lifier mounting in console: (1) Pull off the control
knobs. 2 Remove the four screws that fasten
the bezel
to the side pieces and
remove the bezel. (3) Remove the
two screws and nuts that fasten the
control plate to the
bezel. The bezel
is not used in
console mounting. ~)
Fasten the control plate to the console panel with the two
#4x3/S wood screws supplied. (5) If the rubber feet
have
been inserted irwhe bottom plate, remove them. (They
may
be pried out with a thin screwdriver. ) (6) Place the unit -
on the mounting shelf and slide it forward until the slide
switch
sl,lpport bracket is
up against the panel and the
slide switch accessible from the front; the control shafts
should be approximately centered in the
corresponding
holes in the control plate.
(7) With a sharp penci!l draw
the outline of the side and rear
bottom edges on the chassis
shelf. As the bottom plate falls short of the full width by
3/16" on each side, draw new side edge
lines 3/16" in-
side the original side edge
lines. (S)
Now remove the
knobs and take the chassis off the shelf.
(9) Remove the
6screws which fasten the bottom plate to
the chassis. (10)
Place the bottom plate exactly in the outl
ine drawn on the
shelf and mark the position of the center hole on the left
side and the center hole on the right side. (11)
Remove
the bottom plate and dril! each of the marked holes on the
shelf to a diameter of 1/4"
(12) Refasten the bottom
plate to the chassisl withthefourof the six
#8x3/Sscrews
previously removed, using the two holes at the
rear and the
two holes at the front of the
chassis. (13) Replace the
chassis on the shelf
l positioning
it exactly in the outline
previously drawn, and restore the knobs. This time
make
sure that the indicator dot on each
knob agrees with the
control position. (14) From the bottom side of
the shelf
insert a #S
xl" screw, with a 1/2" flat
washer against
the head, through both the left and right side
center holes.
These screws engage the stamped nut over each hole on
the chassis flange and when tightened secure the
chassis
to the shelf.
 Loading...