D
- 14 -
Werkzeugwechsel ohne Zuhilfenahme eines
zusätzlichen Futterschlüssels vorgenommen wer-
den, indem man das Werkzeug in das
Schnellspannbohrfutter einsetzt und von Hand
festspannt.
6.4.Verwendung von Werkzeugen mit kegeli-
gem Schaft (Abb. 19)
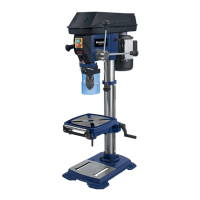
Die Säulenbohrmaschine verfügt über einen
Bohrspindelkonus. Um Werkzeuge mit kegeligem
Schaft (MK2) zu verwenden, gehen Sie wie folgt
vor:
•
Bohrfutter in untere Position bringen.
•
Spindel mit Hilfe des unteren Skalenringes
(25) in abgesenkter Position arretieren, so
dass die Öffnung zum Austreiben des Bohr-
futters frei zugänglich bleibt (siehe Punkt 7.6).
•
Kegelschaft mit beiliegendem Austreibkeil
(31) austreiben, dabei darauf achten, dass
das Werkzeug nicht auf den Boden fallen
kann.
•
Neues Werkzeug mit Kegelschaft ruckkartig
in den Bohrspindelkonus einschieben und
festen Sitz des Werkzeuges kontrollieren.
6.5.Drehzahleinstellung (Abb. 1)
Die Drehzahl der Maschine kann stufenlos einge-
stellt werden.
Achtung!
•
Die Drehzahl darf nur bei laufendem Mo-
tor verändert werden.
•
Drehzahl-Einstellhebel (15) nicht ruck-
artig bewegen, Drehzahl langsam und
gleichmäßig einstellen während sich die
Maschine im Leerlauf befindet.
•
Sorgen Sie dafür, dass die Maschine
ungehindert laufen kann (Entfernen Sie
Werkstücke, Bohrer etc.).
Mit dem Drehzahl-Einstellhebel (15) kann die
Drehzahl stufenlos angepasst werden. Die
eingestellte Geschwindigkeit wird in Umdrehun-
gen pro Minute am Digitaldisplay (17) angezeigt.
Achtung! Niemals die Bohrmaschine mit geöff -
neter Keilriemenabdeckung laufen lassen. Vor
dem Öff nen des Deckels immer den Netzstecker
zeihen. Niemals in laufende Keilriemen greifen.
6.6 Bohrtiefenanschlag (Abb. 20/Pos. 14)
Die Bohrspindel besitzt einen verdrehbaren
Skalenring zum Einstellen der Bohrtiefe.
Einrichtarbeiten nur im Stillstand vornehmen.
•
Bohrspindel (11) nach unten drücken bis die-
Bohrerspitze auf dem Werkstück anliegt.
•
Skalenring (25) bis zum Anschlag nach unten
drehen.
•
Skalenring (25) um die gewünschte Bohrtiefe
nach oben drehen und mit dem zweiten Ska-
lenring (25) kontern.
•
Die höchste Position der Bohrspindel kann
analog mit dem unteren Skalenring justiert
werden. Dies ist z.B. beim Austreiben des
Bohrfutters (siehe Punkt 7.4) hilfreich.
6.7 Neigung des Bohrtisches einstellen (Abb.
21-22)
•
Schlossschraube (26) unter dem Bohrtisch
(4) lockern.
•
Bohrtisch (4) auf das gewünschte Winkelmaß
einstellen.
•
Schlossschraube (26) wieder fest anziehen
um den Bohrtisch (4) in dieser Position zu
fixieren.
6.8.Höhe des Bohrtisches einstellen (Abb.
21; 23)
•
Spannschraube (37) lockern.
•
Bohrtisch mit Hilfe der Handkurbel (27) in die
gewünschte Position bringen.
•
Spannschraube (37) wieder festziehen.
6.9 Bohrtisch und Rollaufl age (Abb. 24)
•
Nach lösen der Klemmschraube (29) kann
der Bohrtisch (4) gedreht werden.
•
Nach lösen der Flügelschrauben (21) kann
die Rollauflage (3) ausgezogen werden.
6.10 Werkstück spannen (Abb.25)
Spannen Sie Werkstücke grundsätzlich mit Hilfe
eines Maschinenschraubstocks oder mit geeig-
netem Spannmittel fest ein. Werkstücke nie von
Hand halten! Beim Bohren sollten das Werkstück
auf dem Bohrtisch (4) beweglich sein, damit eine
Selbstzentrierung stattfi nden kann. Werkstück un-
bedingt gegen Verdrehen sichern. Dies geschieht
am besten durch Anlegen des Werkstückes bzw.
des Maschinenschraubstocks an einen festen
Anschlag.
Achtung! Blechteile müssen eingespannt
werden, damit sie nicht hochgerissen werden
können. Stellen Sie den Bohrtisch je nach Werk-
stück in Höhe und Neigung richtig ein. Es muss
zwischen Werkstückoberkante und Bohrerspitze
genügend Abstand bleiben.
Diese Maschine ist mit einem fest montierbaren
Anschlag (30) ausgestattet. Gehen Sie zur Mon-
tage wie folgt vor:
•
Führen Sie die beiden Nutensteine am An-
schlag (30) in zwei der vier Führungsschie-
Anl_BT_BD_801_E_SPK1.indd 14Anl_BT_BD_801_E_SPK1.indd 14 02.08.12 11:2202.08.12 11:22