This document provides a comprehensive guide for the ERT 300/1 Grass Trimmer, manufactured by Einhell Royal. It covers the device's function, technical specifications, usage, and maintenance.
Function Description
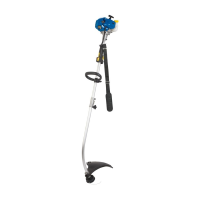
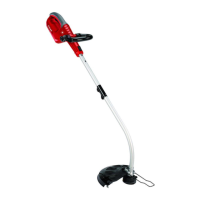
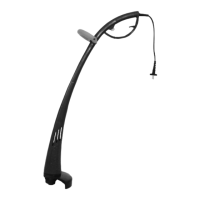
The ERT 300/1 Grass Trimmer is designed for cutting lawns and small grass areas in private and hobby gardens. It is not intended for use in public facilities, parks, sports centers, along roadways, on farms, or in the forestry sector. The device operates by means of a nylon cutting line that rotates at high speed to trim grass. The guard hood (5) protects the user from flying debris, and the adjustable handle (4) allows for comfortable operation. The ON/OFF switch (3) controls the motor.
Important Technical Specifications
- Voltage: 230 V ~ 50 Hz
- Power Rating: 275 Watt
- Cutting Width: 200 mm
- Revolutions (no-load speed): 13000 min⁻¹
- Nylon Cutting Line: Ø 1.3 mm
- Sound Pressure Level (LpA): 74.8 dB
- Sound Power Level (LWA): 94.8 dB
- Vibration (ahv): ≤ 2.5 m/s²
- Weight: 1.35 kg
The noise level of the machine may exceed 85 dB(A), requiring noise protection measures for the user. Vibration levels at the handle are ≤ 2.5 m/s².
Usage Features
The grass trimmer is designed for efficient and safe operation, with several features to enhance user experience:
- Assembly: The guard hood (5) is fitted onto the motor head by twisting it counter-clockwise until it locks, then secured with screw (C). The handle (4) is then attached as illustrated in Figure 5.
- Starting and Operation: Before starting, ensure the nylon line is not touching any hard objects. To activate, press the ON/OFF switch (3). To deactivate, release the switch. The trimmer should only be brought to the grass when the switch is pressed and the trimmer is running.
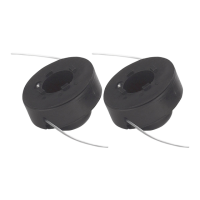
- Line Length Adjustment: For first-time use, the nylon line must be pulled out forcefully by pressing the pushbutton (Figure 6) and extending the line to the edge of the guard hood. The line will be cut to the correct length when the cutting head starts (Figure 7). If the line becomes short or worn, press the trimmer against the ground while the cutting head is running to automatically adjust the line length (Figure 8).
- Cutting Technique: For optimal results, swing the trimmer sideways while walking forward, holding it at an angle of approximately 30° (Figures 10 and 11). For long grass, cut in stages from the top downwards (Figure 12). Avoid cutting against hard objects to prevent injury and unnecessary line wear.
- Safety Precautions: Always wear appropriate protective clothing, including a helmet, goggles or visor, high boots or strong shoes, long trousers, and work gloves. Maintain a minimum distance of 5 meters from other persons and animals during operation. Never use the trimmer without the guard. Do not use the trimmer in rain or wet conditions. Always unplug the trimmer before making adjustments or repairs. The nylon line will continue to rotate for a few seconds after the trimmer is switched off.
Maintenance Features
Regular maintenance ensures the longevity and safe operation of the grass trimmer:
- Cleaning: Before storing or cleaning, switch off the trimmer and unplug it from the power supply. Remove deposits from the guard hood with a brush. Clean the plastic body and parts with a mild household detergent and a damp cloth. Do not use aggressive cleaning agents or solvents. Never spray the trimmer with water and prevent water from entering the device.
- Line Spool Replacement: Before replacing the line spool, always unplug the trimmer. Hold the motor mount (D) and twist the spool mount (E) counter-clockwise until it can be removed (Figure 13). Replace the empty spool with a full one, threading the line through the side holes of the spool (Figure 14). Place the new spool mount on the motor mount, hold the motor mount firmly, press down the spool mount, and twist it clockwise until it is securely seated. Press the pushbutton and pull out the line to the edge of the guard hood (Figure 6). The line will be cut to the correct length when the cutting head starts (Figure 7).
- Repairs and Spare Parts: Use only original replacement parts for repairs and maintenance. Repairs should only be carried out by a qualified electrician. Before each use and after any impact, inspect the trimmer for signs of wear or damage and have necessary repairs performed. Spare parts can be ordered by providing the device type, article number, ID number, and the required spare part number. Current prices and information are available on www.isc-gmbh.info.
- Disposal: Accessories and packaging should be recycled in an environmentally friendly manner. Plastic parts are marked for recycling according to their type. Electrical tools should not be disposed of with household waste but collected separately for environmentally friendly recycling, in accordance with European Directive 2002/96/EC.