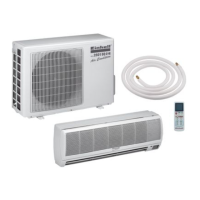
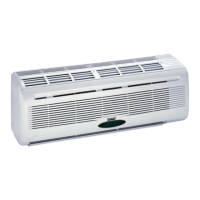
This document describes the Einhell SKA 3500 C+H_GB Split-system Air Conditioner, a device designed for both indoor and outdoor use.
Function Description
The Einhell SKA 3500 C+H_GB is a split-system air conditioner capable of cooling, heating, and dehumidifying. It features an automatic function that adjusts the room temperature based on preset conditions, and offers various modes including cool, dehumidify, and heat. The device also includes a comfortable sleep mode for quiet operation and a "full blast" function for rapid temperature changes. The remote control allows for setting the timer for both ON and OFF operations, adjusting air velocity and direction, and selecting different operating modes.
Important Technical Specifications
Cooling Capacity: 3,500 watts
Heating Capacity: 3,800 watts
Energy Efficiency: B (EER 3.02/COP 3.42)
Air Capacity: 520 m³/h
Absorbed Humidity: 2.3 l/h
Timer: 24 h
Operating Voltage: 230 V ~ 50 Hz
Nominal Power Consumption (Cooling): 1,320 watts
Nominal Power Consumption (Heating): 1,360 watts
Compressor: Rotary piston
Indoor Temperature (Cooling Operation): +21 - +33 (DB) °C
Outdoor Temperature (Heating Operation): +7 - +24 (DB) °C
Fluid Line Ø: 6 mm
Suction Pipe Ø: 12 mm
Length of Refrigerant Line Supplied: 4 m
Length of Refrigerant Line (Max): 15 m
Max. Difference in Height Between Indoor/Outdoor Device: 5 m
Refrigerant: R 407 C
Refrigerant Filling Capacity: 900 g
Refrigerant Refill Quantity from 5 m: 20 g/m
Sound Pressure Level (Inside): ≤ 40 dB (A)
Sound Pressure Level (Outside): ≤ 55 dB (A)
Indoor Device Dimensions: 79 x 27.5 x 18 cm
Outdoor Device Dimensions: 83 x 54.5 x 25.5 cm
Indoor Device Weight: 10 kg
Outdoor Device Weight: 36 kg
Cooling: Air temperature at the inlet on the indoor device: 27°C for dry thermometer bulb (DB), 19°C for wet thermometer bulb (WB). Outdoor air temperature: 35°C for dry thermometer bulb (DB), 24°C for wet thermometer bulb (WB).
Heating: Air temperature at the inlet on the indoor device: 20°C for dry thermometer bulb (DB), 15°C for wet thermometer bulb (WB). Outdoor air temperature: 7°C for dry thermometer bulb (DB), 6°C for wet thermometer bulb (WB).
Usage Features
The air conditioner is operated via a remote control.
Starting the Device: Press the ON/OFF key. If the automatic function is indicated, the air conditioner switches to a comfortable room temperature.
Stopping the Device: Press the ON/OFF key again.
Temperature Adjustment: Use the "too hot" key to increase the temperature and the "too cold" key to decrease it. Each press changes the temperature by 1°C.
Automatic Function: The device adjusts the room temperature to the corresponding function (cool, dehumidify, heat) for 2 hours. If the operation is stopped for 2 hours, it begins again with the previous function. If the room temperature has not been checked, the automatic function will not be affected by the room temperature.
Mode Selection: Press the ON key to cycle through Cool, Dehumidify, and Heat modes.
Dehumidifying Mode: This function is set to automatic and cannot be changed. To increase the cooling effect, close windows and lower blinds. Install the outdoor device in a suitable place away from direct sunlight.
Air Velocity and Flow Adjustment: Press the fan key to adjust air velocity (low, moderate, high, automatic). Press the swing key to adjust the air direction up/down.
Comfortable Sleep Mode: Press the sleep key for quiet operation while sleeping.
Full Blast Function: Press the full blast key for rapid cooling. The cool air will reach every corner of the room.
Timer ON/OFF Setting:
- Timer On: Press the timer ON key, then use the hours/minutes keys to set the desired ON time.
- Timer Off: Press the timer OFF key, then use the hours/minutes keys to set the desired OFF time.
- The timer ON and timer OFF can be combined.
Remote Control Usage:
- Open the rear cover and insert batteries (make sure + and - terminals are positioned correctly).
- Press the reset key with a pointed object.
- Press the clock setting key with a pointed object.
- Press the hours/minutes keys to set the current time (AM=24:00-12:00 or PM=12:00-24:00).
- Press the clock setting key again and replace the cover.
Important Notes for Remote Control:
- The operating range is approx. 6 m.
- When ON/OFF button is pressed, the indoor device will emit an audio signal once or twice to indicate that the device has received the signal.
- If you do not hear a signal, press again.
- Handle the remote control with care (do not drop or leave it in a damp location).
- The remote control should not be installed on a wall in a way that the receiver on the indoor device can receive the remote control signal effectively.
- Change batteries immediately if the signal becomes weak or the indicator on the remote control becomes difficult to read. Both batteries should always be new and of the same make.
- If the remote control fails to work (empty batteries or malfunction), use the emergency switch. When the emergency switch is pressed, the function changes in the following sequence: Cooling -> Stop. For the first 30 minutes, the temperature adjustment does not yet function.
- Function: Cooling
- Set Temperature: 24°C
- Air Speed: Medium
- Air Flow Slats: Automatic
Maintenance Features
General Care:
- Always switch off the device and pull the power plug before cleaning.
- Clean the indoor device with a soft cloth only. Never use petrol, thinners, scouring powder, cleaners, etc., as these may cause damage to the device.
- Make sure that all inlets and outlets on the indoor and outdoor device are kept clear and are not covered or blocked.
Air Filter Cleaning:
- Clean the air filter and insert it back in the original position.
- Before cleaning, always pull out the power plug.
Care Precautions:
- If the air conditioner is not going to be used for some time:
- Let the fans run for 3 - 4 hours to allow the device to completely dry out. Set the highest possible temperature level while the fans are running.
- Switch off the device and pull the power plug.
- Always pull out the power plug if the device is not going to be used for some time. Collections of dust pose a fire hazard.
- Take the batteries out of the remote control.
Troubleshooting (Device Does Not Start):
- Is voltage present at the plug socket outlet?
- Is the power plug fused?
- Is the timer set?
Troubleshooting (Device Does Not Provide Satisfactory Cooling):
- Is the set temperature been set?
- Is the air filter soiled? Clean and fit back in place.
- Are the inlets and outlets on the indoor/outdoor device blocked?
- Are the doors/windows open during the operation?
- Are the connections between the indoor and outdoor device adequately sealed?
- If not, contact your service company.
Troubleshooting (Remote Control Does Not Work):
- Are the batteries still OK? Replace if necessary.
- Have the batteries been inserted correctly? Check that the + and - terminals are correct!
Troubleshooting (In the Event of a Power Failure):
- Press the ON/OFF key after a power failure.
- If problems remain after checking through the above points, switch off the device and contact your service company.
Installation Instructions (Important for Professional Installers):
- Selecting the place to install the indoor device:
- The air flow must never be blocked.
- The cooled air should be capable of being distributed to all parts of the room.
- The maximum distance between the indoor and outdoor device is 15m and their maximum difference in height 5m.
- Install the device well to prevent vibrations.
- Avoid direct sunlight.
- Take into account a slight condensate run-off.
- Selecting the place to install the outdoor device:
- The device must not be exposed to strong gusts of wind.
- Make sure that the device is well ventilated and has good footing. Avoid direct exposure to wind and sunlight.
- Make sure that the operational noises and air emissions do not cause a nuisance for neighbours.
- Install on a firm base, avoiding excessive noise or vibrations.
- Avoid locations where combustible gas or leakage can be expected.
- Fix the device's installation feet with care if the device is to be installed well above them.
- Mounting accessories: Mounting plate, Screws 4x25 mm, Batteries 2x MICRO LR03 1.5V, Remote control.
- Tubing accessories: Tube connector, Composite wrap-around tape, Clamp, Drainage hose, Connection cable.
- Installation Instructions (General):
- The device must be installed at a distance of at least 3m from other electrical devices and installations (e.g., TV, radio, computer, etc.).
- Select a location which is easily accessible so that the filter can be cleaned or replaced without difficulty.
- Outdoor Device Installation:
- Select a location which avoids causing a nuisance to neighbours from noise and air emissions from device.
- Select a location which is sufficiently well ventilated.
- Do not cover the air inlets and outlets.
- The location must be sufficiently firm for installation and prevention of vibrations.
- There must be no risk presented by combustible gas or leakage in the immediate vicinity.
- Check that the device is installed in accordance with regulations.
- Connecting the Coolant Tubes:
- Make sure that coolant is never allowed to enter the environment.
- Improper handling of coolant may be harmful to health. Always wear work gloves and goggles when handling coolant.
- Make sure that the work place is well ventilated at all times, including during holidays.
- The device must never be operated without the coolant tubes connected, otherwise the device will be damaged immediately.
- Ask one of our service partners or a specialist cooling system firm to connect the coolant lines and put the system into operation for the first time.
- The maximum length of the coolant line in the split-system is 15m.
- If the outdoor device is higher than the indoor device, the coolant tube is required to be positioned below the height of the indoor device.
- Electrical Connections:
- Remove the fresh air connection part.
- Remove the connection terminal and connect the mains cable to the connection terminal with the screws. Make sure that the wiring conforms with the indoor device.
- Fix the wires in position with the terminal and make the electrical connections.
- Check once again that connections are really secure.
- Re-fasten the fresh air part.
- A wrong electrical connection can cause faults in the electrical system. Do not pull on the cable when you connect it to the terminal.
- If the power cable should ever be damaged, have it replaced by an electrician.