refrigerant line until immediately before you
connect them. The mating connections are
marked with identical letters.
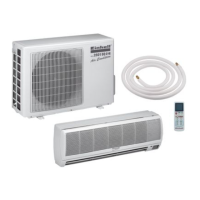
3. Fig. 29/30: Align the refrigerant lines correctly so
that they line up with the valves and are not
stressed. Place the screw connector on the
refrigerant line just on to the thread on the
outdoor equipment and tighten the first few
threads by hand.
Note: The refrigerant lines must be connected to
the valves on the outdoor equipment with as little
stress as possible.
IMPORTANT! Before you continue, it is essential
that you read the following instructions carefully.
4.
Fig. 31/32: Now tighten the bottom screw
connector first and then the top screw connector
using the open-ended spanner.
Hold the points marked “A” using a 24 mm open-
ended spanner and turn the nuts only at the
positions marked “B” using a 27 mm open-ended
spanner.
Notes:
a) Never place the open-ended spanner in the
positions marked “X” (Fig. 33).
b) Ensure that the screw connectors do not skew as
you tighten them and work quickly.
Important! Since the coupling works with tapping
rings, it may leak if you undo and reconnect the lines.
This will also void the warranty.
After completing steps 1 – 4, check that all the
connections are sealed correctly using leak detection
spray or soap suds. If any bubbles form, the system
has a leak and the screw connectors must be
retightened using an open-ended spanner.
5.
Fig. 34-36: Now remove the cover on the top
valve using a 19 mm open-ended spanner. Open
the valve by turning it counter-clockwise as far as
it will go using a 5 mm Allen key. The valve is
now open. If the valve is not opened fully, the
system may malfunction and suffer damage.
Screw the cover back on to the top valve and
tighten it well to ensure that it is properly sealed.
Important! The conical ring on the valve has an
important sealing function together with the sealing
seat in the caps. Ensure that you do not damage the
cone and that you keep the cap free of dirt and dust.
6.
Fig. 37-39: Now remove the cover on the bottom
valve using a 19 mm open-ended spanner. Open
the valve by turning it counter-clockwise as far as
it will go using a 5 mm Allen key. The valve is
now open. If the valve is not opened fully, the
system may malfunction and suffer damage.
Screw the cover back on to the bottom valve and
tighten it well to ensure that it is properly sealed.
Important! The conical ring on the valve has an
important sealing function together with the sealing
seat in the caps. Ensure that you do not damage the
cone and that you keep the cap free of dirt and dust.
7. After completing steps 1 – 6, check that all the
connections are sealed correctly using leak
detection spray or soap suds. If any bubbles
form, the system has a leak and the screw
connectors must be retightened using an open-
ended spanner.
8. Start the equipment so that the operating
pressures build up inside it. Check all the
connectors again for signs of leaks
a) during cooling mode
b) in heating mode.
If any bubbles form, the system has a leak and
the screw connectors must be retightened using
an open-ended spanner.
9.
Secure the connection protective cover back into
position.
4. Electrical connection of indoor and outdoor
devices (Fig. 40/41)
앬 Follow all instructions and notes on electrical
connection.
1. Unscrew the connection protective cover (A).
2. Connect the exposed end of the connection
cable (I) which leads from the indoor device to
the outdoor device to the plug-coupling system
on the outdoor device (C). Connect the PE-wire
according the drawing.
3. Fasten the connector cable to the outdoor device
using the cable clamps (K).
4. Screw the connection guard back (A) on the
outdoor device.
Fasten the complete package of lines, with the
protective tape wrapped around them, to the outside
wall using the supplied plastic clamps.
5. Remote control holder
Before you mount the holder, check that the remote
control can be received by the indoor device from the
planned location for the holder. Do not select a
position in direct sunlight or in the vicinity of any
GB
24