EasyManua.ls Logo

ekwb EK-DBAY D5 User Manual

Default Icon
2 pages
To Next Page IconTo Next Page
Page #1 background imageLoading...
Page #1 background image
Revision 1.1. Released on 4
th
of June, 2014
Installation and mounting manual for EK-DBAY D5 (incl. pump) reservoir
This product is intended for installation only by expert users. Please consult with a qualified technician for installation. Improper installation may result in damage to your equipment. EK Water Blocks assumes no liability
whatsoever, expressed or implied, for the use of these products, nor their installation. The following instructions are subject to change without notice. Please visit our web site at www.ekwb.com for updates. Before
installation of this product please read important notice, disclosure and warranty conditions printed on the back of the box.
The barb hose fittings require only a small amount of force to screw them in; otherwise the high flow fittings might break. These fittings do not need to be tightened with much force because the
liquid seal is made using O-rings. The use of an algaecide and corrosion inhibitors is always recommended for any liquid cooling system.
STEP 1: GENERAL INFORMATION Sample picture of EK-DBAY D5 reservoir.
STEP 2: PREPARING THE PUMP
EK-DBAY D5 reservoir is only compatible with the Xylem/Laing D5 Vario or PWM pump. Before installation remove main pump motor/body from the stock or any
other third party pump top.
STEP 3: ASSEMBLING THE EK-DBAY D5 Reservoir
Take your Xylem/Laing D5 pump. Place it according to the picture. Do not forget to place the O-ring accordingly. Use enclosed Allen key to secure the pump with
eight (8) M4×16 DIN7380 screws.
Do not use excessive force when tightening the screws! Overtightening the screws will stripp the M4 threads rendering the product useless.
EK-D5 Vario Motor (12V DC Pump)
Motor)
EK-D5 PWM Motor (12V DC Pump)
Motor)
Acrylic front plate
POM Acetal reservoir body
G 3/8 threaded fill port
M4×16 DIN7380 screw
D5 X-TOP RING
D5 Pump motor
MIN, MAX indicator
Vibration Damper
With M3 threads
Placing the O-ring
Integrated anticyclone
Pump suction port:
- small hole enables coolant to flood the
pump for easier system filling
- lower port disables sucking air from the
surface at higher flow.
Question and Answer IconNeed help?

Do you have a question about the ekwb EK-DBAY D5 and is the answer not in the manual?

ekwb EK-DBAY D5 Specifications

General IconGeneral
Pump ModelD5
Weight1.2 kg
Mounting5.25" Drive Bay
Inlet/Outlet Port SizeG1/4"
TypePump/Reservoir Combo
MaterialAcetal
CompatibilityD5 Pumps

Summary

General Information and Components

Reservoir Body and Ports

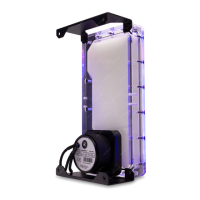
Details the POM Acetal reservoir body, integrated anticyclone, vibration damper, G 3/8 fill port, acrylic front plate, and pump suction ports.

Pump Preparation and Assembly

Pump Compatibility

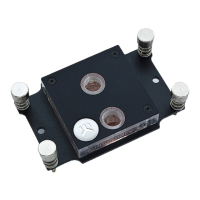
Specifies compatibility with Xylem/Laing D5 Vario or PWM pumps and the need to remove the main motor/body.

Securing the Pump to Reservoir

Instructions on attaching the D5 pump to the reservoir using M4x16 screws and placing the O-ring and gasket.

Reservoir Installation and Connection

Mounting in Computer Chassis

Details on how to install the reservoir into a 5.25" drive bay using M3x4 screws.

Connecting Inlet and Outlet Ports

Mandatory use of correct G1/4 threaded ports and recommendation for EK-CSQ compression fittings.

Filling the Reservoir

Procedure for filling through the G3/8 port, checking water level, and closing the fill port.

Important Notices and Warranty

Leak Testing and Safety

Recommendation for a 24-hour leak test before powering up and warnings against using tap water pressure.

Product Warranty Information

Details on the 24-month warranty period, conditions, and exclusions for defects and misuse.

Required Tools

Lists the necessary tools for installation, primarily a Philips head screwdriver.

Related product manuals