HR2 Quick Reference Guide
The HR2 allows users to enjoy wireless control of their system from any zone in the house. A few simple steps are required prior to
using your new HR2 remote control.
You will need the following items which are included in the HR2 kit:
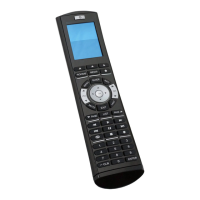
A. Remote
B. Charging Station
C. USB to Mini-USB Cable
D. 16VDC @ 1.5A Power Supply
(2.1mm tip Positive)
Required items not included in HR2 kit:
Computer with g! Connect Pro installed
System Controller*
Optional items Purchased Separately:
2900008 - Additional Battery
HR2CS - Additional Charging Station
* System Controller (HC12 / HC8 / HC6 / HC4) sold separately. Please note: The HR2 requires an HC controller running 5.2 or higher.
Accessing the Mini-USB Programming Port, IR Receiver, and On/Off Switch
Figure 1
Figure 2
Before configuring, the HR2 m st be fully charged. To
charge, place the remote in the charging cradle and connect the included power supply to the back of the charging cradle and wall outlet. The
remote display may light up briefly while beginning to charge. It is recommended to place the remote in the charging cradle when not in use.
u Charge the remote in the included charging cradle for at least 2 hours prior to setup.
Charging the Remote
© ELAN Home Systems 2010 • All rights reserved. Page 1
A B
C
D
The HR2 is shipped with the power switch in the “off” position to conserve battery life. Prior to setup the endcap must be
removed and the power switch must be changed to the “on” position. To access the power switch locate the Endcap Release Button on the bottom of the remote.
While depressing the endcap release button pull the endcap away from the body of the remote as illustrated. Move the On/Off power switch
located on the right side to the “on” position. (For extended periods of non-use it is recommended to turn the remote off with this switch
to conserve the battery life.) Note the location of the Mini-USB port and IR Receiver. Replace endcap and follow the charging instructions below.
the pre-installed
On/Off switch
Mini-USB port
Pull Endcap out while pressing
Endcap Release Button
Endcap
Endcap Release Button
1
2
16VDC @ 1.5A
Power Supply
(Included)
On Off