Do you have a question about the Electro Cam PLUS PS-5000 Series and is the answer not in the manual?
Explains the function of a cam switch and how PLµS controls simulate it.
Details key features like Keyboard/Controller, Ease of Setup, and Multiple Programs.
Provides detailed physical dimensions and component identification for external I/O racks.
Details physical dimensions and component locations for controllers with I/O modules on the back.
Shows physical dimensions and component layout for controllers with integrated transistor I/O chips.
Provides detailed dimensional drawings for various controller models.
Details dimensions and component layout for PS-5011 and PS-5111 controllers.
Diagram and explanation of the standard controller's logic terminal strip connections.
Specifications and dimensions for the standard 16-module I/O rack.
Specifications and dimensions for the Slimline M16 DIN rail rack.
Specifications and dimensions for the standard 24/48 module I/O racks.
Details wiring configurations for AC, DC Sourcing, DC Sinking, and Analog output modules.
Explains wiring for AC and DC input modules, including sinking and sourcing configurations.
Provides wiring diagrams for 3-wire sensors using logic terminal strip power or external supply.
Overview of the PS-5X34 system, its low-current transistor outputs, and capabilities.
Explains how to configure and connect multiple output racks for 32 or 64 outputs.
Details standard resolver cable specifications and wiring.
Provides dimensions and mounting details for 3/4" shaft foot mount resolvers.
Shows dimensions and mounting information for 3/8" shaft flange mount resolvers.
Wiring and dimension details for stainless steel resolvers.
Provides dimensions for 5/8" shaft stainless steel foot mount resolvers.
Describes the three programming access levels: Master, Setup, and Operator.
Illustrates hardware connections for program selection and enable functions.
Explains how to use keyboard codes to access Setup and Operator programming levels.
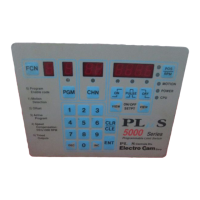
Details the FCN key and how function numbers are accessed and displayed.
Explains the PGM and CHN keys for program and channel selection.
Describes the POS/RPM display, related keys, and ON/OFF LEDs.
Explains the status indicated by the MOTION, POWER, and CPU LEDs.
Details the function of numeric keys, CLR/CLE, ENT, INC, and DEC keys.
Guides on creating, changing, and clearing output setpoints using the keypad.
Lists common programming error messages and how to clear them.
Instructions for selecting an output channel and viewing or clearing its setpoints.
Details master level programming for Function 0 features.
Explains how to set the direction of rotation for transducers.
Describes how to set the scale factor for resolver-based systems.
Instructions for setting up keyboard enable codes for programming access.
Configures the default display mode (Auto, Spd, or Pos).
Sets the RPM threshold for automatic display switching between position and RPM.
Selects the time resolution for timed output functions.
Configures communication type, speed, and address for serial ports.
Sets how often the RPM value is updated on the display.
Explains how to view or change active program bank (Pb) settings.
Configures which features operators can adjust at the Operator access level.
Defines which output channels operators can adjust.
Enables or disables specific functions for operator adjustment.
Defines the number of output groups and outputs per group.
Assigns enable inputs and selects modes for output groups.
Sets the low and high RPM values for motion detection.
Allows matching the controller position to the machine position.
Manages active programs, banks, and individual program numbers.
How to view or change the active program number (Pn) from the keyboard.
Explains how to view or change the active program (AP) setting.
Details how to view or change the program bank (Pb) setting.
Enables automatic adjustment of output setpoints based on machine speed.
Allows output channels to lag machine position for timing adjustments.
Details programming negative speed compensation values.
Configures outputs to turn off after a specified time duration.
Selects standard or leading/trailing edge speed compensation.
Programs separate compensation for leading and trailing edges.
Sets the speed compensation value for the leading edge of output pulses.
Sets the speed compensation value for the trailing edge of output pulses.
Configures analog output offset (Ao) and high RPM (Ah).
Details how to set the analog offset value for 0-10 VDC or 4-20 mA output.
Sets the RPM value at which the analog output reaches full scale.
Explains how to base output operation on resolver rotation direction.
Describes the 8-bit Gray Code output and its relation to position display.
Illustrates the ladder diagram for converting Gray Code to Binary.
Applies speed compensation to Gray Code outputs as a group.
Explains the increased pulse and program storage capacity with the '-F' option.
Shows how active program numbers are displayed with RPM or position.
Covers FCN 3 changes, keyboard access, and hardware selection of program numbers.
Guides on viewing/changing program number (Pn), active program (AP), and program bank (Pb).
Instructions for viewing or editing programs not currently active.
Illustrates registration windows and how to adjust them.
Details logic terminal strip functions for phase mark registration.
Describes input terminals used for phase mark registration functions.
Provides general information on logic inputs and their behavior.
Explains how to automatically center registration windows.
Details how to monitor and adjust the registration center position.
Describes how the control handles "off" logic for registration centering.
Explains the benefits and reasons for grouping outputs together.
Provides step-by-step instructions for programming output groups and modes.
Compares logic terminal inputs with I/O rack input modules.
Configuration example for a 9 I/O 5X24 controller with three output groups.
Configuration example for a 16 I/O 5XX4 controller with four output groups.
Lists applications and modes for different machine processes.
Explains Mode 0 operation where outputs are always enabled.
Provides steps for programming Mode 0 operation.
Explains Mode 1 operation where position resets to zero on input signal.
Provides steps for programming Mode 1 operation, including input windows.
Illustrates Mode 1 use for sections with varying phase relationships.
Explains Mode 2 operation where outputs are enabled after input signal.
Provides steps for programming Mode 2 operation, including input windows.
Illustrates Mode 2 use for controlling functions asynchronously.
Explains Mode 3 where outputs are enabled only when input signal is on.
Provides steps for programming Mode 3 operation.
Illustrates Mode 3 use for functions requiring a maintained input signal.
Explains Mode 4 where outputs cycle only if input occurs within a specified window.
Provides steps for programming Mode 4 operation, including input windows.
Illustrates Mode 4 use for punch operation based on part position.
Lists programming error messages and their general causes.
Details system error messages that disable outputs and require correction.
Explains common error codes like CrASH, EEPROM, Memory, and Pulse Overlap.
Covers errors related to programming not enabled or numbers out of range.
Details errors like Resolver Fault and too many speed compensated channels.
Explains errors related to internal hardware, power voltage, and stuck buttons.
Details communication port pinouts and RS-232 cable wiring.
Itemized list of alternate functions for testing and diagnostics.
Provides wiring diagrams and physical dimensions for the remote display.
Explains how the remote display shows position or RPM values.
Details necessary FCN 0 settings in the PLµS control for display setup.
| Brand | Electro Cam |
|---|---|
| Model | PLUS PS-5000 Series |
| Category | Switch |
| Language | English |