Do you have a question about the Electrolux TCW 1990 and is the answer not in the manual?
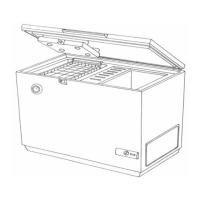
Unit operates on vapour compression system, features a top opening door to minimize cold air loss.
Icebank provides cold storage; unit holds temp below +8°C for 30 hrs during power failure.
Details power supply, voltage range, and recommendations for stabilizers and wiring.
Unit has a key lock and an external thermometer for temperature monitoring.
Check manufacturer's plate for correct voltage (115/230V) before connecting.
Install in a well-ventilated room, away from heat sources, ensuring nearest 15A socket availability.
Steps to remove the side cover of the compressor compartment for inspection.
Examine compressor compartment for damage, dislocation, or looseness at specific locations.
Check all 4 mounting brackets of the compressor are in place and secured.
Ensure incoming electrical connections to the terminal strip are tight.
Ensure outgoing electrical connections from the terminal strip are tight.
Verify fan mounting brackets are tight and fan blades rotate freely.
Refit the side cover of the compressor compartment and secure with screws.
Ensure 3cm back/left and 10cm right clearance for optimal air circulation.
Adjust the 4 supporting legs if the ILR is not level or stable.
Connect the power supply cord leads to a suitable 3-pin plug according to color coding.
Open lid, remove ballast container, and fill ice accu with clean water.
Remove innerliner, remove all ice-packs from their compartments.
Plug in for test, check green lamp, compressor, fan, and blower operation.
Fill ice-packs to marked level, screw cap, place small packs in refrigeration, stack large packs in freezing.
Insert plastic innerliner, fix with screws, and ensure drainage plug is in position.
Refit the filled ballast container onto the lid.
Close lid, plug in; green indicator light confirms the unit is powered on.
Set thermostat (1 or 2), run for 48 hrs, check ice-packs, adjust as needed.
Transfer vaccines only when front thermometer is steady between +2°C and +8°C.
After storing vaccines, ensure the lid is properly closed and locked.
Inner temperature can be affected by ambient temperature, lid openings, and vaccine arrangement.
Defrost when frost layer around the evaporator reaches 6-10 mm (1/4"-1/2") thick.
Remove and temporarily store vaccines in another refrigerator or cold box.
Unplug unit, open lid for 24 hrs to melt ice, open drainage plug, and collect water.
Remove innerliner and ice-packs. Use a scraper for ice removal, not a hairdryer.
Ensure inner parts are dry before reinserting ice-packs and refitting innerliner. Refit drainage plug.
Record temperatures, adjust thermostat as needed, and check inner blower airflow.
Clean compressor compartment, check brackets/bolts, and clean lid seal.
Compare dial thermometer readings with a standard mercury thermometer for accuracy.
Check for ice formation, gasket integrity, and ballast container status.
Monitor vaccine temp, transfer if needed. Disconnect power for abnormal sound/smoke/smell.
Check socket power, stabilizer, plug, and cable connections. Notify technician.
Check fan/compressor operation, adjust thermostat. Notify technician if issues persist.
Check air circulation space, defrost if frost is excessive, check thermostat cut-off.
Indicates refrigerant leakage or unit defect. Notify technician.
Low voltage or compressor/relay defect. Try again after voltage normalization. Notify technician.
Adjust thermostat anti-clockwise. Defective thermostat may require replacement.
Use fresh ice packs, monitor temp, switch unit on/off to maintain range.
Check compressor/fan brackets, bolts, pipes, and unit leveling. Notify technician if noise persists.
Disconnect power, melt/pour ice, defrost, clean, dry interior, and coil cord for transport.
Keep vaccines in neat rows, separate types, allow 2cm air space, use baskets, and monitor temp.
| Brand | Electrolux |
|---|---|
| Model | TCW 1990 |
| Category | Refrigerator |
| Language | English |