EasyManua.ls Logo

ELEY 1043 - User Manual

Default Icon
18 pages
Print Icon
To Next Page IconTo Next Page
Loading...
Watering Done Right
ITEM 1043
PORTABLEPORTABLE
GARDEN HOSE
REEL
Question and Answer IconNeed help?

Do you have a question about the ELEY 1043 and is the answer not in the manual?

Summary

Portable Garden Hose Reel

Specifications

Details hose capacity, maximum working pressure, and drinking water safety.

Assembly Instructions

Step 1: Connect Flanges

Connect the front and rear flanges using three screws.

Step 2: Tighten Screws

Tighten the three screws, avoiding power tools to prevent thread damage.

Step 3: Attach Handle Post

Insert and secure the handle post into the outer edge of the flange.

Step 4: Attach Wheels to Legs

Insert and secure spindles through wheels and into leg holes.

Step 5: Attach Legs to Frame

Attach legs to the front frame, leaving screws loose initially.

Step 6: Attach Frame Wye

Connect the frame wye to the legs, securing hardware loosely.

Step 7: Secure Front Frame

Tilt the cart upright and tighten the screws fastening the front frame to the legs.

Step 8: Attach Handles

Assemble handles onto the frame wye using screws, clamps, and nuts.

Step 9: Mount Flange Assembly and Brake

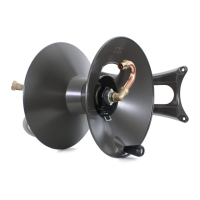
Mount the flange assembly and align the brake tab with the flange notch.

Step 10: Install Inlet Hose and Swivel

Insert inlet hose through axle tube and screw swivel onto the hose and axle.

Step 11: Install Hose Strap

Feed hose through the strap, connect to swivel, and tighten the strap.

Using Your Reel

Brake Operation

Learn how to operate the brake for pulling hose out and reeling it in.

Warranty and Support

10-Year Warranty Details

Information on the industry-leading 10-Year No-Leak, No-Rust, No Break Guarantee.

Warranty Registration

Link and instructions for registering your product warranty.

Customer Support Resources

Access to support, FAQs, and helpful videos via website.

Overview

The ELEY Portable Garden Hose Reel (Item 1043) is a robust and meticulously designed tool for managing garden hoses, reflecting ELEY's commitment to quality and durability. As a family-owned business with over 30 years of experience, ELEY emphasizes producing dependable reels that are built to last.

Function Description:

The ELEY Portable Garden Hose Reel is designed to store, transport, and deploy garden hoses efficiently and conveniently. Its portable nature, featuring two wheels and a handle, allows users to easily move the hose reel around their garden or property, eliminating the need to drag or carry a heavy, tangled hose. The reel mechanism facilitates smooth winding and unwinding of the hose, preventing kinks and tangles that can shorten hose life and impede water flow. An integrated brake system provides control during hose deployment and storage, ensuring the reel doesn't free-spin or unspool unintentionally. The reel is also designed for easy connection to a water source and the garden hose itself, making it a practical solution for various watering tasks.

Important Technical Specifications:

  • Item Number: 1043
  • Hose Capacity (5/8 in. hose): 125 ft.
  • Hose Capacity (3/4 in. hose): 100 ft.
  • Max. Working Pressure: 150 PSI
  • Drinking Water Safe: Yes
  • Needed Tool: Phillips head screwdriver (illustrated on page 4)
  • Warranty: 10-Year No-Leak, No-Rust, No Break Guarantee.

Components Included in the Box (Item 1043):

  • Left Leg: 2573 (x1)
  • Right Leg: 2574 (x1)
  • Front Flange: 4149 (x1)
  • Rear Flange: 4148 (x1)
  • Front Frame: 2575 (x1)
  • Frame Wye: 3096 (x1)
  • Inlet Hose 6.5': 1160 (x1)
  • Wheel: 2079 (x2)
  • Handle: 2572 (x1)
  • Spindle: 3094 (x2)
  • Crank Handle: 2658 (x1)
  • Brake: 2587 (x1)
  • Hose Strap: 4114 (x1)
  • Swivel: 4291 (x1)
  • Screw: 4006 (x3)
  • Hex Key: 4003 (x1)

Optional Kits (Refer to separate manuals):

  • Extra-Capacity Kit: 1044 (for 1043X models)
  • Quad-Wheel Kit: 1045 (for 1043Q models)

Usage Features:

The ELEY Portable Garden Hose Reel is designed for ease of use, from assembly to daily operation.

  • Assembly: The manual provides clear, step-by-step instructions with illustrations. Key steps include:
    1. Connecting the front and rear flanges with three screws, initially keeping them loose (Step 1).
    2. Tightening all three screws once inserted, with a caution against using power tools at high speed to avoid thread damage (Step 2).
    3. Attaching the crank handle post to the flange (Step 3).
    4. Assembling the wheels onto the legs using spindles and screws, ensuring the tapered edge of the spindle tip is nested against the tube wall (Step 4).
    5. Attaching the legs to the front frame (Step 5). If using a Quad-Wheel Kit, refer to its specific manual before this step.
    6. Connecting the frame wye to the legs, installing screws, washers, clamps, and nuts (Step 6).
    7. Tightening the screws that fasten the front frame to the legs (Step 7).
    8. Assembling the main handle to the frame wye using screws, clamps, and nuts (Step 8).
    9. Sliding the flange assembly onto the axle tube, inserting the hose strap, and placing the brake onto the axle, aligning its tab with the flange notch (Step 9).
    10. Inserting the inlet hose through the axle tube, screwing on the swivel, and pushing it fully onto the axle before tightening the screw (Step 10).
    11. Installing the garden hose by placing the crank handle at 12 o'clock, flipping the brake lever ON, feeding the female end of the hose through the flexible strap and flange opening, screwing it onto the swivel, and then tightening the hose strap screw with a Phillips head screwdriver until snug (Step 11).
  • Brake System: The reel features a brake system to control hose deployment and retraction.
    • Brake ON (Pulling hose out): When pulling the hose from the reel, the brake prevents free-spinning and unintended unspooling.
    • Brake OFF (Reeling hose in): To reel in the hose, the brake should be turned OFF.
    • Post-Use: Once the hose is reeled in, turn the brake ON to prepare for the next use.
    • Adjustment: If the hose is difficult to pull or continues unspooling, the brake tension can be adjusted by loosening or tightening the nut on the brake 1/4 turn using a 3/8" wrench. A QR code is provided for a video guide on adjusting and using the brake.
  • Portability: The two-wheel design and sturdy handle allow for easy movement of the reel across various terrains in the garden.

Maintenance Features:

While the manual doesn't explicitly detail ongoing maintenance, the design and warranty suggest a low-maintenance product.

  • Durable Construction: ELEY's 10-Year No-Leak, No-Rust, No Break Guarantee indicates the use of high-quality, corrosion-resistant materials designed for longevity.
  • Adjustable Brake: The ability to adjust the brake tension ensures optimal performance over time, accommodating wear or user preference.
  • Cleanliness: Keeping the reel clean from dirt and debris will help maintain its smooth operation and appearance.
  • Hose Care: Proper winding and unwinding of the hose, facilitated by the reel, contributes to the longevity of the garden hose itself by preventing kinks and damage.

ELEY emphasizes the value of high-quality tools and equipment, and this portable garden hose reel is a testament to that philosophy, offering a reliable and convenient solution for garden watering needs.

ELEY 1043 Specifications

General IconGeneral
BrandELEY
Model1043
CategoryTools
LanguageEnglish

Related product manuals