Do you have a question about the Elicent AXM Series and is the answer not in the manual?
Ensure power supply is disconnected before installation or electrical connections.
Installation and connections must be done by a qualified person per local regulations.
Following instructions is crucial to prevent product damage and ensure optimal performance.
Designed for household ventilation; not for other purposes. Children's use requires supervision.
Avoid areas with oil, grease, corrosive/flammable substances, extreme temps, or obstructions.
Do not expose the product to rain, sun, snow, or submerge in water.
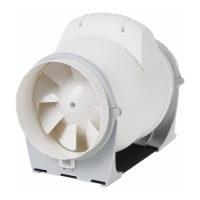
Check propeller for deformation, damage, and free rotation before starting installation.
Position mounting bracket, mark holes, drill, and secure using provided plugs and screws.
Connect suction and expulsion conduits to nozzles using flanges or tape. Ensure tube diameter matches openings.
Place casing in housing, align airflow direction, close flanges, and tighten screws.
Verify voltage and frequency match the nameplate before connecting to the mains supply.
Ensure appliance can be disconnected from mains with all-pole separation, meeting overvoltage category III.
Use fixed wiring with 2- or 3-core cable (1-1.5mm² cross-section). No earthing needed (Class II).
Route power cable carefully to prevent liquid entry. Seal entry if necessary to maintain IP rating.
Connect for desired speed (S1, S2, S3) and set timer if applicable. Factory timer set for high speed.
Adjust timer clockwise to set operating time from 3 to 15 minutes for post-switch-off fan run.
Verify all connections are correct, cables are tidy, and the connection cover is secure. Ensure blades turn freely.
Ensure the appliance is disconnected from the electric network and cannot be reconnected accidentally.
Clean the appliance regularly with a damp cloth.
Remove casing and reducer pipes for inspection. Clean motor, propeller, and casing for balance and performance.
Motor bearings do not require maintenance. Always use original spare parts for repairs.