EasyManua.ls Logo

Elite Fitness IT 9760-E User Manual

Elite Fitness IT 9760-E
16 pages
To Next Page IconTo Next Page
Page #1 background imageLoading...
Page #1 background image
Deluxe Inversion Table
Model IT 9760-E
CAUTION:
WARNING: Do not use this
inversion table without a
physician’s approval.
Do not let children use the
inversion table unsupervised.
Read all instructions carefully
before using.
Tighten all bolts before using
equipment.
1
Owners Manual
Photo may differ from actual product
equipment.
Leave adequate space to
properly invert.
.
Questions/ Comments
PLEASE DO NOT CONTACT THE
STORE
Elite Fitness is committed to
providing the very best of quality
and customer satisfaction for all of
the products we distribute. If for
any reason , you are dissatisfied
with the product you have
purchased or need assistance in
any way, please do not hesitate to
contact our knowledgeable support
staff at: 623-888-6379
Mon.-Fri 9:00 am – 5:00 pm Mountain Time
g42613
Question and Answer IconNeed help?

Do you have a question about the Elite Fitness IT 9760-E and is the answer not in the manual?

Elite Fitness IT 9760-E Specifications

General IconGeneral
TypeTreadmill
Motor2.5 HP
Speed Range0.5 - 10 mph
DisplayLCD
FoldableYes

Summary

CAUTION AND SAFETY ADVICE

CUSTOMER SUPPORT CONTACT

Contact details for customer service and support inquiries.

ASSEMBLY PREPARATION AND WARRANTY

PRODUCT WARRANTY AND LIABILITY

Information regarding the limited warranty, liability, and return policy.

PARTS LISTING

EXPLODED VIEW DIAGRAM

BASE FRAME AND HANDLEBAR ASSEMBLY

STEP 1: BASE FRAME ATTACHMENT

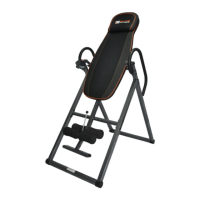
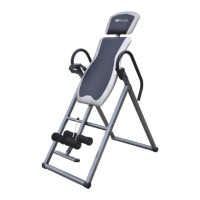
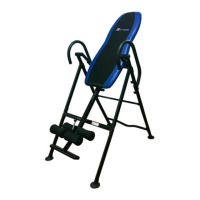
Steps to connect the front and rear bottom tubes to the base frames.

STEP 2: INSTALLING HANDLEBARS

Guide for attaching the main handlebars to the base frame structure.

HANDLEBAR ASSEMBLY CONTINUED

STEP 2 (CONT.): HANDLEBAR ATTACHMENT

Completing the handlebar connection to the base frame components.

BACKREST ASSEMBLY TO BASE FRAME

STEP 3: CONNECTING THE BACKREST

Detailed steps for attaching the backrest pad assembly to the base frame unit.

HEAD PAD ASSEMBLY

STEP 4: CONNECTING HEAD PILLOW PAD

Guide for securing the head pillow pad onto the backrest pad.

BODY HEIGHT ADJUSTMENT AND ROLLERS

STEP 4: HEIGHT ADJUSTMENT TUBE AND ROLLERS

Steps for fitting the height adjustment tube, leg tube, and foam rollers.

FINAL ASSEMBLY AND ADJUSTMENT

STEP 5: FINAL ASSEMBLY AND LOCKING

Final connection of the height adjustment tube and locking it with the knob.

FINAL ASSEMBLY CHECK AND CONTACT DETAILS

ENSURE TIGHTENING OF ALL FASTENERS

A crucial reminder to tighten all nuts, bolts, and screws before using the equipment.

IMPORTANT PRECAUTIONS AND WARNINGS

MEDICAL AND USAGE PROHIBITIONS

List of conditions that require physician approval or prohibit inversion table use.

USAGE GUIDELINES: INVERSION SELECTOR

INVERSION SELECTOR PIN OPERATION

Explanation of the 3 settings (20, 40, 60) for inversion intensity.

USAGE GUIDELINES: SECURING FEET

PROCEDURE FOR SECURING FEET AND ANKLES

Step-by-step process for using the foot rollers and ankle lock.

USAGE GUIDELINES: HEIGHT AND WEIGHT ADJUSTMENT

FINDING PROPER USER ADJUSTMENTS

Guidance on adjusting the table for individual body type and achieving proper inversion balance.

COMPANY CONTACT AND WEBSITE

Related product manuals