English only ( Australia, New Zea land, UK , Hong Kong, a nd Ireland)
www.ins inkerator.com
©2009 I nSinkErator, a div ision of Emer son
Electr ic Co. All Right s Reserved .
1b
1a
2
3
4
5
6
7
8
12
11
10
13
14
15
19
20
21
22
16
17
18
23
24
25
22
26
27
28
29
30
9
Food was te disposers p rovide an envir onmentall y responsib le alternati ve to transpor ting food waste t o landfills. An d they can help re duce
green house gas emi ssions. At cap able wastewate r treatment pl ants, food was te can be conver ted to biosoli ds and used as f ertilizer. Capa ble
plants c an also captu re methane gas a nd recycle it a s an energy sou rce. (Chec k the plant in your a rea.)
Read thr ough the entir e Installati on, Care & Use man ual before ins talling the di sposer. Determ ine which of the to ols, materia ls, and
acces sories you wil l need before yo u begin. Make sur e you have all nece ssary dis poser part s before inst alling the disp oser.
NOTE : The Evolution m odels grind m uch finer than a ny other dispo ser. For this reaso n you may notice th at it takes a litt le longer to gri nd
some foo d waste. Due to the Evo lution 200 mo del’s micropro cessor, users w ill experien ce a fraction al second del ay when star ting on all
Evolutio n 200 models. T his is comple tely normal.
NOTE : In Australi a, all plumbin g and electri cal work mus t be completed b y a qualified tra desperso n. This produ ct may require a pproval of the
relevan t regulator an d/or the sewe rage system op erator. Dispos er must be inst alled to AS/ NZS 3500.2 st andard requ irements.
NOTE : Make sure that th e installati on of this appli ance is allowe d by the authorit ies.
TOOLS & M ATERIALS YOU WI LL NEED:
Slotte d Screwdriver, Adj ustable Plie rs, Safety G lasses
TOOLS , MATERIALS , AND ACCESS ORIES YOU MAY NEE D:
Phillips Screwdrive r, Drain Auger, 9.5 mm Electrica l Clamp, Wire Nuts (2), 38 mm Drain Trap, 33 mm Hole Drill, Hammer, Hacksaw, Water Ho se
Clamp, Pip e Wrench, Copp er Earth Wir e, Dishwashe r Drain Conne ction Kit, Ele ctrical On /Off Switch , Drain Tube Exten sion
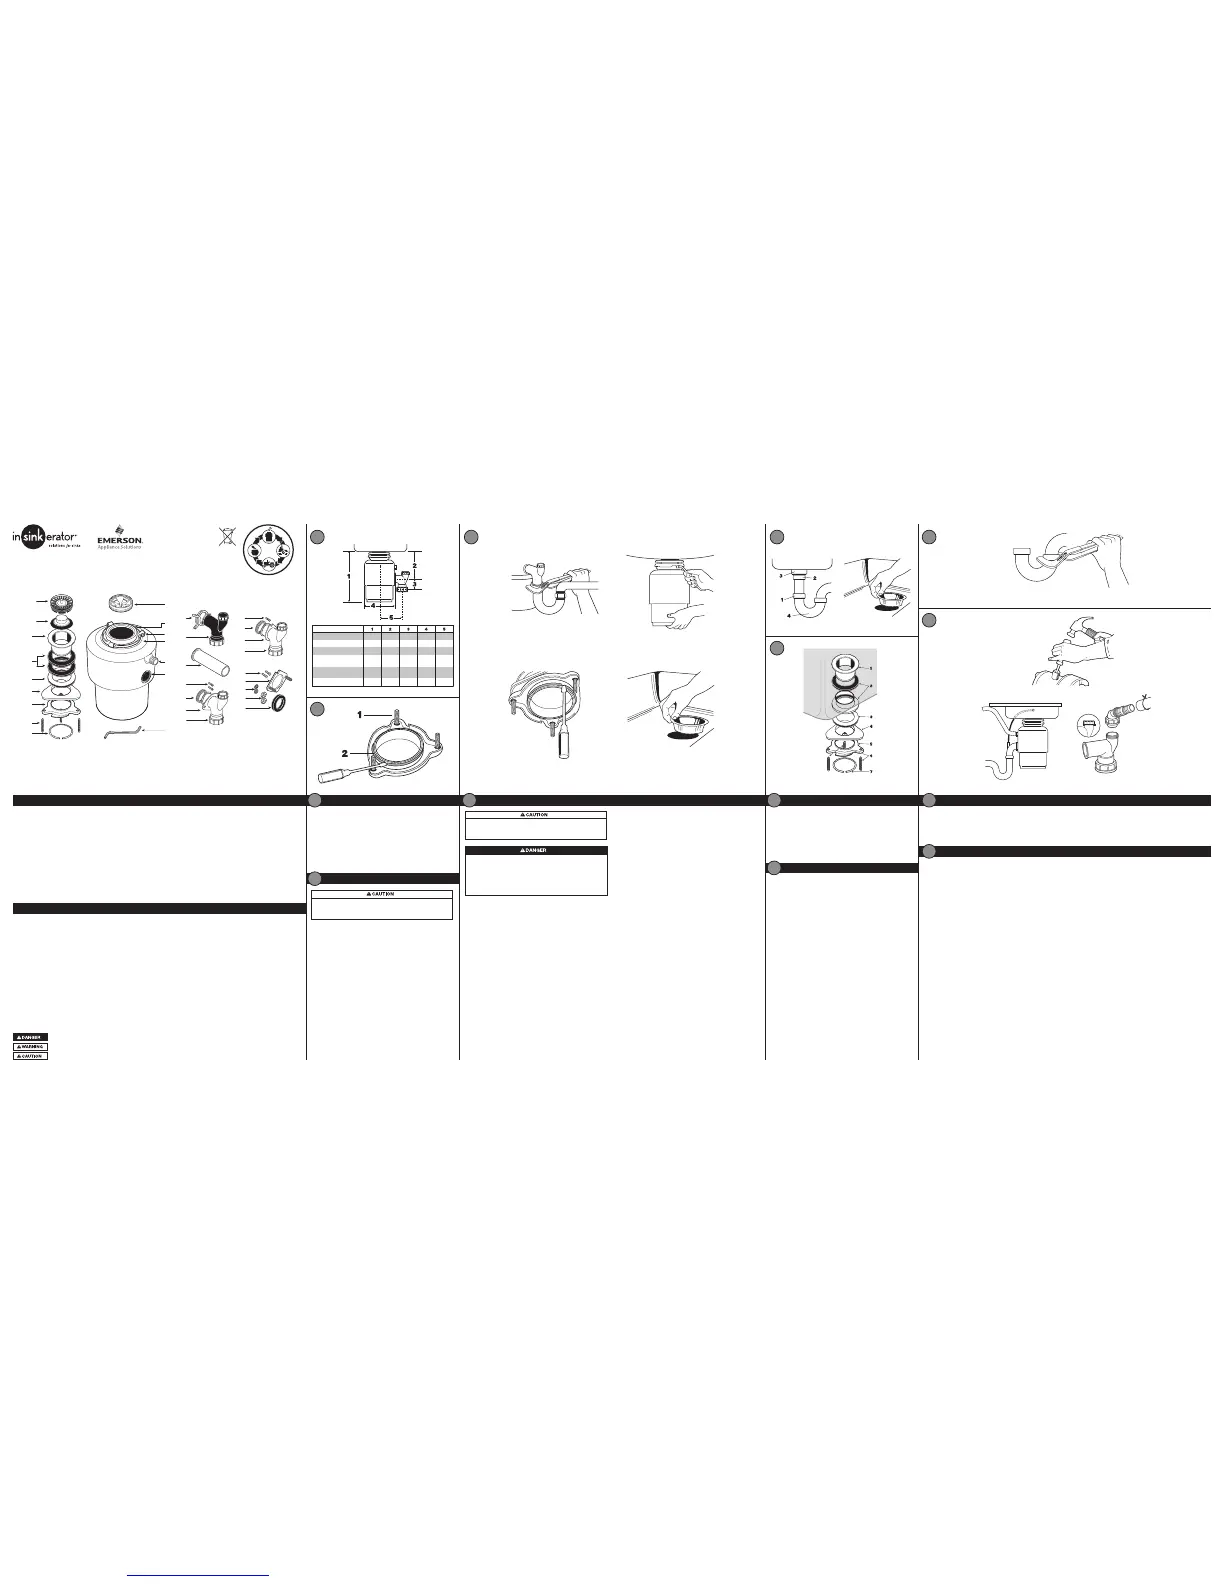
MOUNT ING ASSEM BLY
1a. Strai ner Basket and P lug
(Evolution m odels)
1b. Stopper ( Models 65, 55 , 45, LC-50)
2. Sink Fla nge
3. Rubbe r Gaskets (2 )
4. Fiber Ga sket (optio nal)
5. Backup R ing
6. Mounti ng Ring
7. Screws ( 3)
8. Snap Rin g
DISP OSER
9. Sound Ba ffle (Evolu tion models,
Model 65)
10. Mounti ng Gasket/ Splash Baf fle
11. Lugs
12. Lower Mou nting Ring
13. Dishwas her Inlet
14. Disch arge Outlet
15. Wrenche tte
DISCH ARGE ASSE MBLY #4
(Aust ralia Model LC -50 connec ted to
Caroma C onnector not s upplied)
26. Bolt (1) 19 mm 1/4 -20 UNC
27. Metal Flange ( Use to connect
to proper Caro ma Connector )
28. Metal Was hers (2)
29. Nuts ( 2)
30. Rubbe r Gasket
DISCH ARGE ASSE MBLY #5
(Aust ralia Models 6 5, 55, 45; conn ected to
Caroma C onnector not s upplied)
26. Bolts ( 2) 19 mm 1/4-20 UNC
28. Metal Was hers (2)
30. Rubbe r Gasket
DISCH ARGE ASSE MBLY #1
(Evolu tion models )
16. Hose Cla mp
17. Black Elbow Disc harge Tube
(38 mm diame ter/Evoluti on flange)
18. Straig ht Discharg e Tube 40. 3 mm OD
(Australi a installati on only)
DISCH ARGE ASSE MBLY #2
(Mod els 65, 55, 45)
19. Bolts ( 2) 13 mm 1/4-20 UNC
20. Rubbe r Gasket
21. Metal Flan ge
22. White Elb ow Discharge Tube
(38 mm diame ter/non-Evo lution flange )
DISCH ARGE ASSE MBLY #3
(LC- 50 for househ old installa tion)
23. Bolt (1) 19 mm 1/4 -20 UNC
24. Rubber G asket
25. Metal F lange
22. White Elb ow Discharge Tube
(38 mm diame ter/non-Evo lution flange )
230 -240V, 50H z
for Aus tralia a nd New Zeal and
220 -240V, 50H z
for UK /Hong Kon g/Ir eland
Part No. 75 978 REV. A
FOOD WASTE DISPOSER INSTALLATION, CARE & USE MANUAL
PARTS LIST (May var y depend ing on mode l)
Dange r indicates an i mminently ha zardous si tuation which , if not avoided, wi ll result in dea th or serious i njury.
Warning i ndicates a pote ntially haz ardous situ ation which, if n ot avoided, cou ld result in dea th or serious i njury.
Cautio n indicated a pot entially ha zardous situ ation, which , if not avoided, ma y result in mino r or moderate in jury.
31.8 cm 16.8 cm 6.4 cm 18.5 cm 13.1 cm
31.8 cm 16.8 cm 6.4 cm 17.3 cm 13.1 cm
31.8 cm 16.8 cm 6.4 cm 15.9 cm 13.1 cm
36.9 cm 19.3 cm 6.4 cm 20.6 cm 14.9 cm
34.4 cm 18.5 cm 6.4 cm 23.4 cm 16.8 cm
31.2 cm 17.1 cm 6.4 cm 20.5 cm 16.8 cm
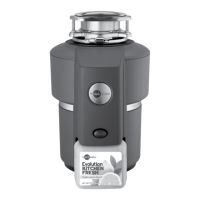
(Evolution) 200-1, -3
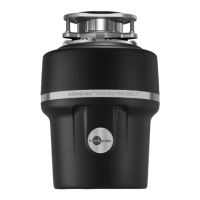
(Evolution) 100-1, -3
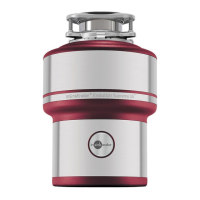
Mode l 65-1B, -3 B
Model 55-1B,
-1B A/S, -3B, -3B A/S
Mode l 45-1B,
-1B A/S , -3B
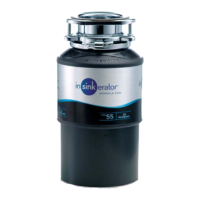
LC50 -12, -13
CHECK INSTALLATION DIMENSIONS
1. Dis poser Heigh t
2. Dis tance from bo ttom of sink bowl to c enterline of d ischarge ou tlet.
(Add 12 mm whe n stainless s teel sink is use d.)
3. Dis tance from ce nterline of the d ischarge ou tlet to end of
dischar ge tube.
4. Dis poser Width
5. Dis tance from di sposer ver tical center line to center line of
trap conn ection.
To properly d rain and preve nt standing wa ter in the dispo ser, the waste
pipe ent ering the wall mu st be lower than t he disposer di scharge out let.
DISCONNECT SINK DRAIN
1. Loo sen nut (1) at top of tr ap (4) with pi pe wrench (s ee Figure 4.1).
2. Loo sen nut (2) a t top of extensio n pipe. Remove ex tension pipe .
3. Loo sen nut (3 ) at base of sink fla nge.
4. Push s ink flange up th rough sink hol e and remove it (s ee Figure 4.2 ).
5. Cle an sink flange a rea of any putt y or other debr is.
NOTE: The sink hole may have to be enlarg ed to accept the dispose r
sink flang e. Sink hole enl argement too ls are availabl e from your
InSinkE rator Dealer.
1
2
1
2
2.1
3
4.33.3
2.31.3
2.41.4
5.1
1. Turn mou nting assemb ly over (see Fi gure 2.1) and loosen th ree
mountin g screws (1) until yo u can access sn ap ring (2) .
2. Use s crewdriver to pr y snap ring off of s ink flange. Mou nting
assemb ly will now come ap art.
3. Set mou nting assem bly aside. Thi s will be used in I nstruction 5 .
IF REPLACING AN E XISTING D ISPOSER,
CONTINUE WITH INSTRUCTION 3.
IF THIS IS A FIRST TIM E INSTALLATION,
SKIP A HEAD TO INSTRUCTION 4.
DISAS SEMBLE NE W DISPOSER
MOUNTI NG ASSEMBLY
Refere nce Figure 5.1.
1. Place o ne of two rubber gaskets ( 2) under sink flan ge (1). Ensure sin k
hole area i s clear of debr is and place si nk flange/g asket into sink h ole.
You may wish to plac e a weighted obj ect in the sink to ho ld the sink
flange in pl ace. (Place a towel unde r object to prevent scra tching.)
2. Work ing from unde r the sink, slip se cond rubbe r gasket (2) , fiber
gasket (o ptional) ( 3) and meta l backup ring ( 4) (flat sid e up) over the
sink flang e.
3. Hol ding second r ubber gasket , fiber gasket ( optional) a nd metal
backup ri ng in place, slip m ounting ring ( 5) over sink flang e so it seats
against b ackup ring.
4. With t he rubber gas ket, fiber gaske t (optional ), backup ring, a nd
mountin g ring tight aga inst sink bott om, slide snap r ing (7) onto sin k
flange unt il it pops into gro ove on flange.
5. Tig hten three mou nting screws ( 6) up to sink un til mounting as sembly
is seated t ightly and even ly against sin k.
ATTACH UPPER MOUNTING ASSEMBLY TO SINK
4
5
4
5
REMOVE EXISTING DISPOSER
3
P ERSONAL I NJURY
To avoid perso nal injury, do no t position you r head or body un der
dispos er; the unit co uld fall durin g installati on.
ELECTR ICAL SHOCK
• To avoid ele ctrical sho ck, disconn ect power befo re installin g or
serv icing dispos er. Turn of f electric al power at fuse b ox or circuit
breake r or if equippe d unplug dispo ser electr ical power plug f rom
wall outl et.
• Imp roper conne ction of equip ment earth ( grounded ) conductor
can res ult in electr ic shock.
1. If you r disposer is e quipped with a n electric p lug and cord
connec tion, unplug p ower plug from el ectrical wa ll outlet.
If your disp oser is not equ ipped with an e lectrical p lug and
cord con nection, con tact an elec trician to disc onnect the ol d
dispose r plus instal l an earth (g rounded) e lectrica l wall outlet for
the new disp oser conne ction that mus t be complian t to all local
electr ical codes.
2. Dis connect dra in trap from di sposer waste d ischarge tub e with
adjusta ble pliers ( see Figure 3.1). Al so disconne ct dishwashe r drain
connec tion, if applic able.
3. Sup port dispo ser with one han d and inser t end of wrenche tte or
screwdri ver into right si de of one mounti ng lug on lower mou nting
ring (se e Figure 3.2 ). Lift dis poser slight ly and remove fro m mounting
by pushing o r pulling wren chette or scr ewdriver to lef t (dispose r may
be heavy ; provide supp ort).
4. Loo sen three mou nting screws, p ry snap ring o ff with screwd river,
and remove o ld mounting as sembly (se e Figure 3.3 ). Some moun ting
assemb ly removal requ ires additio nal tools.
5. Push old sink flan ge up through sink hole (see Figure 3.4) . Skip ahead
to Instruction 5.
7.1
7.3
7.2
Failure to c lean sink wast e pipe line may res ult in waste pipe b lockage.
1. Rem ove trap. (See F igure 6.1)
2. With d rain auger, cle ar away all harde ned waste mater ial in horizon tal drain l ine running fr om drain trap to m ain pipe.
IF YOU ARE NOT CONNECTING A DISHWASHER TO DIS POSER, S KIP AHEA D TO INSTRUCTION 8.
DOES NO T APPLY TO AUSTRA LIA/N EW ZEALA ND In Austra lia, it is
sugge sted that the dis hwasher unit s be connecte d to IPLEX/ CO ROMA
dishwas her spigot for m aximum ef ficiency.
Wastewate r from a dishwas her can be plum bed into the disp oser
throug h the inlet acce ss on the upper p art of the dis poser. There is a
plug on th e inside of the inl et tube on all mo dels. Once re moved, the
knocko ut plug cannot b e replaced.
NOTE : If the dishwash er connect ion is made with out removing th e plug,
the dishwa sher may over flow. (Connec tions must com ply with loca l
plumbi ng codes.)
REMOV E KNOCKOUT PLU G
1. Lay d isposer on it s side and inse rt screwdri ver into dishwasher inlet so
tip rests on outer edge of knockout plug.
2. Tap end of sc rewdriver han dle with hamm er until molde d plug breaks
loose ( see Figure 7.1).
3. Rem ove loose knocko ut plug from in side dispos er.
DISHWASHER ATTACHMENT AND OVERFLOW CONNECTION
CLEAN SINK WASTE PIPE
6
7
THE SIN K OVERFLOW
The sink ov erflow may be co nnected to the ove rflow tube on th e
tailpi pe (see Figu re 7.2) . Remove the over flow connecto r cap and
blue pla stic seal fro m the end of the over flow tube (se e Figure 7.3).
Utilizi ng the nut, conn ect the overfl ow hose to the tailp ipe.
NOTE : The straigh t discharge t ube for use in Aus tralia does no t
have an over flow connec tion tube. In the U K, waste trap ki t, which
does not i nclude the sin k overflow kit, i s available fro m your local
InSink Erator deale r.
6
7
6.1
(installation continued on reverse)
InSink Erator Divis ion
Suite 6, Bu ilding 6
Hatte rs Lane,
Croxley G reen Busine ss Park
Watford H ERTS WD18 8YH
United K ingdom
Sales Tel : (0) 1 923 297 88 0
Serv ice Tel: (0) 8 00 389 3715
www.ins inkerator.co.uk
Parex Ind ustries Ltd.
5 Tolich Place, Henderson
P.O. Box 21-102
Auckland, New Zealand 0610
Sales Tel : 64 9 836 6566
Serv ice Tel: 0800 20 0 510
www.pa rex.co.nz
InSink Erator Divis ion
471 Mountain H ighway
Bayswate r Vic 3153, Australi a
Sales Tel : 61 03 9720 5599
Serv ice Tel: 1 300 136 205
www.ins inkerator.com.a u
InSink Erator Divis ion
Emers on Electric C o.
4700 21st Street
Racine , WI 53406-5 093
USA
Sales /Service Tel :
262-554 -3652
www.ins inkerator.com /
worldm ap.html
KAL G roup
4078 Kings wood Road,
City west Busines s Park
Dublin , Ireland
Tel: 01 413 6481,
01 413 6400
Fax: 01 413 6464
Email : info@ka l.ie
P ERSONAL I NJURY
Wearing s afety glas ses is recomm ended durin g the installa tion of
the food wa ste dispose r.
Evolutio n 100: Austra lia Pat. No. 307603 , 307769, 308385 , and other fore ign patents pe nding
Evolutio n 200: Austr alia Pat. No. 307601, 30776 9, 308695, 30 8385, and othe r foreign pate nts pending
 Loading...