Air Sw itch (Evo lution 2 00, Evolut ion 100, Mo del 65,
Mode l 55-1B A/S, 5 5-3B A /S and 45 -1B A/ S):
The Evolu tion 200, Evolut ion 100, and Mode l 65 disposer s include a
built-in a ir switch (Sa tin Nickel and C hrome finishe s). An air sw itch
activat es/turns o ff the unit by se nding a pulse of a ir to the control b ox.
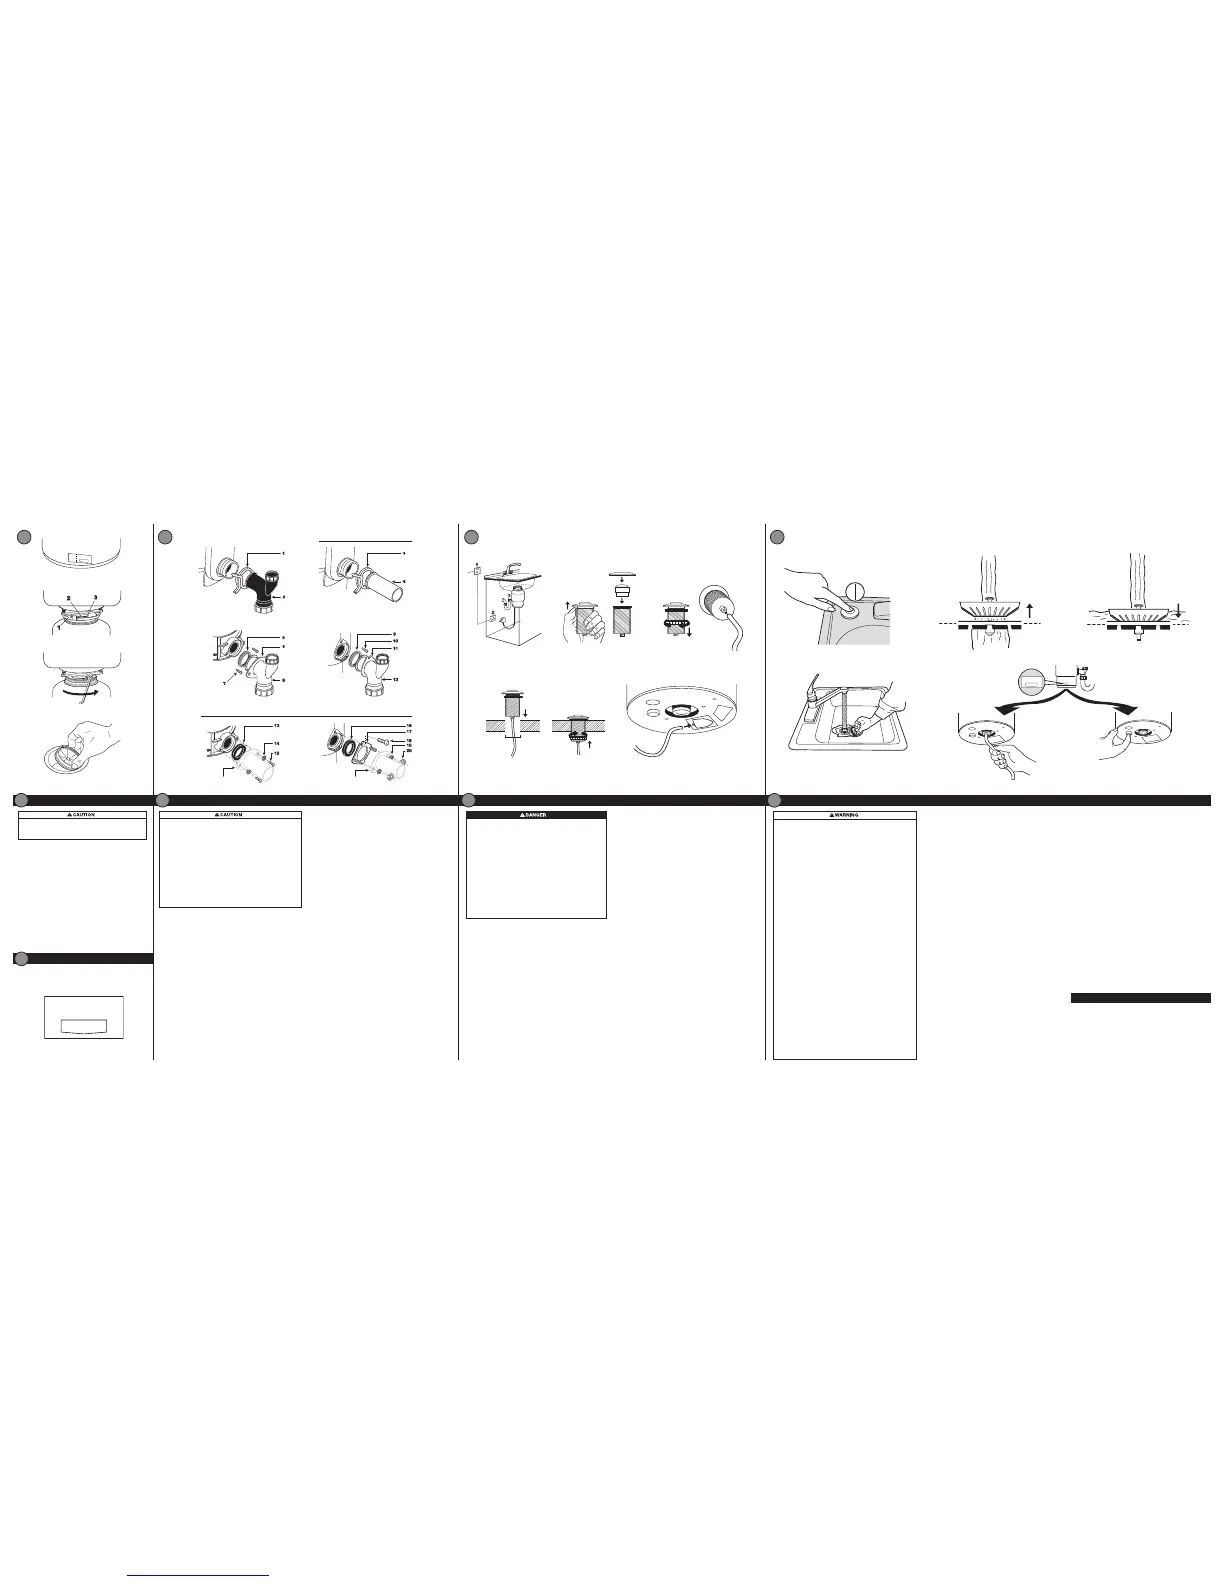
AIR SWI TCH INSTALLATI ON
The air sw itch include s two differe nt button finis hes. If you wish to
change t he button fini sh (optiona l), simply p ry off the exi sting button
and sna p the other butt on finish onto the b ellows. (Se e Figure 11.2)
1. Dri ll a 33 mm wide hole i nto the kitchen wo rk top, or the corn er of
the sink uni t, at the most co nvenient poin t for use. Some si nk units
may alrea dy have a suitabl e hole in them whi ch can be expose d by
removing t he cap.
2. Rem ove the nut from the p ush button be llows, while ke eping the
stainle ss steel wash er and rubber g asket in place . Push one end of
the PVC tubin g onto the spout of t he push butto n bellows, fee d the
other end o f the tube throug h the hole in the wor k top and throug h
the nut und erneath the wo rk top. (See Fi gure 11.3)
3. Fit th e push button b ellows in the hol e and then screw u p the nut
undern eath the work top u ntil it is hand tig ht. Do not use a w rench
to tigh ten the nut . (See Figu re 11.4)
4. Take the othe r end of the air tu be and firmly pu sh it over the spou t
of the air swi tch, which is loc ated on the unde rside of the wa ste
dispose r. (See Figure 11.5)
DISA BLING THE AI R SWITCH
The air sw itch can be disa bled if wall swi tch operatio n is preferre d.
The disp oser is shipp ed with the switc h in the “off ” pos ition.
1. Push o ne end of the PVC tub ing provided o nto the spout of th e push
button b ellows. (Se e Figure 11.3)
2. Take the othe r end of the air tu be and push it over t he spout of the
air switch , which is locate d on the under side of the waste d isposer.
(See Fi gure 11.5)
3. Dep ress the air swi tch one time unti l you hear the swit ch “click.”
Remove and d iscard the pu sh button bel lows and PVC tubin g. The
dispose r may now be activa ted by a wall switch.
The dis poser ins tallati on is compl ete. Read all o perati ng and
safet y instructio ns in Instruct ion 12 before operati ng the disposer.
Last ly, place st opper in s ink in close p ositio n. Fill sin k with wate r,
remov e stopper, tu rn dispos er on and ch eck for lea ks.
CONNECT DISPOSE R TO ELECTRICAL SUPPLY
ELECTR ICAL SHOCK
• To avoid ele ctrical sho ck, disconn ect power befo re installin g or
serv icing dispos er.
• If you a re not thoroug hly familiar wi th electric p ower, contact a
qualifi ed electric ian to connec t disposer to el ectrical c ircuit.
• If thr ee-prong, e arth (gro unded) plu g is used, plug m ust be
inser ted into three -hole, ear th (ground ed) recept acle.
• Do no t modify plug p rovided with u nit (if appli cable).
• Imp roper conne ction of equip ment earth ( grounded ) conductor
can res ult in electr ic shock.
• All w iring must com ply with loca l electrica l codes.
• Do no t attach ear th wire (grou nd wire) to gas s upply pipe.
• Do no t reconnect e lectrical c urrent at mai n service pa nel until
prope r earth (gr ounded) ou tlets are inst alled.
• If the s upply cord is d amaged, it mus t be replace d by the
manufa cturer, its ser vice agent or s imilarly qu alified-pe rsons
in order t o avoid a hazard.
11
11
8.3
8.2
8.1
8.4
MODEL XX – XX
S/N XXXX XXXXX X
PUSH RED BUTTON
TO RESET
Clear a ny objects fro m inside the dis poser grind c hamber befo re
mounti ng the dispose r to the sink.
1. Thi s product mus t be installe d so that the motor r eset button
located o n the bottom of th e disposer is re adily acces sible.
Keep this sp ace clear of al l objects.
2. Prio r to connecti ng disposer to m ounting asse mbly, detach the
perfo rated porti on of the speci fication labe l found at the bas e
of the disp oser, and set asid e for Instruc tion 9 (See Fi gure 8.1).
3. Posi tion dispose r with three mo unting tabs (1) a ligned in
positio n to slide over moun ting tracks ( 2). (Se e Figure 8.2)
4. Lif t disposer, ins ert top end ( mounting gas ket) into mount ing
assemb ly, and turn lower mo unting ring to ri ght (with
wrenche tte or adjust able pliers ) until mount ing tabs lock ove r
ridges ( 3) on mount ing ring track s (see Figure 8 .3). Make s ure
all thr ee mount ing tabs ar e locked over r idges. D isposer will
now hang by it self.
EVOLUT ION 200 AN D EVOLUTIO N 100, MODEL 6 5
Inser t sound baffl e into sink open ing, with flat sid e upward. (Se e
Figure 8 .4)
CONNECT DISPOSER TO MOUNTING ASSEMBLY
P ERSONAL I NJURY
To avoid perso nal injury, do no t position you r head or body
under di sposer; the u nit could fall d uring insta llation.
8
8
MODEL XX – XX
S/N XXXXXX XXXX
PUSH RE D BUTTON
TO RESE T
10.3 10.4
10.5 10.6
10.210.1
(FLANGED DISCHARGE
PIPE NOT PROVIDED)
(FLANGED DISCHARGE
PIPE NOT PROVIDED)
AUSTRALIA ONLY
AUSTRALIA ONLY
DISCH ARGE TUBE I NSTALLATION ( EVOLUTIO N 200 AND
EVOLUT ION 100)
1. Plac e discharge tu be (2) into A nti-Vibrati on Tailpipe Mount
™
. Secur e
with spri ng type hose c lamp (1). (Se e Figure 10.1)
UK, NE W ZEALA ND, HONG KONG AN D IRELAN D DISCHARGE
TUBE INSTALLATION ( MODELS 65, 55 , 45)
1. Plac e metal flange ( 6) over discha rge tube (8 ). Inser t rubber
gasket ( 5) with gaske t lip facing the me tal flange into d ischarge
tube. (S ee Figure 10.3)
2. Sec ure metal flan ge and discha rge tube to dispo ser with two
13 mm bolts (7 ).
ATTACH DISCHARGE TUBE TO WASTE DRAIN PIPE
This sp ecification l abel contai ns importa nt informati on you will
need to kn ow in the event ser vice is requ ired.
1. Apply the la bel to the front side o f the disposer, wher e it can
be easily re ad.
ATTACH SPECIFICATION LABEL
10
9
10
OPERATING INSTRUCTIONS (EVOLUTION 200 AND EVOLUTION 100)
1. Remove strainer basket and plug from sink opening and run cold water.
2. Turn on wal l switch or pres s air switch (se e Figure 12.1) to
start d isposer.
3. Slow ly insert fo od waste into disp oser and pos ition strain er basket
and plug in u pright posi tion (allowi ng water to run thr ough) to
minimize n oise and poss ible ejectio n of material w hile grinding
(See Fi gure 12.2).
4. Af ter grinding is c omplete, tur n disposer of f and run water fo r at
least 15 sec onds to flush dra in line.
5. Str ainer basket a nd plug also ac ts as a stopper in t he lower positi on.
(See Fi gure 12.3)
OPER ATIN G INSTRUCTI ONS (MOD ELS 65, 55 , 45, LC-5 0)
1. Rem ove stopper fro m sink opening a nd run cold wate r.
2. Turn on wal l switch or pres s air switch (se e Figure 12.1) to
start d isposer.
3. Slow ly insert fo od waste into disp oser and pos ition stoppe r to
minimize n oise and poss ible ejectio n of material w hile grinding .
(See Fi gure 12.4)
4. Af ter grinding is c omplete, tur n disposer of f and run water fo r at
least 15 sec onds to flush dra in line.
DO...
• G rind food was te with minimum c old water flow of 5.7 lite rs per
minute (1-1/2 G.P.M.).
• G rind hard mat erial such as s mall bones an d fruit pits to cl ean
inside of g rind chambe r.
• G rind citrus , melon rinds , vegetables , and coffee g rounds.
• A fter grindi ng, run water for a t least 15 second s to flush drain li ne.
• S witch off or un plug the appli ance before at tempting to fre e a
jammed ro tor with an impl ement.
• M aintain the a rea underne ath the dispos er of any object s to be sure
you have acce ss to the dispos er reset but ton.
DON’T...
• D on’t use hot water w hen grindin g food waste (al though hot wate r
can be dra ined into disp oser betwee n grinding pe riods).
• D on’t turn off wa ter or dispose r until grindi ng is complete d and only
sound of mo tor and water run ning is heard.
• D on’t grind lar ge amounts of eg g shells or fibr ous material s like corn
husks, ar tichokes, e tc., to avoid possib le pipe block age.
• D on’t grind non -food waste of any k ind.
• D on’t use this app liance to disp ose of hard mate rials such as g lass
and meta l.
• D on’t ever pour fat s, oils or grea se down the sink – it w ill block your
drains an d the sewerage s ystem.
INSTRUCTIONS PERTAINING TO RISK OF FIRE, ELECTRICAL SHOCK , OR INJURY TO PERSONS (SAVE THESE INSTRUCTIONS )
InSink Erator produ cts are guara nteed agains t defects in ma terial and
workmanship for the period of the guarantee from the date of purchase.
Evolutio n 200: 6 year s Evolutio n 100: 5 years
Model 6 5: 4 years Mo del 55: 3 year s
Model 45 : 2 years LC -50: 1 year
SERVI CE
If ser vice is requir ed, contact a n InSinkErato r Authorized S ervice
Center ( see enclos ed list) or you r dealer. Guara ntees are void i f you
remove you r disposer af ter install ation and att empt to repair it , or if
the disp oser is used fo r commercia l purposes.
IN-HOME FULL SERVICE GUARANTEE
12.4 12.612.5
12.312.2
12.1
MODEL XX – XX
S/N XXXXXXXXXX
PUSH RED BUTTON
TO RESET
MODEL XX – XX
S/N XXX XXXX XXX
PUSH RED BUTTON
TO RESET
When usi ng electroni c appliance s, basic pre cautions are a lways
to be foll owed, includi ng:
• In Aus tralia, pro duct may requi re approval of th e relevant regu lator
and/ or the sewerag e system opera tor.
• If the a ir switch or wall sw itch fails to shu t off or turn on di sposer,
unplug p ower cord plug a nd contact you r qualified tr ade person.
• Thi s product is de signed to disp ose of normal h ousehold foo d
waste; i nserting m aterials oth er than food was te into dispose r
could ca use person al injury an d/or prope rty damag e. To reduce
the risk o f injury, do not use t he sink contai ning the dispo ser for
purpo ses other than f ood prepara tion (such a s baby bathing or
washin g hair).
• Thi s appliance is n ot intended fo r use by person s (includin g
childr en) with redu ced physica l, sensory o r mental capa bilities,
or lack of ex perience a nd knowledge, unless they have been given
supervi sion or instruc tion concer ning use of appl iance by a pers on
respo nsible for thei r safety. Childr en should be su pervised t o
ensure t hat they do not pla y with dispose r. To reduce t he risk of
injur y, clos e supervi sion is requir ed when an appl iance is used
near chi ldren.
• Whe n attempting to l oosen a jam in th e food waste disp oser,
switch of f or unplug the a ppliance be fore attempti ng to free a
jamme d rotor. Use a self ser vice wrenc hette as desc ribed in
the Rele asing Dispo ser Jam sect ion.
• Use l ong-handle d tongs or plie rs to remove obje cts from dispo ser.
• To reduce the risk of injury by materials that are expellable by a waste
dispos er, do not operate Evo lution dispo sers withou t the sound
baffle in place (See Figure 8.4). Place stopper in sink opening as shown
in Figure 12.2 or 12.4. Do not put the fo llowing into a disposer : clam
or oyster shel ls, caustic drain cl eaners or simila r products, glas s,
china, o r plastic, lar ge (whole) bones, met al (such as bottle caps,
steel shot, tin cans, or utens ils), hot grease or other hot liquids.
• Replac e sound baffle/mount ing gasket/splash baffl e when worn to
help prevent entry or eje ction of material and water.
• Whe n not using disp oser, leave stoppe r in place to red uce risk of
object s falling into di sposer. Make sure d isposer powe r switch is
turned o ff.
• Befo re pressing r eset button , attempting to c lear jam, or re moving
object s from inside d isposer, make sur e disposer pow er switch is
turned o ff.
• Do no t insert han ds or fingers in to disposer.
• FIRE H AZARD : Do not store flam mable items su ch as rags, paper,
or aerosol cans near disposer. Do not store or use gasoline or other
flamma ble vapors and l iquids in vici nity of dispo ser.
• Do no t dispose of the fo llowing in the di sposer: pai nts, solvents ,
househo ld cleaners and ch emicals, automot ive fluids, plastic wr ap.
• Don’t fill disposer with a lot of vegetable peels all at once. Instead, turn
the water and disposer on first an d then feed the peels in gradually.
• D on’t waste food. N early a quar ter of the food we bu y is thrown
away untouc hed: salad, b read and cake s and fruit hea d the list.
Three tip s to stop waste and s ave you money: onl y buy, or cook,
the por tions you need fo r the meal; ch eck the fridg e and cupboar d
for food you h aven’t eaten– make it your nex t snack or free ze it;
and make su re you leave that foo d off your next s hopping list !
CLEA NING DISP OSER
Over time , grease/ food parti cles may accum ulate in the grin d
chambe r and baffle, c ausing an unp leasant odo r. To clean
the disp oser:
1. Turn of f disposer a nd disconne ct power suppl y.
2. Rea ch through sin k opening and cl ean unders ide of splash
baffle an d inside uppe r lip of grind cha mber with sco uring pad.
3. Plac e stopper in sin k opening and fil l sink halfway w ith
warm water.
4. Mix 6 0 ml baking soda w ith water. Turn dispos er on and
remove stop per from sink a t same time to wash a way
loose pa rticles.
RELE ASING DIS POSER JAM
If the moto r stops while the d isposer is op erating, the d isposer
may be jam med. To release jam :
1. Turn disp oser power an d water off.
2. Ins ert one end of th e self-ser vice wrench ette into the center
hole on the b ottom of the disp oser (see F igure 12.5). Wor k the
wrenche tte back and fo rth until it tur ns one full revol ution.
Remove wre nchette.
3. Rea ch into the dispo ser with tongs a nd remove objec t(s) . Allow
the dispo ser motor to coo l for 3 - 5 minutes and l ightly push
red rese t button on the di sposer bot tom (see Figu re 12.6). (If
the motor re mains inope rative, check t he service p anel for
tripped c ircuit brea kers or blown fu ses.)
12
12
UK, NE W ZEALA ND, HONG KONG AN D IRELAN D DISCHAR GE
TUBE IN STALLATION ( LC-50 )
1. Plac e metal flange (11) over di scharge tube ( 12) . (See Figur e 10.4)
2. Ins ert rubber g asket (9 ) with the gasket l ip facing the met al flange
into disch arge tube (g asket may be pre -fitted in disc harge tube) .
Secure m etal flange an d discharge tu be to disposer w ith one
19 mm bolt (10) ( Gasket will ho ld in place) .
AUSTR ALIA DISCH ARGE TUBE I NSTALLATION ( MODELS 6 5, 55,
45 ) (Optiona l straigh t pipe conne ction; con nection to C aroma
Conne ction not su pplied. At tach disch arge tube to w aste pipe. )
1. Ins ert rubber g asket (13) into dis charge outl et. (See Fig ure 10.5)
2. Att ach flanged di scharge pip e (not provide d) using was hers (14) and
19 mm 1/4 -20 bolts (15) .
AUSTRALIA DISCHARGE TUBE INSTALLATION (LC-50 ) (O ptional
stra ight pipe con nection ; connecti on to Caroma C onnectio n not
suppl ied. Atta ch dischar ge tube to was te pipe.)
1. Plac e rubber gask et (16) between d isposer an d flange (17). (Se e
Figure 10.6 )
2. Tig hten flange with o ne 19 mm bolt (18). At tach flange d discharge
pipe (no t provided) u sing washer s (19) and nuts ( 20).
ALL DIS POSERS CO NTINUE WIT H STEPS 3-5
3. Rota te disposer s o that dischar ge tube is align ed with drain tr ap.
(To prevent le aks, do not pull o r bend discha rge tube to drain t rap.)
If discha rge tube is too sh ort, you can pu rchase an ext ension from
hardwar e store. (Dis poser must re main in vert ical positio n to
prevent vi bration.)
4. Plac e nut, then fer rule on discha rge tube (not s upplied) a nd tighten
on drain tr ap. (If you have a do uble sink, use s eparate dra in traps for
both side s of sink.)
5. Ensu re lower mounti ng ring is still s ecurely loc ked over ridges o n
mountin g flange. (Se e Figure 8.2)
NOTE : You mus t have access to a n earth (gr ounded) wal l socket.
Any addi tional socket s hould be fitte d by a qualified el ectrician a nd
prope rly earthe d (grounde d). The dis poser is fitte d with a molded p lug
and cab le.
ON/ OFF CONTROL
There a re two types of c ontrols for co ntinuous-fe ed dispose rs:
a double -pole switch a nd an air switch ( built in for Evol ution 200,
Evolutio n 100, and Model 65 ; available as a n accessor y on all
other mo dels).
Doub le Pole Swit ch (1):
If a wall swi tch (not suppl ied) is requ ired for your in stallation, i t must
have on/ off markin gs and be insta lled by a qualifi ed tradeper son. It
should b e located in a co nvenient posi tion above the wor k surface
with a mini mum of 3 mm conta ct separatio n between ea ch pole (20
ADP switc hes to BS 3676) . In New Zealand , please refe r to AS/NZS
3000 :2007 for elec trical inst allation. Con nect to a 13 amp ear th
(grounded) wall socket (2 ) using a 13 amp cable. (See Figure 11.1)
11.1 11.3
11.4
33 mm
11.5
11.2
P ROPERTY D AMAGE
• Wear ing safety gl asses is rec ommended du ring the insta llation
of the foo d waste dispose r.
• All Evo lution 200 an d Evolution 100 mod els must be con nected
to the supp lied tailpip e with the suppl ied spring t ype hose clam p.
(See F igure 10.1) In Australia i t is required to u se the supplie d
straig ht discharg e tube with supp lied spring t ype hose clam p.
(See F igure 10.2) Fail ure to use the supp lied tubes an d spring
type ho se clamp will voi d the guarante e and possib ly cause
premat ure failure of th e Anti-Vibra tion Tailpipe Moun t
™
.
• Do no t use plumber’s pu tty on any othe r disposer c onnection
other th an on sink flange . Do not use threa d sealants or p ipe
dope. Th ese may harm di sposer and ca use proper ty damage.
• Reg ularly insp ect dispose r and plumbin g fittings for wa ter leaks,
as water le aks can cause p roperty d amage. Manu facturer ca nnot
be held responsible for property damage as a result of water leaks.

 Loading...