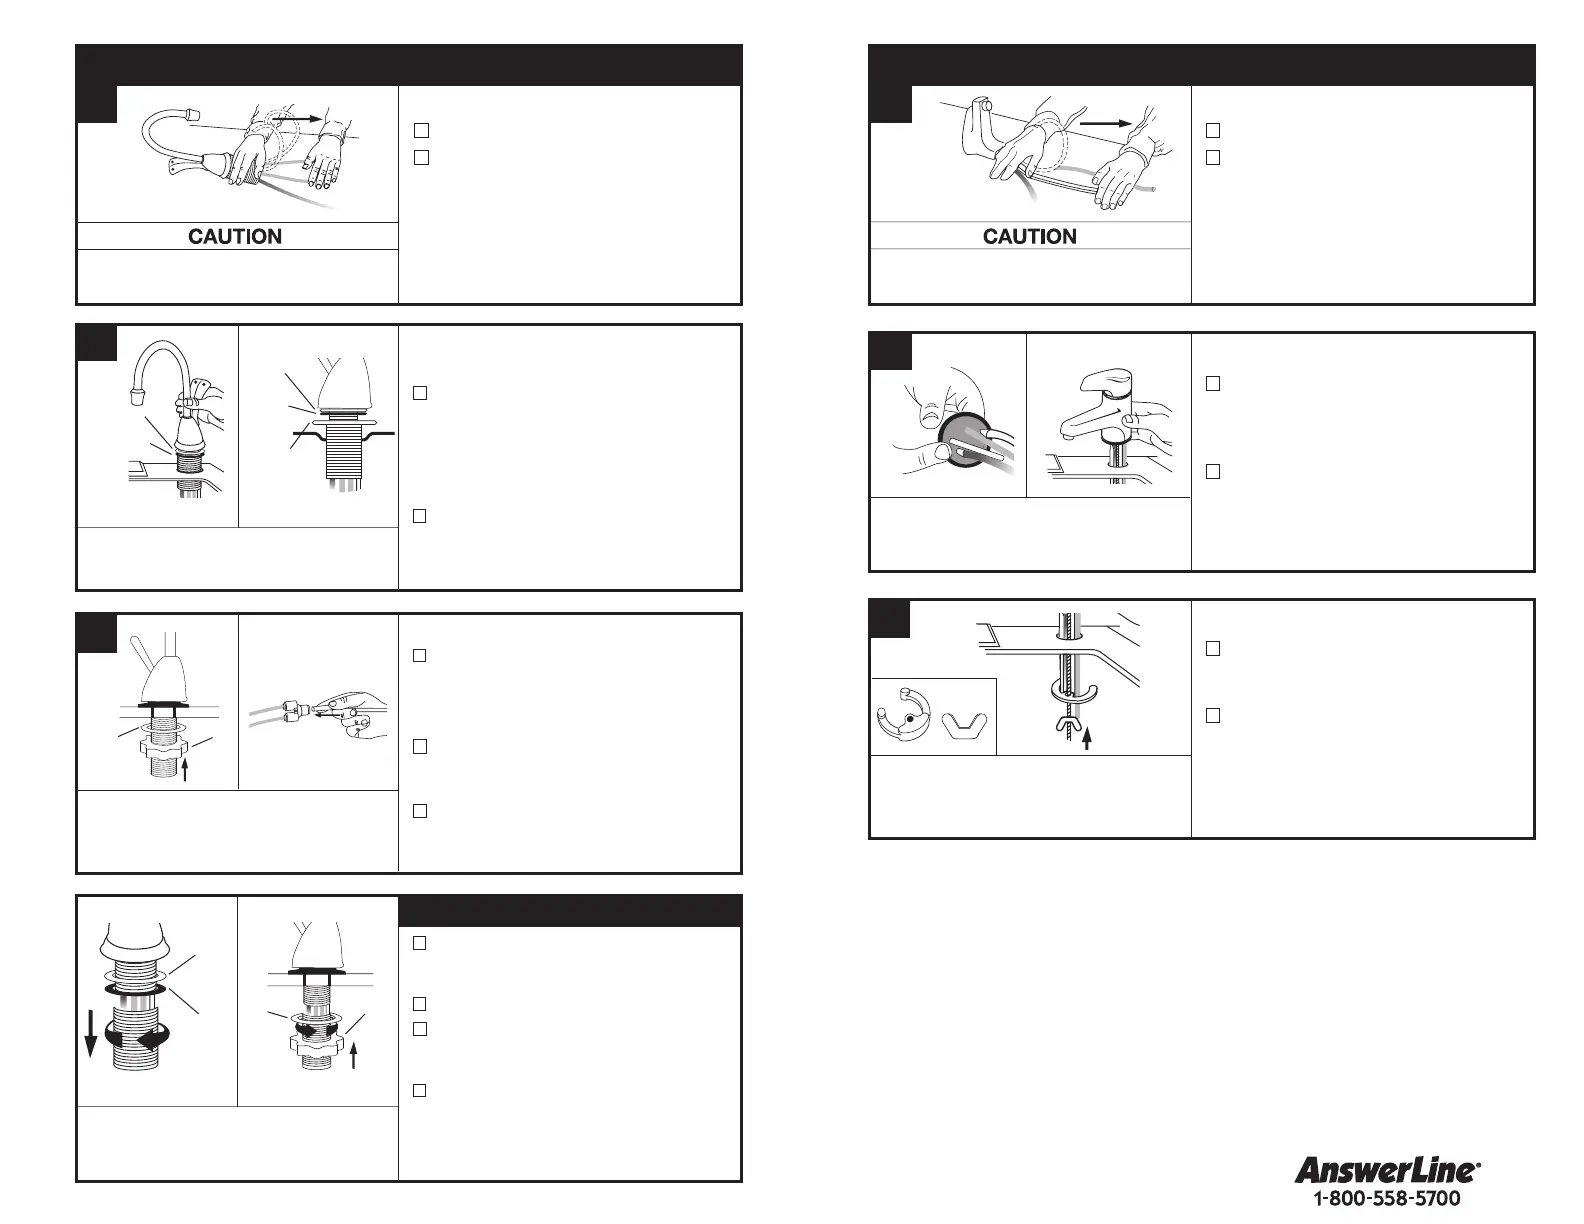
Unpack dispenser components.
On a firm, flat surface, carefully
straighten the copper tubing using
hands only.
Unscrew and remove threaded extension
from valve body. Do not discard, as you
will need this later (See Figure 1).
Leave small washers in place.
Feed tubes down through the hole in
the sink/counter until the base is at
rest. Set faucet at desired angle.
From under sink, slide 1-1/2" fiber washer
over faucet base. Reinstall threaded
extension onto the base until snug.
Thread star nut onto extension until
snug (See Figure 2).
From under sink, slide 1-1/2" fiber washer
over threaded extension. Thread star
nut onto extension until snug.
Hot & Cool models only
Attach the quick connector to the
ends of the copper tubes running
from the dispenser.
Install a white 3/8" tube into other
end of quick connector.
If sink/counter thickness exceeds 3/4"
a hole diameter of 1-1⁄2" is required.
An assistant may be needed to hold
the dispenser head in place
while securing the dispenser.
2
View/Wave
View/Wave
Hot & Cool models only
For a standard 1-1⁄2" sink/counter hole
Feed tubes down through the hole in
the sink/counter until the base is at
rest. Set faucet at desired angle.
Large washer required for sink holes
larger than 1-1⁄2" or for porcelain sinks
with radius or beveled holes.
Before feeding tubes through sink
hole, remove extension. Place 1-5/16"
large steel washer over threads on
faucet base. Reinstall extension.
View/Wave
Faucet is factory-ready for installation
into a standard 1-1⁄2" sink/counter hole.
1-1/4"
Small
Steel
Washer
Fiber
Washer
Star Nut
1-5/16" Large
Steel Washer
1-1/4"
Small
Rubber
Washer
Standard 1-1⁄2" hole Hole larger than 1-1⁄2"
Installing into hole smaller than 1-1⁄2"
Figure 1 Figure 2
Property Damage: Do not pinch or break copper
tubing. Do not distort the last 1 inch of tubing.
1-1/4" Small
Steel Washer
Fiber
Washer
Star Nut
1-1/4" Small
Rubber Washer
1-1/4"
Small
Steel
Washer
1-1/4"
Small
Rubber
Washer
INSTALLING THE FAUCET - VIEW/WAVE
Property Damage: Do not pinch or break copper
tubing. Do not distort the last 1 inch of tubing.
Make sure to use rubber gasket
to ensure proper seal.
2
Brass Nut
Plastic
tube
tube
Ferrule
Brass Insert
Wing Nut
Plug
Fiber
Washer
Wing Nut
Fiber
Washer
Wing Nut
Fiber
Washer
Fiber
Washer
Star Nut
Fiber
Washer
1
2
3
Star Nut
Fiber
Washer
Star Nut
Copper
Brass Nut
Ferrule
Brass Nut
Plastic
tube
tube
Ferrule
Brass Insert
Wing Nut
Plug
Fiber
Washer
Wing Nut
Fiber
Washer
Wing Nut
Fiber
Washer
Fiber
Washer
Star Nut
Fiber
Washer
1
2
3
Star Nut
Fiber
Washer
Star Nut
Copper
Brass Nut
Ferrule
Unpack dispenser components.
On a firm, flat surface, carefully
straighten the copper tubing using
hands only.
Ensure that the black rubber
gasket is properly seated into the
base of the dispenser head and will
surround the sink mount.
Feed tubes down the hole in the
sink or countertop until the base
is at rest on the sink or countertop
surface.
From under the sink, place the
semi-circular mounting plate onto
the threaded stud.
Place wing nut onto the threaded
stud. Make sure faucet head is
at the desired angle. Tighten the
wing nut until snug, while ensuring
the semi-circular mounting plate
extends beyond the sink hole.
An assistant may be needed to hold
the dispenser head in place
while securing the dispenser.
Brass Nut
Plastic
tube
tube
Ferrule
Brass Insert
Wing Nut
Plug
Fiber
Washer
Wing Nut
Fiber
Washer
Wing Nut
Fiber
Washer
Fiber
Washer
Star Nut
Fiber
Washer
1
2
3
Star Nut
Fiber
Washer
Star Nut
Copper
Brass Nut
Ferrule
H990
H990
H990
Brass Nut
Plastic
tube
tube
Ferrule
Brass Insert
Wing Nut
Plug
Fiber
Washer
Wing Nut
Fiber
Washer
Wing Nut
Fiber
Washer
Fiber
Washer
Star Nut
Fiber
Washer
1
2
3
Star Nut
Fiber
Washer
Star Nut
Copper
Brass Nut
Ferrule
INSTALLING THE FAUCET - H990
a
C
b
b
a
C
7
6
 Loading...