Do you have a question about the EMI UNHG09 and is the answer not in the manual?
Instructions for removing and replacing the piston/orifice in specific models, referencing figures.
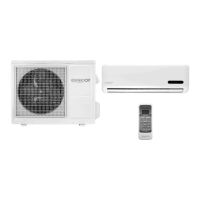
Details the features and capabilities of the AmericaSeries UNCG/UNHG air handler, including its design and functions.
Overview of the unit's controls and components, including the LCD display and remote thermostat compatibility.
Highlights key features of the unit's cabinet, such as filter accessibility and drain pan construction.
Lists optional accessories available for the unit, enhancing its functionality and installation flexibility.
Details the necessary items that installers must provide for the unit's installation, such as wiring and fasteners.
Key points to consider before installation, including unit location, clearance, and piping routing.
Details part numbers for condensate pump kits for floor-mounted and ceiling-mounted units.
Provides part numbers for the optional toe kick kit required for floor-mounted units with condensate pumps.
Guidelines for preparing the site, ensuring the unit is mounted plumb and level to a smooth surface.
Instructions for preparing the site for electrical wiring, including checking the rating plate and wire size.
Steps for accessing and connecting high and low voltage wiring to the unit's control box.
Detailed instructions for connecting the high voltage power supply to the unit's wiring compartment.
Detailed instructions for connecting the low voltage control wiring for unit-mounted controls.
Wiring instructions for cooling-only units, detailing connections between indoor and outdoor units.
Wiring instructions for heat pump units, including reversing valve and electric heat connections.
Guidance on connecting and configuring remote thermostats for unit operation.
Wiring requirements for electric heat applications, detailing the 'W' connection.
Wiring requirements for heat pump operation, detailing the 'O' terminal connection for the reversing valve.
Instructions for insulating unused wires and replacing the control box cover after electrical connections are made.
Details on connecting flexible PVC hoses to condensate drain pipework, ensuring proper slope and drainage.
Notice regarding the use of condensate hose tie downs in ceiling mount applications.
Instructions for preparing the unit and piping connections before starting refrigerant piping installation.
Information on the UNHG's Flo Rater piston expansion device and the UNCG's thermo expansion valve.
Guidelines for sizing refrigerant lines based on system capacity and condenser connection sizes.
Steps for brazing refrigerant tubing, insulating the suction line, and connecting outdoor units.
Procedures for attaching manifold sets, evacuating, and charging the refrigerant system.
Reference to the refrigerant charge table for specified charge amounts and adjustment procedures.
Guidance on fine-tuning refrigerant charge and setting the TXV for the UNCG30 unit.
Formulas and steps to calculate system charge adjustment based on line length and factory charge.
Instructions for reattaching the cabinet and grille, ensuring all screws are tightened.
Steps to perform before starting the unit, including removing obstructions and verifying level.
Instructions for operating the unit using the unit-mounted controller, including mode selection and configuration.
Setup instructions for operating the unit using a remote thermostat, including configuration settings.
Details the functions of individual and combined button presses on the unit-mounted controller keypad.
Describes the functions of buttons on the infrared remote control for unit operation.
Setting to select between Fahrenheit (°F) and Celsius (°C) for temperature display and operation.
Enables or disables the use of a remote thermostat, switching control between unit and external thermostat.
Configures the unit to recognize an electric heater or heat pump for heating operations.
Enables heat pump operation when the unit is connected to an appropriate compressor unit.
Sets the temperature dead band for automatic changeover between heating and cooling modes.
Sets the time interval for the FILTER CHECK warning to appear, indicating filter cleaning is needed.
Configures periodic fan cycling for accurate room temperature sampling, minimizing stratification.
Activates or deactivates audible beeps confirming controller commands and button presses.
Sets the LCD backlight to always on, off, or intermittent for visibility and power saving.
Enables quicker operational testing by setting all timers to zero, with caution against rapid compressor cycling.
Allows setting temperature and time schedules for different periods of the day and week.
Sets the default temperature for auto changeover mode within the 7-day programming schedule.
A three-minute delay is enforced before compressor or electric heat energizes to prevent short cycling.
Emphasizes configuring the controller with 'Remote Thermostat OFF' for unit-mounted operation.
Explains how to turn the unit on or off and what the LCD displays in each mode.
Details how to select operating modes like Cool, Heat, Auto Changeover, Dry, or Fan using the MODE button.
Explains how the FAN button controls fan speed and modes, including specific behavior in Dry mode.
Describes High, Low, and Auto fan speed settings and how Auto mode adjusts speed based on temperature.
Explains how room air sampling, when enabled, circulates air for accurate temperature readings and stratification prevention.
Detailed steps for operating the unit in COOL mode, including setpoint adjustment and compressor control.
Instructions for operating the unit with optional electric heat, requiring specific configuration and mode selection.
Details operation for heat pump systems with electric heat, enabling two-stage heating based on temperature.
Instructions for operating in DRY mode, which uses cooling and electric heat to remove humidity.
Explains how Auto Changeover (ACO) mode automatically selects heating or cooling based on temperature and settings.
Describes manual mode where user selects temperature, mode, and fan speed, which do not change over time.
Explains how to enter and utilize pre-programmed schedules for automatic temperature and mode changes.
Details how room air sampling minimizes stratification by circulating air during idle periods for accurate temperature sensing.
A three-minute delay is enforced before compressor or electric heat energizes to prevent short cycling.
Emphasizes configuring the controller with 'Remote Thermostat ON' for remote thermostat operation.
Provides guidance on selecting EMI or field-supplied thermostats based on system type (cooling, heat pump, electric heat).
Specifies the required terminals (R, Y, G, C) for thermostats used with cooling-only systems.
Specifies the required terminals (R, Y, W, G, C) for thermostats used with cooling and electric heat systems.
Specifies the required terminals (R, Y, O, W, G, C) for thermostats used with heat pump and electric heat systems.
Explains how the remote thermostat controls the indoor fan speed and operation (AUTO/ON).
Details how the wall thermostat controls cooling operation, including setpoint adjustment and unit response.
Instructions for operating electric heat via remote thermostat, including configuration and setpoint adjustments.
Details operation of two-stage heat pump with electric heat using a remote thermostat, including setpoint control.
Explains the anti-short-cycle timer feature that protects the compressor from rapid restarts after cycling off.
Describes the staggered start feature that prevents simultaneous starting of compressor and electric heater in certain modes.
Ensures the compressor or heat source runs for a minimum of two minutes to prevent premature cycling.
Details the selectable settings for the LCD backlight (Off, On, Intermittent) for visibility.
Monitors condensate levels, signaling the control unit to switch off the condensing unit if a critical level is reached.
Provides audible feedback via beeps to confirm received commands from the microprocessor.
Retains all settings, including operation mode, during power failures and restores them after power restoration.
Indicates a disconnected, damaged, or malfunctioning room air sensor; operation continues with last known value.
Signals a condensate fault from pumps or drain pan sensors; compressor switches off until condition is corrected.
Indicates a freeze condition detected by the indoor coil sensor; compressor switches off until corrected.
Instructions for cleaning the unit's air filter monthly or when visibly dirty to maintain airflow and efficiency.
Guidance on referencing the unit's wiring diagram for troubleshooting indoor unit issues.
Details on air handler and condenser connection requirements, including electrical service panel and 24V interconnect wiring.
Steps to check the rating plate for proper voltage and breaker size, and verify incoming power supply with a voltmeter.
Explains how to use Test Mode for functional checks, noting timers are shortened and cautioning against compressor short cycling.
Details low voltage interconnect wiring for cooling-only units and checking 24V signals.
Refers to specific figures for unit-mounted and remote thermostat applications for interconnect wiring checks.
Procedures for checking 24V transformer output and signals across various terminals using a voltmeter.
Information on control relays, limit switches, and fuse links for electric heat systems.
Details low voltage wiring for heat pump/electric heat systems and checking 24V signals for cooling and heating stages.
How to check for a condenser cooling signal by measuring 24V across Y and C wires.
How to check for a condenser heating signal (Y) and electric heat energization for two-stage heating.
Information on condensate pump operation, maximum lift, float switch function, and safety switch interruption.
Addresses issues with no display or unit operation when mixing EMI indoor units with non-EMI condensers, focusing on transformer requirements.
Troubleshooting steps for a condenser not starting, including checking setpoints, voltage, and high-pressure switch reset.
Troubleshooting for a blank display, involving power supply checks, wire inspection, and potential circuit board replacement.
Confirms that slight flickering of the display is normal and may vary with room lighting.
Explains fan run times in cooling/heating with auto fan mode, including speed adjustments and post-cycle operation.
Discusses common causes of indoor unit freeze-up, including sensor placement, air filter condition, coil cleanliness, and refrigerant charge.
Provides instructions on accessing all infrared remote functions via the unit-mounted control keypad.
Notice regarding potential changes in designs, specifications, and performance without prior notification.
Instructions for completing the performance data sheet, emphasizing readiness for technical support calls.
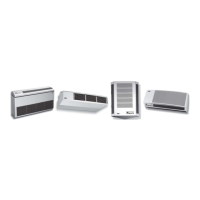
Illustrations and names of EMI's indoor air handler units, including UNCG/UNHG, WLCG/WLHG, and CACG/CAHG.
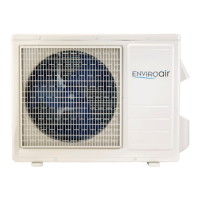
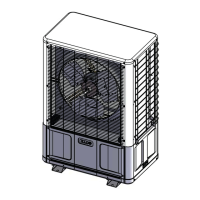
Illustrations and names of EMI's outdoor condenser units, including S1CG/S1HG and T2CG/T3CG/T4CG series.
| Brand | EMI |
|---|---|
| Model | UNHG09 |
| Category | Air Conditioner |
| Language | English |