6
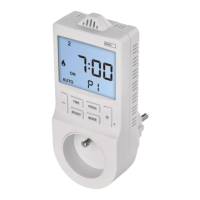
The year will start ashing. Use the + and – buttons to set the current
year and press TIME to conrm.
The hour will start ashing. Use the + and – buttons to set the current
hour and press TIME to conrm.
The minute will start ashing. Use the + and – buttons to set the
current minute and press TIME to conrm.
Wait 30 seconds or press MODE to save the setting and return to
the main screen.
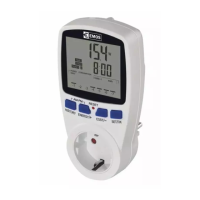
Table of Factory Preset Programmes
(Max. 6 Temperature Changes a Day)
Time Temperature
Monday–Sunday P1 6:00 20 °C
Monday–Friday P2 8:00 15 °C
Mon/Tue/Wed/Thu/Fri P3 12:00 15 °C
P4 14:00 15 °C
P5 17:00 21 °C
P6 22:00 15 °C
Time Temperature
Saturday–Sunday P1 7:30 20 °C
P2 9:30 20 °C
Sat/Sun P3 11:30 20 °C
P4 13:30 20 °C
P5 16:30 21 °C
P6 22:30 15 °C
Setting Programmes – Automatic Mode
If the factory preset programmes do not suit your needs, you can
adjust their timing and temperatures.
The day can be divided into a maximum of 6 time periods = 6 tem-
perature changes.
1. Press the PROG button; the day number will begin ashing.
1 to 7 = Monday to Sunday.
2. Use the + and – buttons to select the days:
individual days in the week/workdays – 1, 2, 3, 4, 5/weekend – 6,
7/whole week – 1, 2, 3, 4, 5, 6, 7.
3. Conrm by pressing TIME; the time value will start ashing and
P1 will appear on the screen (indicating the 1st temperature
change in the day).
4. Use the + and – buttons to set the time (1 minute resolution)
when the 1st temperature change should start and conrm
with the TIME button.
5. The temperature value will start ashing; use the + and – buttons
to set the temperature of choice and conrm with TIME.
6. The time value will start ashing and P2 will appear on the
screen (indicating the 2nd temperature change in the day).
7. Use the + and – buttons to set the time when the 2nd tempe-
rature change should start and conrm with the TIME button.
 Loading...