5
The connected heating appliance should be at a sucient distance
from the socket to prevent the devices from inuencing each other.
Otherwise, the socket may activate the appliance when not needed.
Putting the Device into Operation
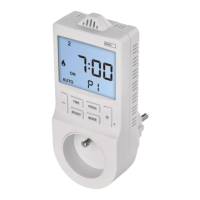
Plug the socket into a 230 V/50 Hz socket; the screen will activate.
Plug the appliance into the thermostatic socket.
Activating Thermo-Switch Socket (Thermostat) Mode
Long-press the TIME and MODE buttons at the same time to access
settings.
Repeatedly press the + and – buttons to select the mode marked
as „tHE“
.
Conrm by pressing the TIME button and continue with further
settings.
The settings below are only available when in thermostat mode!
Heating or Cooling Mode
Long-press the TIME and MODE buttons at the same time and then
press the TIME button 1×.
Use the + and – buttons to choose between heating
or
cooling
mode.
Conrm by pressing TIME; this will open:
Temperature Dierential Setting
Use the + and – buttons to set a value of 0.2 °C to 2 °C, with 0.1°C
resolution.
Conrm by pressing TIME; this will open:
Room Temperature Calibration
Use the + and – buttons to set a value of -3 °C to +3 °C, with 0.5 °C
resolution.
Wait 30 seconds or press MODE to save the setting and return to
the main screen.
Explanation of functions:
Temperature Dierential Setting
The temperature dierential (hysteresis) is the dierence in tempe-
rature required for switching the system on and o.
If, for example, you set the temperature in heating mode to 20 °C
and dierential to 0.2 °C, the thermostat activates heating as soon
as room temperature drops to 19.8 °C and switches heating o when
temperature reaches 20.2 °C.
Room Temperature Calibration
The temperature sensor in the thermostat is calibrated from producti-
on, but additional calibration can be done to optimise the thermostat
further, for instance by comparing the measured room temperature
with a reference thermometer.
Setting Day and Time
Press the TIME button; the day number will begin ashing.
Use the + and – buttons to set the current day and press TIME to
conrm.
The month number will start ashing. Use the + and – buttons to set
the current month and press TIME to conrm.
 Loading...