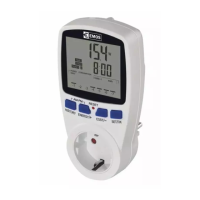
9
7. The time value will start ashing and P2 – ON (activation of the
2nd programme) will appear on the screen.
8. Repeat this process for the other programmes.
To end setting, wait 1 minute or press the MODE button.
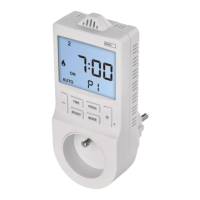
While a program is on, the screen will display AUTO ON.
While a program is o, the screen will display AUTO OFF.
Note: If you wish to delete a set programme, long-press the TIME
button when the time is ashing.
Move forward in settings by pressing the TIME button; pressing the
PROG navigates one step back in settings.
BOOST Mode (Countdown)
The countdown function enables turning o an appliance after
a preset time.
Press the BOOST button repeatedly to choose the time frame (30min
to 9 hours, 30 min resolution).
The countdown from the set time will start automatically.
The time remaining will be ashing on the screen alongside the mode
icon (
or ) and clock.
Once the set time elapses, the system will automatically switch to
the previous mode.
To end the BOOST function prematurely, use the MODE button to
select a dierent mode or press the BOOST button repeatedly until
the time setting reaches 9 hours; the next press then deactivates
the BOOST function.
Note: The BOOST function cannot be used in manual mode (ON).
Manual Mode (ON)
Press the MODE button repeatedly until ON and the mode icon (
or
) appear in the left of the screen.
The socket will remain operational.
The set mode will be active until you switch to another one using
the MODE button.
OFF Mode
Press the MODE button until OFF appears on the screen.
The clock will remain on the screen but the current output from the
socket will be turned o.
To reactivate the socket, press MODE repeatedly to set the socket
to either the automatic (AUTO) or manual (ON) temperature control
mode.
Screen Illumination
Pressing any button activates screen illumination for 15 seconds.
Factory Reset
If the socket is not working properly, you can reset it to factory
settings.
Long-press the PROG button and insert e.g. a straightened paper clip
into the RESET hole; you will hear a click.
The screen will display all segments/icons; release the PROG button.
Safety Warnings
• The device is intended for use in dry, indoor environments
only. Do not expose the device to rain, snow or other extreme
conditions. Do not use the product outdoors!
• Do not overload the device.
 Loading...