11
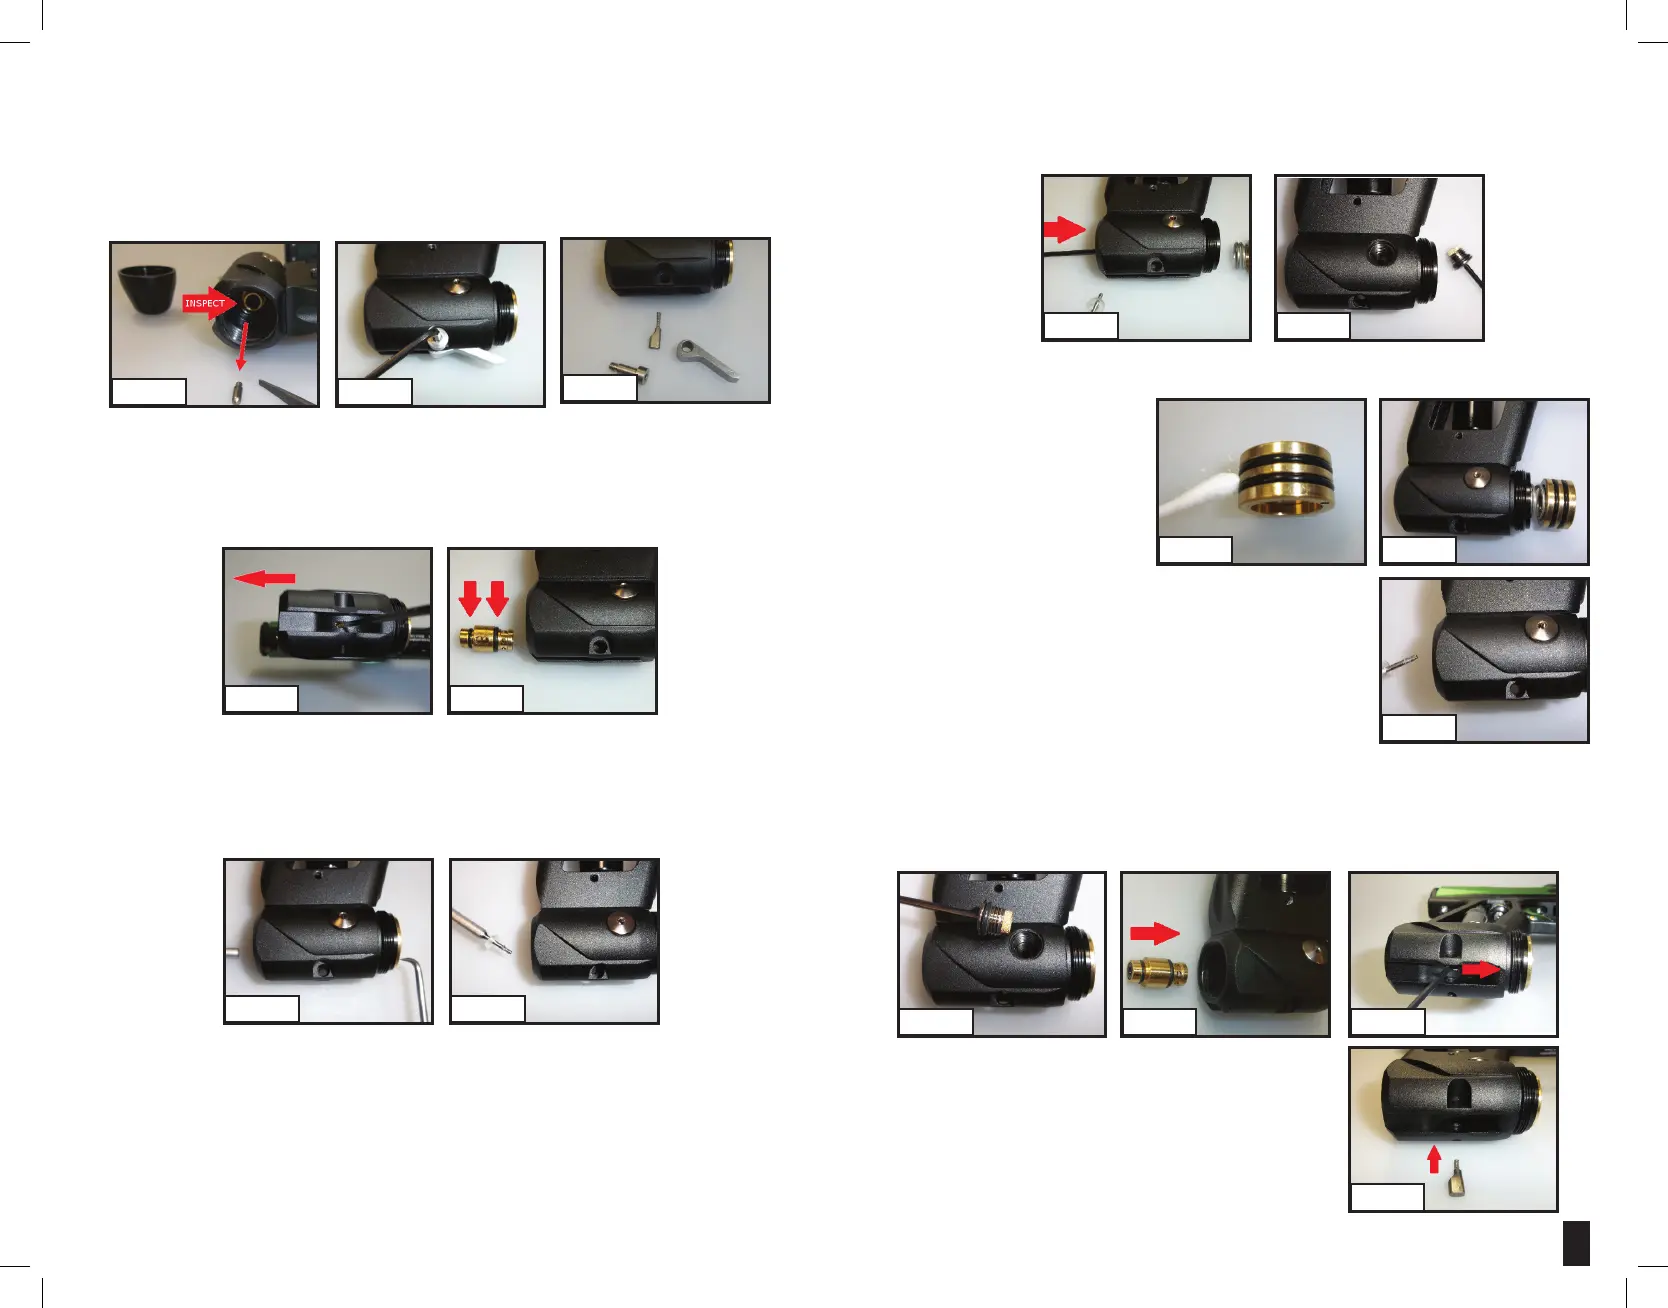
9. OncethesilverPistonandwasherisremoved,inserta3/32”hexwrenchintothetanksideofthe
RegulatortopushthesilverpistonthroughthefrontoftheRegulatorasseenin(Fig8-12)
10. Inserta3/32”hexwrenchintothesilvercaponsideofRegulatortounscrewlterretainercap.
Thelterwillfalloutontothecaponceremoved.InspecttheO-ringonltercapandreplaceif
needed.(Fig8-13)
11. ProceedtocleantheinsideoftheRegulatorandtheremovedpartswithacleanclothorcottonswab.
REASSEMBLY
1. Onceclean,applyaliberalamount
of Dow 33 or equivalent grease to
thetwoO-ringsonthebrassPiston
asshownin(Fig8-14,)makingsure
tollthegroovesthattheO-ringssit
in with grease.
2. Placethesecondaryspringintothe
deeper side of the brass piston and insert the assembly into the
frontoftheRegulator(Fig8-15).
3. Placethesilverpistonintothe3mmnutdriverandthewasheronto
the silver piston with the curved side of the washer facing the head
ofthepiston(Fig8-16).Inserttheassemblyintothetanksideof
Regulator and screw silver piston into brass piston until snug. DO
NOTOVERTIGHTENthesilverpiston.Onlytightenuntilturning
silver piston spins brass piston as well.
4. Placelterinltercapandscrewtheassemblyintolterareausing3/32hexwrench(Fig8-17).
5. Insertpin/sealretainerinorientationshownin(Fig8-18)intotanksideofRegulatorensuringoval
slot in the pin/seal retainer is lined up with bottom slot on Regulator.
6. Insertthe3/32”hexwrenchintobottomslotofRegulatorandpushthePin/SealRetainertowards
frontofRegulatoruntiltheslotontheRegulatorlinesupwiththeslotonthesealretainer(Fig8-19).
7. InsertthePinDepressionRampandSpringbackintothe
bottom of Regulator with the ramp facing toward tank side of
Regulator(Fig8-20).Therampshouldfallintoplaceeasily
andifnot,ensuretheslotsontheRegulatorandPin/Seal
Retainer line up on all sides.
4. UseapairofplierstoremovethetankdepressionpinfromthePin/SealRetainerinthetankside
oftheRegulator.Besuretograbthepinbyitssmallersection,nearthetip.InspectO-ringonthe
insideofthepinretainerandreplaceifnecessary(Fig8-5).
5. Usea3/32”hexwrenchtounscrewtheLeverRetainingScrew(Fig8-6).TheLeverisunder
spring pressure, so you may have to push the Lever down slightly to remove the screw. Once the
screwisremoved,theLeverwillfalloutandthePinDepressionRampwithSpringwillfallfromthe
bottomoftheRegulator(Fig8-7).
6. Insertthe3/32”hexwrenchintothebottomoftheRegulatorwherethePinDepressionRampwas
removedfrom.UsethehexwrenchtounseatthePin/SealRetainerbypushingittowardsthetank
side(rear)oftheRegulator(Fig8-8).Onceunseated,removethehexwrenchandturnthetank
sideopeningdowntoallowPin/SealRetainertofallintoyourhand.InspecttheouterO-ringsof
thepin/sealretainerfordamageandreplaceifneeded(Fig8-9).
7. Insertthe3mmnutdriverintothetanksideoftheRegulatorontothesilverPiston.Onthe
oppositesideoftheRegulator(front),placetheO-ringpickinthesmallholeonthebrasspiston
asshownin(Fig8-10)HoldthebrassPistonstationaryandunscrewthesilverPiston.Oncefully
unscrewed, turn the tank opening side down and allow the washer and silver piston to come out
onthe3mmnutdriverasshownin(Fig8-11).
8. IfthePistonandwasherdon’tfallouteasily,useplierstograbthePistonbytheheadandliftit
from the Regulator body. Then use an O-ring pick to loosen the washer, carefully, while not
damagingthewasher.Notethewasherissemi-transparentandmaybehardtosee.Ifthewasher
isdamagedortheRegulatorwashavingoverpressurizationproblemsthewashershouldbe
replaced.
(FIG. 8-7)
(FIG. 8-10)
(FIG. 8-13)
(FIG. 8-14) (FIG. 8-15)
(FIG. 8-5)
(FIG. 8-8)
(FIG. 8-11)
(FIG. 8-6)
(FIG. 8-9)
(FIG. 8-12)
(FIG. 8-16)
(FIG. 8-17) (FIG. 8-18) (FIG. 8-19)
(FIG. 8-20)
 Loading...