10
REMOVAL OF REGULATOR
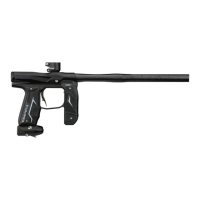
- Remove the four screws that hold the rear
GriptotheGripFrameusinga5/64”hex
wrench.
- Remove the Air Transfer tube by unscrewing
itcounter-clockwise.Becarefulnottolosethe
female Air Transfer Tube bottom O-ring, which
sits on the bottom of the tube.
- Loosen the two Regulator Mount screws
locatedontheinsideoftheGripFrame
(oneachsideofthetransfertube)witha3/32”hexwrenchbyturningthemcounterclockwise.(Fig7-11)
- TheRegulatorcannowbeslidforwardandofftheGripFrame.
INSTALLATION OF REGULATOR ASSEMBLY
- SlideRegulatoralongtheT-railoftheGripFrame,orientatedfortheASAopeningisfacingtherear
of the marker.
- InstallthetwoRegulatorMountscrewslocatedontheinsideoftheGripFrame(oneachsideof
thetransfertube)witha3/32”hexwrenchbyturningthemclockwise.Donotovertighten.
- Make sure the female Air Transfer Tube O-ring is on the bottom of the Air Tube, add grease if
necessary.
- InstalltheAirTransfertubebescrewingitclockwise.DoNOTtorque,handtightenonly.
- InstallthefourscrewsthatholdtherearGriptotheGripFrameusinga5/64”hexwrench.
REMOVAL OF AIR TRANSFER PLATE
- RemovetheForegripandGripFrameusinginstructionsshownearlierinthismanual.
- CarefullyunplugthesolenoidfromtheSensorboard.
- RemovethemaleAirTransferTubeassemblyfromtheAirTransferPlatebyunscrewingitcounter
clockwise.(Fig7-12)
- RemovetheSolenoidfromtheAirTransferPlatebyunscrewingitcounter-clockwise.(Fig7-13)
- Usinga3/32”hexwrench,removealloftheAirTransferPlatescrews(7total).(Fig7-14)
- OncethescrewsareremovedtheAirTransferPlatewillthenliftoff.
Note: Be careful not to lose the Check Valve (air restrictor). The Check Valve is a small plastic piece located between the Body and air
transfer plate.
INSTALLATION OF AIR TRANSFER PLATE
- ItisrecommendedthatasmallamountofEmpiremarkergreaseorpaintballmarkerspecic
greaseisappliedtotheAirTransferGasketbeforetheAirTransferPlateisreattached.
- AlsomakesuretheCheckValveisintheBody,asseeninthepictureabove.
- PlaceTransferPlatebackonBodyandevenlytightenall7screwsusinga3/32”hexwrench.
- ScrewtheSolenoidintotheAirTransferPlate,tighteninginaclockwisedirection.
- Repeat with the male Air Transfer Tube
- PlugtheSolenoidbackintothesensorboard.
REMOVAL AND CLEANING OF SENSOR BOARD
- RemoveForegrip,GripFrame,andAirTransferPlateasdescribedinthestepsabove.
- GentlyremovetheSensorBoardfromtheBody,usingcautiontopreventbendingtheEyes.
- Once the board is removed, use a dry cloth to clean the Eye sensors.
- Ifpaintisontheboard,useadryclothtowipepaintofftheboard.
- Rubbing alcohol may be used if deep cleaning is needed. Do not use water on any electronics.
INSTALLATION OF SENSOR BOARD
- WheninstallingboardbackinmainBody,becarefulthatthesensorslineupcorrectly.
- TheboardshoulddropintotheBodyveryeasily.DoNOTforcetheSensorBoardintotheBody.
- Onceinplace,installtheAirTransferPlateandothercomponentsasdescribedinthismanual.
8. EMPIRE REGULATOR SERVICE GUIDE
WARNING: Remember to remove all gas and ensure marker is discharged before servicing Regulator.
WARNING: The following service should be performed by an experienced user. If you are not comfortable
performing the steps below, please contact Empire customer service at www.paintballsolutions.com
ForASA/Regulatorserviceyouwillneedthefollowingtools:3/32”hexwrench,needlenosepliers,
O-ringpick,1/2insocketornutdriver,3mmnutdriver,Dow33typegrease
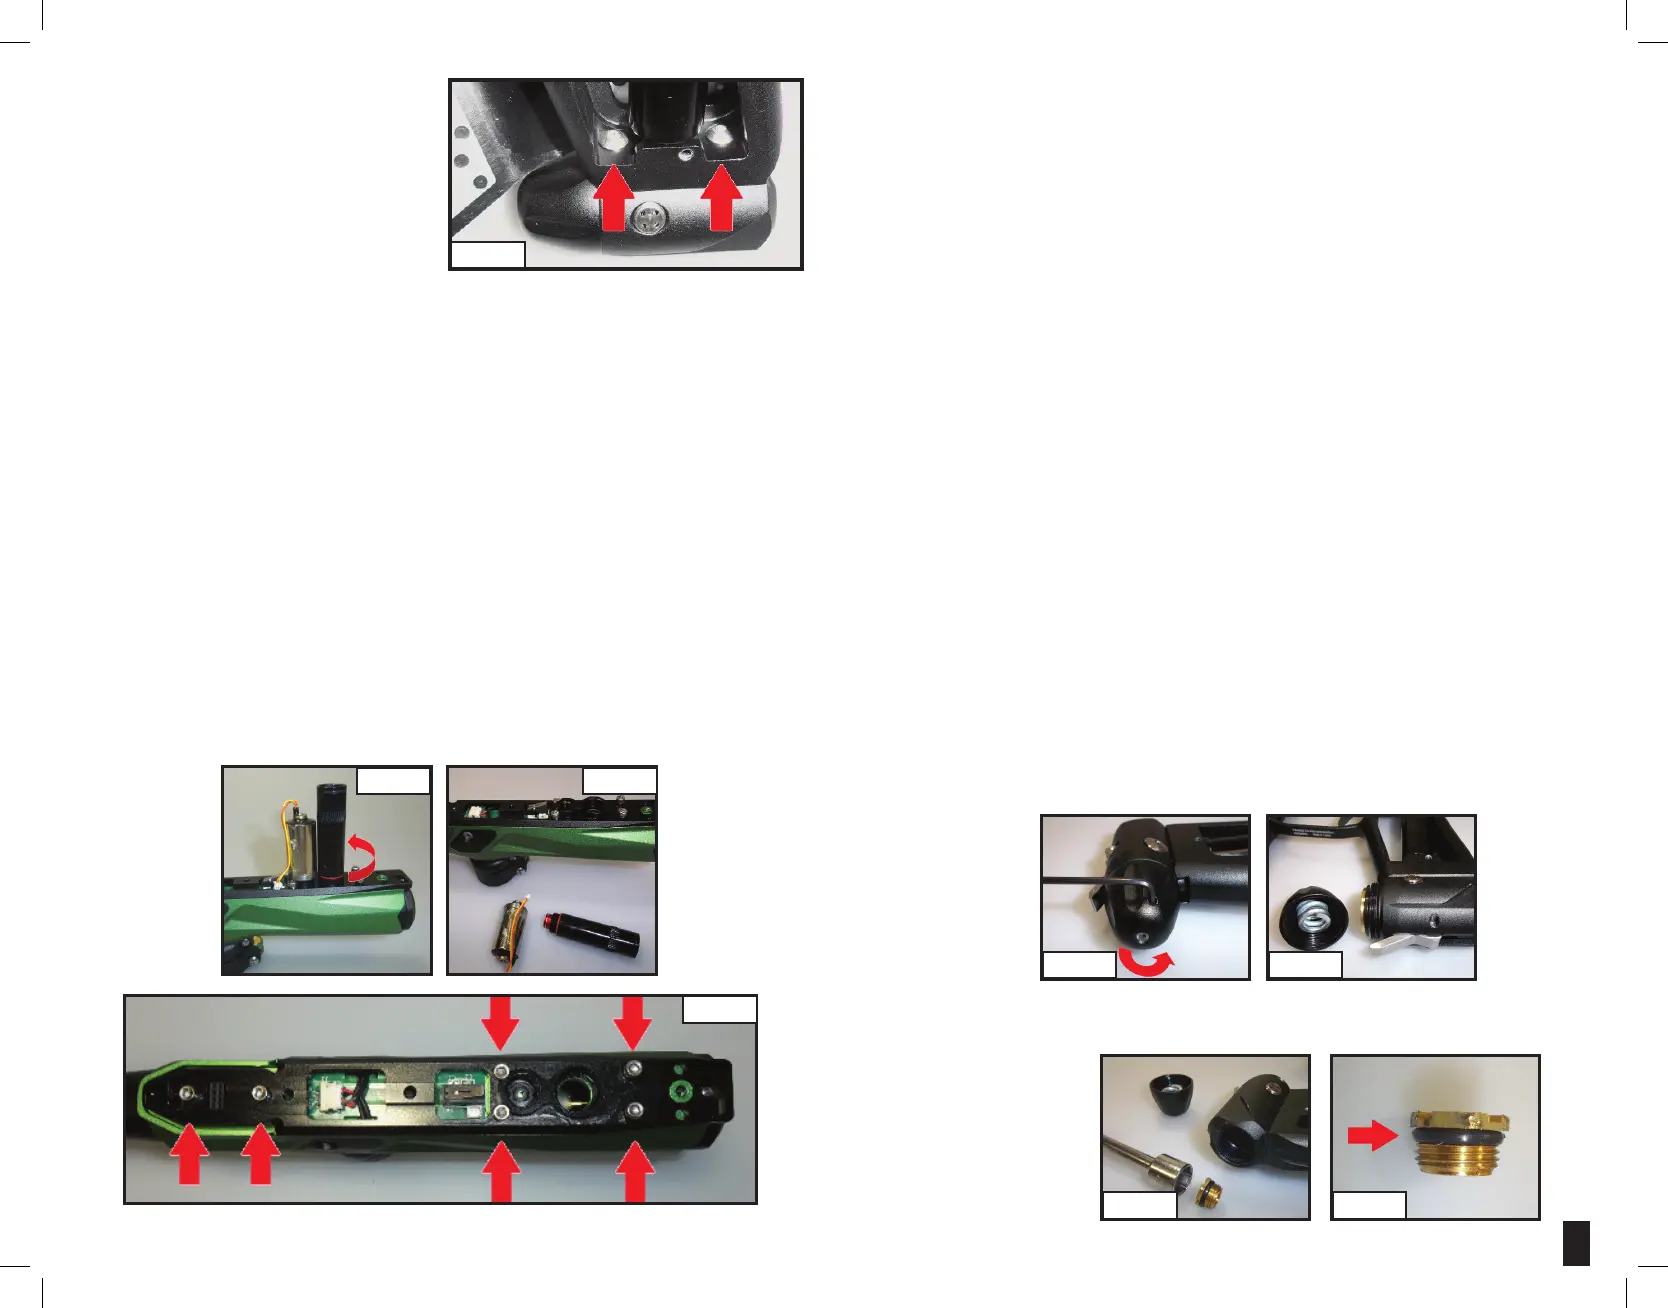
1. GrasptheRegulatorFrontCapandunscrewcounter-clockwise.Ifitdoesnotturneasily,usea
3/32hexwrenchinholeonfrontcapoftheregulatorandunscrewthefrontcap(Fig8-1).
TheMainSpringandSpringPlatewillbesittinglooseintheFrontCap.Besurenottolosethese
parts(Fig8-2).
2. FliptheOn/OffLeverforwardtoOffposition.Insertthe1/2in.hexsocketintoopensideofRegulator
andunscrewthebrassnutfromtheRegulatorinthecounter-clockwisedirection(Fig8-3).
3. InspecttheO-ringonthe
brass nut and replace if
damaged(Fig8-4)
(FIG. 7-11)
(FIG. 7-12) (FIG. 7-13)
(FIG. 7-14)
(FIG. 8-1) (FIG. 8-2)
(FIG. 8-3) (FIG. 8-4)
 Loading...