EasyManua.ls Logo

EmpireCovers Bimini Top Series - User Manual

EmpireCovers Bimini Top Series
2 pages
Print Icon
To Next Page IconTo Next Page
Loading...
Bimini Top
INSTRUCTIONS
DISCLAIMER: Failure to adhere to these instructions will void all warranty.
EmpireCovers is a Budge Industries Company.
LIMITED WARRANTY
US AND CANADA ONLY
Budge Industries, LLC. with its principle place of business at 1690 Sumneytown
Pike, Suite 250, Lansdale, PA 19446, warrants to the original purchaser that it will
correct any defects in material or workmanship by repair or replacement of this
Bimini Top, from the date of purchase.
THE EXPRESS WARRANTY SET FORTH ABOVE IS THE ONLY WARRANTY
APPLICABLE TO THE PRODUCT AND IS EXPRESSLY IN LIEU OF ANY OTHER
WARRANTY, EXPRESSED OR IMPLIED WARRANTY OF MERCHANTABILITY OF
FITNESS FOR A PARTICULAR PURPOSE.
PLEASE SAVE YOUR WARRANTY STATEMENT & RECEIPT OF PURCHASE.
BIMINI INSTRUCTIONS
1. Carefully lay out all pieces. Do NOT remove plastic on poles until bimini is complete.
Be careful, as hardware may have come loose during shipping. Do NOT apply
provided nut lock until you conrm the bimini top is put together correctly AND
mounted on boat.
2. Begin by identifying and separating all curved rib poles. All rib poles are numbered for
easy assembly. Instructions will dier at this point depending on how many bows your
bimini has (2, 3 or 4 bow).
TWO BOW BIMINI: The following curved ribs connect together: ribs 1 & 3 and ribs
2 & 4.
THREE BOW BIMINI: The following curved ribs connect together: ribs 1 & 4, ribs 2
& 5 and ribs 3 & 6.
FOUR BOW BIMINI: The following curved ribs connect together: ribs 1 & 5, ribs 2 &
6, ribs 3 & 7 and ribs 4 & 8.
3. Next, lay your bimini canvas top down on a clean surface and identify sewn in label
stating “Front. Front tag should be facing up.
4. Now feed your connected rib poles through the pockets on the canvas in the order
listed below for your size frame.
TWO BOW: Insert connected rib numbered 1/3 in the front pocket and insert
connected rib 2/4 in the rear pocket. When correctly installed numbers 1 and 2 will
be on one side and numbers 3 and 4 will be on the other.
THREE BOW: Insert connected rib numbered 3/6 in the front pocket. Insert
connected rib 2/5 in middle pocket and connected rib 1/4 in the rear pocket. When
correctly installed numbers will run 1, 2, 3 on one side and 4, 5, 6 on the other.
FOUR BOW: Insert connected rib numbered 4/8 in the front pocket. Insert
connected rib 3/7 in middle front pocket and connected rib 2/6 in middle rear
pocket. Insert connected rib 1/5 in rear pocket. When correctly installed numbers
will run 1, 2, 3, 4 on one side and 5, 6, 7, 8 on the other.
5. Assemble the remaining straight poles in the order shown in images below.
1/3 2/4 1/4 2/5 3/6 1/5 2/6 3/7 4/8
Question and Answer IconNeed help?

Do you have a question about the EmpireCovers Bimini Top Series and is the answer not in the manual?

Summary

Bimini Top Assembly and Installation

Initial Setup and Frame Assembly

Lay out pieces, identify parts, and connect curved ribs based on bow type for initial frame assembly.

Connecting Poles and Straps

Connect straight poles to ribs, add nylon brackets, and attach support poles and front straps securely.

Attaching Bimini to Boat

Position bimini, mark and drill for mounts, attach to fittings, and secure straps for a tight fit.

Overview

This document provides comprehensive instructions for assembling, installing, and maintaining an EmpireCovers Bimini Top, designed to provide shade and protection on a boat. The manual emphasizes careful handling and adherence to steps to ensure proper function and to maintain warranty validity.

Function Description

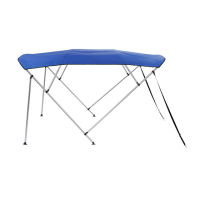
The Bimini Top serves as a protective canopy for boats, offering shade from the sun and light weather. It is designed to be a durable and functional addition, enhancing comfort during boating activities. The structure consists of a canvas top supported by a frame of curved and straight poles, which are then mounted to the boat. The design accommodates various boat sizes and configurations through different "bow" options (two, three, or four bow), allowing for a tailored fit and optimal coverage. The assembly process involves connecting numbered rib poles, feeding them through the canvas pockets, and then attaching straight support poles and mounting hardware to the boat. Once installed, the Bimini Top creates a shaded area, making boating more enjoyable by protecting occupants from direct sunlight.

Usage Features

The Bimini Top is designed for straightforward assembly and installation, with clear, step-by-step instructions.

  • Initial Setup and Identification: Users are instructed to lay out all pieces carefully and to keep plastic on the poles until assembly is complete. This prevents damage and ensures components are properly identified. The manual highlights the importance of not applying nut lock until the bimini top is fully assembled and mounted on the boat, allowing for adjustments. Curved rib poles are numbered for easy identification and connection, simplifying the frame assembly process.
  • Frame Assembly based on Bow Configuration: The instructions differentiate between two, three, and four-bow bimini tops, providing specific guidance for connecting the curved rib poles.
    • Two Bow Bimini: Ribs 1 & 3 connect, and ribs 2 & 4 connect.
    • Three Bow Bimini: Ribs 1 & 4 connect, ribs 2 & 5 connect, and ribs 3 & 6 connect.
    • Four Bow Bimini: Ribs 1 & 5 connect, ribs 2 & 6 connect, ribs 3 & 7 connect, and ribs 4 & 8 connect. This tailored approach ensures that the frame is correctly configured for the specific bimini size.
  • Canvas Integration: The bimini canvas top has a "Front" label to guide orientation. Users feed the connected rib poles through designated pockets in the canvas. The order of insertion varies by bow configuration:
    • Two Bow: Rib 1/3 in the front pocket, rib 2/4 in the rear pocket.
    • Three Bow: Rib 3/6 in the front pocket, rib 2/5 in the middle, rib 1/4 in the rear.
    • Four Bow: Rib 4/8 in the front pocket, rib 3/7 in the middle front, rib 2/6 in the middle rear, rib 1/5 in the rear. Correct installation ensures that the numbers on the ribs run sequentially on each side of the bimini.
  • Connecting Straight Poles and Brackets: Straight poles are connected to the ribs by matching numbers. Black collar brackets are slid over the ribs, positioned one inch above the screw holes, facing outward. These brackets are crucial for securing the frame. Nylon brackets are then slid onto the front and rear poles, also facing outward, before all remaining pole/rib connections are fastened with screws.
  • Attaching Support Poles and Straps: Rear support poles and front straps are attached to corresponding nylon collars. Straps are positioned at the front, and support poles at the back, secured with provided nuts and screws.
  • Boat Mounting: The manual provides detailed steps for attaching the bimini to the boat:
    1. Positioning: Open the bimini top on the boat to determine the best location, ensuring the shade is equally distributed front and back from the center deck mounts.
    2. Marking and Drilling: Mark the locations for deck mounts or side mounts. Drill 3.2mm holes and screw in the mounts.
    3. Attaching Bimini to Mounts: Attach the bimini to the deck mount fittings.
    4. Rear Arm Placement: Fold out the rear arms and mark their location on the gunwale, then repeat the drilling and mounting process.
    5. Front Strap Attachment: Attach the front straps to the stainless steel saddle fittings on the bimini.
    6. Saddle Marking and Installation: Pull out the straps and mark the position for the stainless steel saddles on the boat, then drill 3.2mm holes and screw the saddles into position.
    7. Strap Adjustment: Shorten the straps to ensure the bimini is tight, and verify all other screws and nuts are secure.
  • Drilling Precautions: The manual includes important notes regarding drilling into different materials:
    • Fiberglass: Countersink holes to prevent chipping.
    • Alloy: Use a barrier paste like "Duralac" (not supplied) to prevent corrosion. These detailed instructions ensure a secure and stable installation, maximizing the bimini's effectiveness.

Maintenance Features

The manual implicitly emphasizes maintenance through proper assembly and installation practices, which contribute to the longevity and performance of the Bimini Top.

  • Initial Care: The instruction to "Carefully lay out all pieces" and "Do NOT remove plastic on poles until bimini is complete" serves as a preventative measure, protecting components from scratches or damage during the initial unpacking and assembly phase. This careful handling minimizes wear and tear from the outset.
  • Secure Fastening: The repeated emphasis on securing all screws and nuts, and ensuring straps are tightened, is crucial for maintaining the structural integrity of the bimini. Loose connections can lead to instability, accelerated wear, and potential damage to the frame or canvas, especially during boat movement or in windy conditions. Regular checks of these fastenings are implied for ongoing maintenance.
  • Corrosion Prevention: The specific advice for drilling into alloy—to use a barrier paste like "Duralac"—is a key maintenance feature. This prevents galvanic corrosion between dissimilar metals (e.g., stainless steel screws and aluminum alloy boat surfaces), which can significantly degrade the mounting points and compromise the bimini's attachment over time. While the paste is not supplied, the instruction highlights a critical aspect of long-term material preservation.
  • Warranty Adherence: The disclaimer "Failure to adhere to these instructions will void all warranty" underscores the importance of following all steps correctly. Proper assembly and installation, as per the manual, are essential for the product to function as intended and for the warranty to remain valid. This encourages users to perform maintenance-related tasks correctly from the start.
  • Warranty Information: The "LIMITED WARRANTY US AND CANADA ONLY" section outlines the manufacturer's commitment to correcting defects in material or workmanship by repair or replacement from the date of purchase. This warranty encourages users to address any manufacturing flaws promptly, ensuring the product's quality and extending its usable life. The instruction to "SAVE YOUR WARRANTY STATEMENT & RECEIPT OF PURCHASE" is a practical maintenance tip, as these documents are necessary for any warranty claims.
  • General Care (Implied): While not explicitly detailed, the nature of a canvas product implies general care practices such as cleaning the canvas to prevent mildew and dirt buildup, and inspecting poles for signs of fatigue or damage. Proper installation, as guided by the manual, ensures the bimini is correctly tensioned, which helps prevent flapping and undue stress on the canvas and frame, thereby extending its lifespan.

By following these instructions, users can ensure their Bimini Top remains in good condition, providing reliable shade and protection for many seasons.

EmpireCovers Bimini Top Series Specifications

General IconGeneral
Storage bootIncluded
UV ProtectionYes
Water ResistanceYes
FrameStainless steel
HardwareStainless steel
StrapsAdjustable
Color OptionsMultiple
MaterialPolyester
CompatibilityVarious boat models