8 9
ROLLSROLLER ENTRY IS DELIVERD WITH MACHINE FEET AS STANDARD. FOLLOW STEP 5-6.
IF DELIVERED WITH WHEELS FOLLOW STEP 7-8.
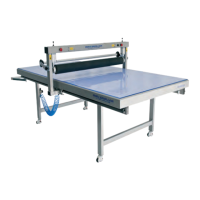
5. Place the table at it’s nal position.
7. Place the table at it’s nal position. 8. Adjust the level of the machine feet with a spanner to make sure that the table is
standing stably on the oor.
6. If needed, adjust the machine feet with a spanner (13mm.) to make sure that the
table is standing stably on the oor.
INSTALL THE
GLIDE BEAM
2. Place the Glide beam on the side of the atbed
that has no end stop mounted on the rail.
3. First remove the wrapping from the lower parts of
the beam.
4. Unpack the glide feets.
6. Connect the air hose to the beam.
7. Slide the Glide beam onto the rail.
NOTE
■ If you unpack the roller with a
box knife or scissors, take care
so you don’t damage the roller.
1. Lift out the Glide beam from the crate.
8. Fasten the end stop with a 10 mm. spanner and
attach the end cover to the rail.
FOR THIS STEP YOU WILL NEED
■ Box cutter
■ Allen key
■ Spanner
■ Tape measure
■ Pen
5. Place the Glide beam with the legs outside the
atbeds short side. Make sure that the hose foot
is placed on the same side as the regulator (see
picture 10 on page 10).