This document is an installation and operation manual for Entrée Gas Ranges with Griddles/Broilers, covering various models including R4-N, R4-P, R4-N-C, R4-P-C, R6-G12-N, R6-G12-P, R6-G12-N-C, R6-G12-P-C, R10-N, R10-P, R10-N-C, R10-P-C, R10-RGB24-N, R10-RGB24-N-C, R6-N, R6-P, R6-N-C, R6-P-C, R6-G24-N, R6-G24-P, R6-G24-N-C, R6-G24-P-C, R10-G24-N, R10-G24-P, R10-G24-N-C, R10-G24-P-C, R10-RGB24-P, and R10-RGB24-P-C. The manual emphasizes the importance of reading it thoroughly before equipment setup, operation, and maintenance to ensure proper functioning and to avoid voiding the warranty. It also highlights safety warnings regarding improper installation, adjustment, alteration, service, or maintenance, which can lead to property damage, injury, or death.
Function Description:
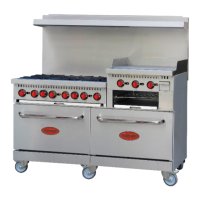
The Entrée Gas Ranges are commercial cooking equipment designed for durability and low maintenance. They are intended for indoor commercial use only and are not suitable for home or residential applications. These units feature top burners, ovens, and some models include griddles and/or broilers. The ranges are designed to provide years of reliable, trouble-free operation with proper care and field maintenance. They are equipped with adjustable feet for leveling and manual gas valves for emergency shut-off. The units operate on either natural gas or propane, with a factory-set gas pressure regulator.
Important Technical Specifications:
The manual provides detailed specifications for different models:
- R4 Models:
- Dimension: 24" W x 32.5" D x 24.75" H
- Oven Capacity: 20.5" W x 26" D x 14" H
- BTU Oven: 30,000 BTU
- BTU Burner: 4 x 30,000 BTU
- BTU Griddle: N/A
- Gas Pressure: Natural 4.0" W/C, LPG 10.0" W/C
- R6, R6-24 Models:
- Dimension: 36" W x 32.5" D x 24.75" H
- Oven Capacity: 26.75" W x 25.75" D x 14" H
- BTU Oven: 30,000 BTU
- BTU Burner: 6 x 30,000 BTU
- BTU Griddle: -12 1 x 20,000 BTU, -24 2 x 20,000 BTU
- Gas Pressure: Natural 4.0" W/C, LPG 10.0" W/C
- R10, R10-24 Models:
- Dimension: 60" W x 32.5" D x 24.75" H
- Oven Capacity: (2) 26.75" W x 25.75" D x 14" H
- BTU Oven: 30,000 BTU
- BTU Burner: 10 x 30,000 BTU
- BTU Griddle: -24 2 x 20,000 BTU
- Gas Pressure: Natural 4.0" W/C, LPG 10.0" W/C
The gas pressure regulator is factory set at 4" Water Column (WC) for Natural Gas and can be converted for Propane at 10" WC. The regulator can withstand a maximum pressure of 1½ PSI (14” WC).
Usage Features:
- Installation: The appliance must be installed by a qualified installer in accordance with all federal, state, and local codes, including National Fuel Gas Code, ANSI-Z223.1/NFPA #54, and NFPA Standard #96 for vapor removal from cooking equipment. It requires a level, solid, non-skid, non-flammable surface and proper ventilation. Non-combustible clearances are 6” sides, 6” rear, and 6” floor. A manual gas shut-off valve must be installed upstream from the manifold within four feet of the appliance.
- Operation (Top Burners):
- Connect gas supply and ignite the pilot flame with a lighter. Initial ignition may take longer due to air in new pipes.
- Turn the corresponding burner valve knob counter-clockwise to ignite the burner. The flame can be adjusted from Max (knob aligned with the round dot) to Min (counter-clockwise rotation).
- Turn off the main burner after use by rotating the knob clockwise to the origin position.
- Turn off all burner valves when not in use.
- Operation (Griddle):
- Ensure the griddle is level and the catch tray is properly placed.
- The pilot light is factory set. Ensure all knobs are in the "OFF" position.
- Close the main gas valve for five minutes to clear existing gas before lighting pilots.
- Turn "ON" or "OPEN" the main gas valve.
- Light pilots with an ignition source (match) through the holes in the front panel.
- Turn each burner knob "ON." If burners don't ignite promptly, turn knobs "OFF" and adjust the pilot valve screw counter-clockwise with a screwdriver to increase flame height.
- Seasoning the Griddle: Start with a clean griddle. Pour about one ounce of high-quality cooking oil per square foot, spread it evenly. Turn griddle to lowest flame/setting and heat for approximately 30 minutes, spreading oil to prevent drying. Repeat 2-3 times, gradually increasing flame height until a slick, mirror-like surface is achieved (1.5-2 hours). Seasoning must be repeated after cleaning with soap and water.
- Preheating: Turn burners on 15-20 minutes before cooking. Set knobs to desired flame height. Manually operated griddles require manual temperature adjustment.
- Operation (Oven):
- Clean the oven and range thoroughly before first use, removing all packing materials and film.
- Burn Off Period: Expect an unpleasant odor and smoke during first use (not gas leakage). Set temperature to 450°F and heat until smell and smoke are gone.
- Ignition: Open the kick plate below the door, press down the knob, rotate counter-clockwise to the ignition symbol, and press down. Ignite the pilot flame with a lighter via the ignition hole.
- Hold the knob for more than 20 seconds after pilot ignition to heat the thermocouple. Repeat if ignition fails.
- By-Pass Setting: With the oven cold, turn the dial to 300°F, observe burner flame for 5 minutes. Turn to lowest setting; a small, stable flame (approx. 1/8" high) should be present. If not, adjust the by-pass screw on the oven thermostat at the six o'clock position.
- Rotate the temperature control knob counter-clockwise to ignite the main burner. Oven temperature can be controlled between 250°F and 550°F.
Maintenance Features:
- Daily Cleaning:
- Turn off the range and gas valve upstream before cleaning.
- Clean burners and crumb tray regularly.
- Clean stainless steel surfaces daily with warm soap-suds, rinse completely, and dry with a clean cloth. Do not spray directly with water, especially when hot.
- Do not use abrasive detergents, brushes, scrapers, chlorine cleansers, or corrosive substances (e.g., KCL) on stainless steel. Scrub with the grain.
- Clean dirt on burners and baffle regularly.
- Clean the griddle surface with a grill pad or metal spatula. Rub with the grain of the metal while warm. Use mild soap if needed, rinse thoroughly, and wipe with a damp cloth. Cover with a thin film of oil to prevent rusting.
- Remove and discard waste, grease, debris, and crumbs from the catch tray as needed.
- Routine Inspection:
- Check the range daily for tilt or control panel damage.
- During use, check for strange smells, vibration noise, abnormal burner flame (flashback or lifting flames).
- If any gas leakage is found, immediately turn off the gas valve, open windows for ventilation, and do not operate electrical switches. Contact professional personnel for maintenance.
- Troubleshooting Guide: Provides solutions for common issues such as pilot flame not igniting (gas pressure, blocked nozzle, loose/defective thermocouple, malfunctioning gas control valve), main burner not igniting (gas pressure, blocked orifice, defective gas control valve), "Pop" sound when gas supply is turned off (incorrect orifice size, improper air shutter adjustment, low gas pressure, incorrect gas supply connection size), and yellow tips/black soot on burners (incorrect orifice size, improper air shutter adjustment, low gas pressure, low gas volume).
- Long-Term Storage: If not using the device for an extended period, turn off all gas valves and clean the stainless steel surface with a stainless steel cleanser and soft cloth.
- Recycling: 90% of the device is made of recyclable metals (stainless steel, iron, aluminum, galvanized metal sheet) and should be recycled by an appointed treatment plant according to environmental standards.
- All new Entrée Gas Cooking Equipment is warranted for one (1) year from the date of original purchase or 20 months after shipment from the manufacturer (whichever comes first) for defects in material and workmanship under normal use and service.
- Mobile kitchens/trailers have a 30-day limited warranty.
- Warranty covers repair and replacement, including labor charges for defective parts/assemblies. Labor, travel, and mileage are covered for the first year within 100 miles roundtrip.
- Warranty is limited to original installation in the United States or Canada and is not transferable.
- Installation must comply with local and national codes and the owner's/installer's manual.
- Warranty is void if equipment is mishandled, abused, misapplied, misused, subjected to harsh chemical action, external causes (gas fluctuations, flood, fire, acts of God), field modified without approval, improperly installed/maintained, or has altered/missing serial numbers.
- Warranty applies only to defects in parts and workmanship, not damage from shipping, handling, or excessive incoming gas pressure.
- Unauthorized changes, alterations, modifications, or repairs void the warranty.
- Adjustments like calibrations, leveling, tightening fasteners, pipe unions, or utility connections are the installer's responsibility. Regular maintenance and cleaning are the customer's responsibility.
- Entrée covers normal labor charges within 50 miles of an authorized service agent. Overtime, premium labor, and travel charges over 100 miles are not covered.
- Replacement parts are warranted for 90 days from the invoice date for parts cost only.
- The warranty provides the exclusive remedy against Entrée and limits liability to repair or replacement of defective parts.
- Entrée is not responsible for economic loss, profit loss, special, indirect, or consequential damages, or losses from food/product spoilage.
- Warranty is not transferable.
- Entrée assumes no liability for improper usage, installation, or failure to clean/maintain the product.
- Entrée is not responsible for the cost to move the unit for warranty repair.
- Residential applications are not covered.
- Entrée is not responsible for damage due to alteration, neglect, abuse, misuse, accident, damage during transit/installation, fire, flood, or acts of God.
- Entrée is not responsible for failures resulting from incorrect gas pressure or type.
- There are no other warranties, expressed, implied, or statutory, except the one (1) year parts & labor warranty.
- Warranty does not apply to products sold or used outside the United States and Canada.
- For warranty service, call (704) 900 2068.