© EnvisionTEC Page 2 of 3
TS-OPI-PWA-2000-V20200219-FN-EN.pdf
When ready to begin a cleaning cycle add the cleaning agent in the
following manner -
1 Open the washing compartment lid, Fig. 1
2 Lift the handle to raise the interior grate to the highest position,
Fig. 2
3 Pour the 99% IPA or the dilluted PC1 into the washing
compartment to just below the grate while it is in the lifted position.
This ensures you will not have to reach into the cleaning agent
when retrieving models after washing
4 Close the washing compartment lid and lock in place
Programs and Features
The PWA 2000 has a microprocessor-controlled touch screen interface
and intuitive software that allows you to control every aspect of the
washing process of your 3D printed models.
Set program
Once the PWA 2000 is powered on, it
automatically switches to the Set Program
menu. The three washing options are
accessible from this screen -
High, Medium, and Low
High Program
The High program is a strong washing
program designed for sturdy models and
materials
Medium Program
The Medium program is a standard washing program designed for
standard models and materials
Low Program
The Low program is a slow washing program designed for very
delicate models and materials
Setting a Program
1 Once the High, Medium, or Low program
is selected, the Set Timer menu is displayed
2 Using the Plus and Minus symbols
towards the bottom of the Set Timer menu,
adjust the time to the desired setting. Each
digit will need to be selected and adjusted
individually
3 Open the washing compartment lid. Lift
the handle to raise the interior grate to the
highest position, Fig. 2. Place the model(s)
on the grate and gently lower the handle to
submerge the model(s) in the cleaning agent. Close the washing
compartment lid and lock in place
4 When ready, select the Start button. The PWA 2000 will
immediately beginning the set washing cycle
5 Open the washing compartment lid and lift the handle to raise the
model(s) out of the cleaning agent. Inspect the model(s) and use
a brush to gently clean cavities as needed. Remove the model(s)
from the washing compartment
6 If using PC1 - rinse models thoroughly in water for 30
seconds. A tub of water or a sink can be used for this step. After
rinsing, use compressed air to quickly dry the models
7 If using IPA - use compressed air to remove all IPA from the
surface of the model as soon as possible
Do not expose models to IPA or PC1 for an extended period of
time. For more specic post processing information on the material
used, see the Cookbook for that material. Cookbooks are available for
download in the E-Team, or by contacting technical support.
Product Setup
Complete the following steps in order to correctly unpack and assemble
the PWA 2000 -
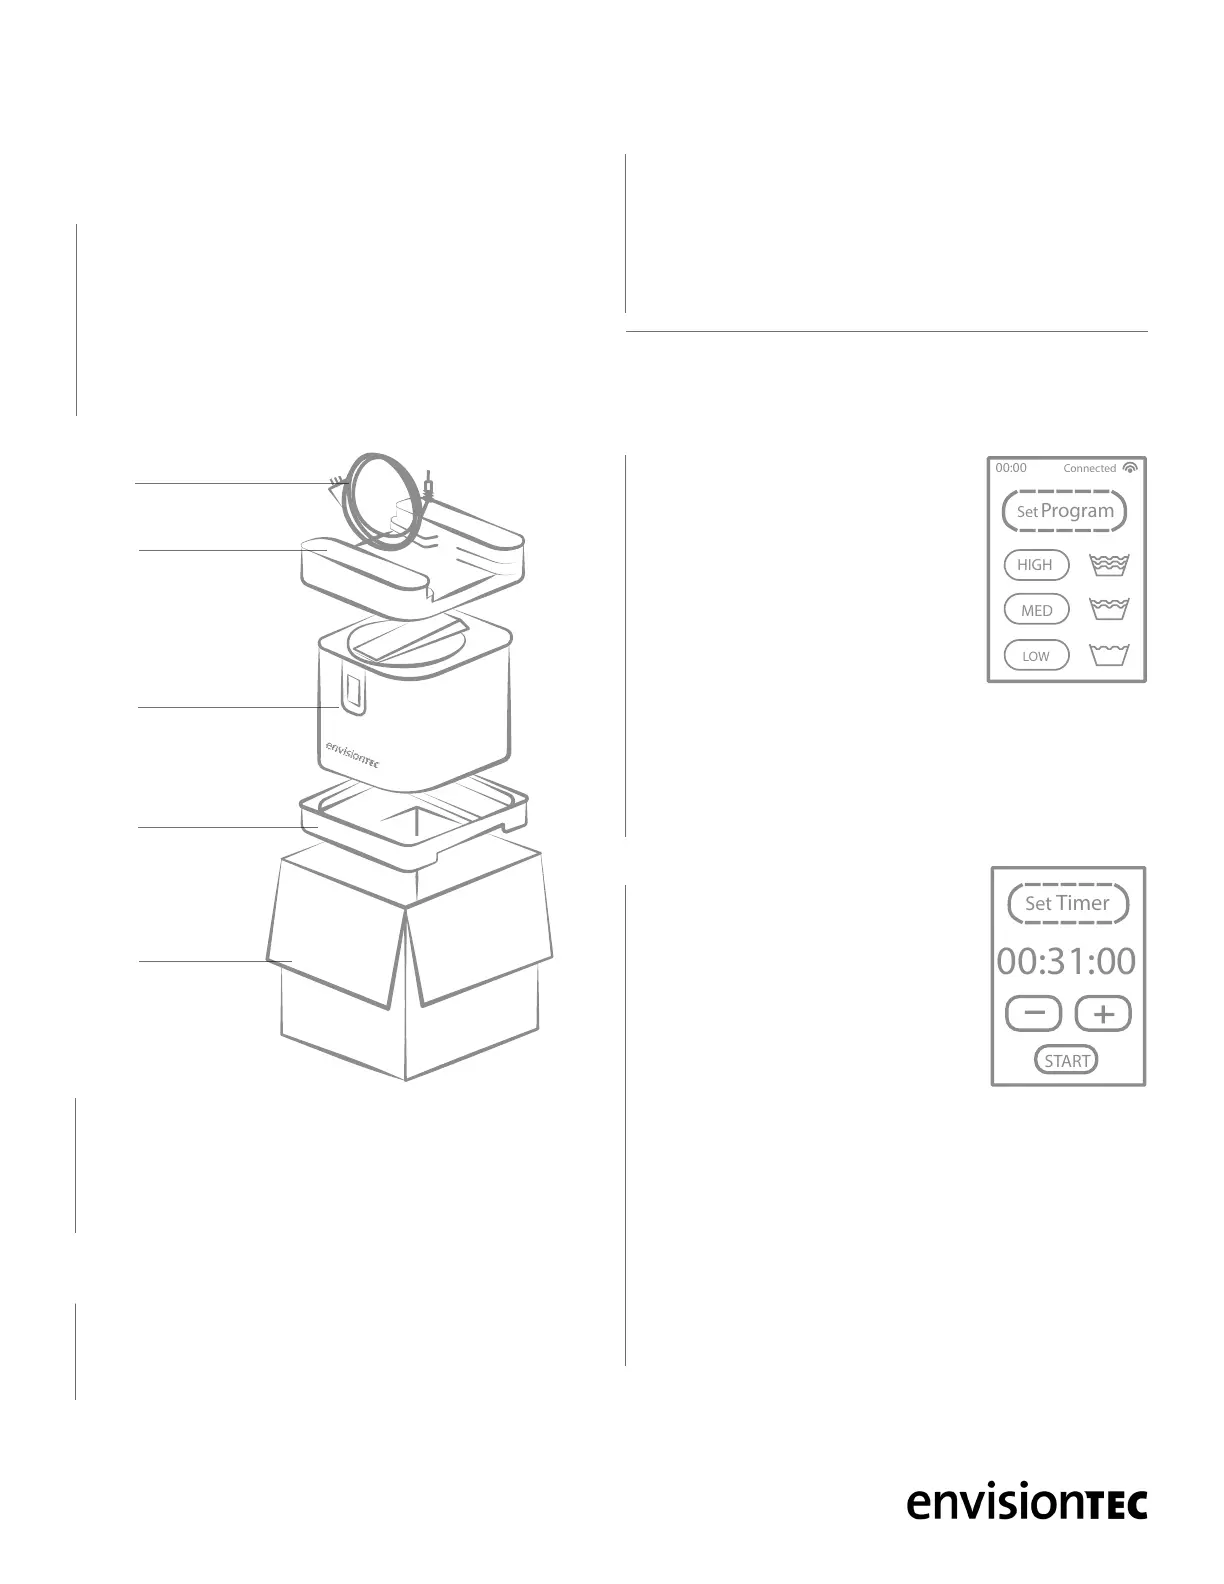
Unpacking the PWA 2000
1 Carefully open the packaging: Do not use blades that could
damage the contents
2 The PWA 2000’s power cable is packed on the top foam panel,
Fig. 3. Remove the power cable from the box and set aside
3 Extract the PWA 2000 from the box by lifting upwards
4 Remove the foam panels from the top and bottom
5 Do not throw away the box and foam panels. Keep the packaging
6 Situate the PWA 2000 on a secure surface. Place the PWA 2000
at a distance of at least 8 inches (20 cm) from any other object,
including the back wall
7 Connect the power cable to the PWA 2000 and into a power
socket US - 110V / EU - 220V with a grounding socket. A controlled
switch socket is prefered as this would allow the operator to easily
disconnect the power to the apparatus when not in use
8 Once power is connected, the PWA 2000 will display a brief start-
up screen and will then go to stand-by mode. In this mode the PWA
2000 is ready to start the required program
Adding the cleaning agent
There are two recommended cleaning agents for the PWA 2000 -
1 99% isopropyl alcohol (IPA) - See the manufacturer for use and
safety instructions
2 PC1 - A non-carcinogenic, non-hazardous, non-ammable, eco-
friendly alternative to IPA. PC1 must be diluted with water before
using in the PWA 2000. Use a ratio of 2 parts water to 1 part PC1
Do not store the cleaning agent in the PWA 2000 after use. Use the
drainage spout, Fig. 2, to pour the cleaning agent into a separate
storage container between uses.
00:00
Connected
Set
Program
HIGH
MED
LOW
PWA
2000
Foam
panel
Foam
panel
Box
Power
cable
PWA 2000 UNPACKINGFig. 3
 Loading...