Do you have a question about the epiphan video Epiphan Pearl-2 and is the answer not in the manual?
Learn about your Pearl device and get familiar with its connectors and features.
Step-by-step procedures to quickly connect a video source, audio, and start recording.
Detailed technical specifications, AV inputs, optimizing performance, and international character support.
Lists features and updates introduced in specific firmware releases.
Defines Pearl-2 as a versatile live video production device that acts as an encoder, streamer, switcher, and recorder.
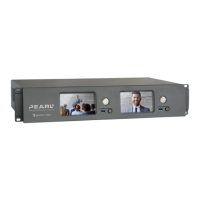
Details the physical connectors and features on the front and back panels of the Pearl-2 unit.
Explains how to use the 3.5 mm headphone jack for audio monitoring and adjust volume levels.
Details Pearl-2 and Pearl Nano support for 4K resolutions and the required feature add-on.
Step-by-step instructions for the initial setup of the Pearl device, including connecting sources and power.
Lists the supported AV inputs for Pearl-2, including SDI, HDMI, USB, and RJ-45 connections.
Provides detailed technical specifications for Pearl-2, covering video inputs, outputs, codecs, and processing.
Discusses factors affecting CPU load and provides recommendations for maintaining system performance.
Explains how to use the touch screen for switching layouts, controlling recording/streaming, and configuring settings.
A web-based interface for system setup and administrative tasks, accessible via browser or local console.
A web-based interface for confidence monitoring, statistics, live switching, and recording control.
Describes the Admin panel as a web-based UI for system setup and administrative tasks.
Instructions on how to access the Admin panel using a web browser or local console.
Explains how to connect a mouse, keyboard, and monitor directly to the Pearl device for local access.
The initial page in Epiphan Live, providing tools for confidence monitoring, streaming, and recording control.
Instructions for accessing Epiphan Live via web browser on Windows, Mac, Linux, Android, or iOS devices.
Explains how to customize dashboard panels to display specific channels, sources, or system information.
Guides users on monitoring video and audio inputs via the Dashboard, including understanding status indicators.
Details how to view and select video sources for output ports and manage audio settings via Epiphan Live.
Instructions for installing Pearl-2 models into 19-inch racks or optional rackmount shelves.
Guides users through changing network settings, including DHCP and static IP configuration.
Details how to configure 802.1x security, manage certificates, and use HTTPS for secure access.
Explains how to set date, time, and time zone, or configure a time server for synchronization.
Explains how to configure XLR ports for stereo pairs or separate mono inputs using the Admin panel.
Details how to assign audio sources to input ports, including shared resources like XLR-B and RCA.
Guides on adjusting audio gain and delay for external sources to ensure synchronization.
Explains video output port resolution, aspect ratio, and available settings for display modes.
Guides on selecting channels or video sources for output ports and configuring resolution, aspect ratio, and audio.
Details how to set up and enable MultiViewer for displaying a custom mix of sources in a grid for confidence monitoring.
Describes the different user account types (Administrator, Operator, Viewer) and their default privileges.
Details the Administrator account's full system configuration access and default login credentials.
Explains the Operator account's limited configuration control and access to admin panel functions.
Instructions for resetting lost operator or viewer passwords, or contacting support for admin password recovery.
Explains how administrators can assign additional privileges to operators via the Security menu.
Explains configuration presets as groups of settings for backup, restore, and consistent system setup.
Important considerations to know before using configuration presets, including access, states, and potential lockout.
Step-by-step guide to creating a configuration preset by naming it and selecting configuration groups.
Instructions on applying configuration presets stored locally or from a USB drive via the touch screen.
Steps to download configuration presets to a local computer for backup or transfer to other Pearl-2 systems.
Defines a channel as an encoding instance for video/audio inputs to produce recordings and live streams.
Provides examples of different layouts that can be created using the custom layout editor.
Explains Pearl-2's pre-configured Auto channels (Auto A, Auto B) that automatically detect and configure sources.
Guides on encoding video and audio sources for channels to optimize quality for live streaming and recording.
Details video encoding settings like codec, profile, frame size, key frame interval, and bitrate.
Step-by-step instructions to configure video encoding settings for a channel via the Admin panel.
Lists the video codecs supported by Pearl-2, including H.264 and Motion JPEG.
Provides guidance on supported audio codecs like AAC and MP3, including sample bitrate values.
Guides on creating custom layouts for channels, including renaming and adding elements like images and text.
Describes the layout editing area for adding images, video sources, text overlays, and background colors.
Explains how to position and resize items using the mouse, keyboard, or manual positioning values.
Steps to select or pick a background color for unused space in a layout using the custom layout editor.
Instructions for adding images as backgrounds or overlays to layouts using the custom layout editor.
Steps to add video files for motion backgrounds, pre/post-roll, or playback in a channel using the custom layout editor.
Guides on adding text overlays to layouts using the custom layout editor, including shortcut codes for dynamic information.
Discusses performance impact of chroma keying based on sources, scaling, frame rate, and processor load.
Explains upstream chroma keying, applying the effect to a specific source before processing and broadcast.
Defines downstream chroma keying, applying the effect to all broadcast sources after processing and switching.
Step-by-step guide to configuring chroma keying for a green screen source using the Admin panel and custom layout editor.
Instructions to apply chroma key effects from an external titler software source via the Admin panel.
Guides on connecting an RTSP source, such as an IP camera, to Pearl-2 using the Admin panel.
Details on configuring Pearl-2 as an SRT destination to ingest SRT streams as video inputs.
Explains how to connect NDI sources to Pearl-2 for low-latency video transmission over Ethernet.
Details on changing video settings for input sources like HDMI, SDI, and USB cameras.
Explains the process of streaming live video content to viewers, servers, and media players using various protocols.
Details on streaming to CDNs, local media servers, and other Pearl-2 devices using various protocols like RTMP, SRT, HLS.
Explains how Pearl-2 can use SAP to stream to set-top boxes, digital signs, smart TVs, and other media players.
Guides on starting and stopping channel recordings and configuring recording settings using the Admin panel.
How to control recording across multiple channels with a single touch using the touch screen.
Explains how to use recorders to record multiple channels in a single multi-track file and manage recordings.
Details how to configure automatic uploads of recordings to network storage or USB drives.
Steps to register Pearl-2 with Kaltura CMS for seamless video recording and webcasting experience.
How to register Pearl-2 as an encoder resource for Kaltura using the Admin panel.
How to register Pearl-2 with Panopto as a remote recorder for scheduled, recurring, and ad hoc events.
Guides on integrating Pearl-2 with YuJa for automatic event scheduling and management.
How to register Pearl-2 with Panopto as a remote recorder for scheduled, recurring, and ad hoc events.
Steps to disable CMS on Pearl-2, which disconnects the remote recorder from Panopto.
Guides on setting up authentication for ad hoc events and selecting video sources for multi-source recordings.
Lists known issues or limitations affecting YuJa functionality and suggests workarounds.
Steps to register Pearl devices with YuJa for seamless video recording and webcasting.
Details available features after registering with YuJa, including profiles and upload settings.
Explains that YuJa events must be managed via the YuJa interface after device registration.
How to monitor audio for a specific channel using the touch screen and adjust volume levels via the headphones icon.
Guides on using the grid view and individual channel view on the touch screen for monitoring streaming and recording status.
How to view device, network, and storage information on the touch screen's System Status screen.
How to get information about Pearl-2's firmware, hardware version, and configured settings via the Admin panel.
Instructions on how to power off or reboot the Pearl device using the Admin panel or the power button.
Explains how to back up the system configuration using configuration presets.
Steps to restore Pearl-2 to original default settings, which erases all custom configurations and data.
Guides on checking for and installing firmware updates via the Admin panel or web-based interface.
Instructions on registering the Pearl device to become eligible for firmware updates and new features.
Information on complimentary and extended support plans, and how to contact Epiphan support.
Overview of diagnostic tools available for troubleshooting setup and network connection issues via touch screen or Admin panel.
Steps to access and run diagnostic tools like ping, traceroute, and bandwidth tests from the Admin UI.
How to run diagnostic tools like Connectivity status and Network Tools from the Pearl-2's touch screen.
Tips to improve image quality by adjusting source resolution, bitrate, and limit frame rate.
Suggestions to improve frames per second by adjusting limit frame rate, bitrate, reducing actions, or checking hardware acceleration.
Troubleshooting steps for streams not playing, including checking stream type, URL, and firewall settings.
Diagnostic tips for image problems, including source resolution, scaling, and encoding settings.
How to change channel output frame size to match input signal aspect ratio to avoid black bars or stretching.
Lists keyboard shortcuts for navigating and controlling the Channel View screen.
Lists keyboard shortcuts for navigating and controlling the Grid View screen.
Lists keyboard shortcuts for interacting with the Events screen, including creating ad hoc events.
Lists keyboard shortcuts for navigating and controlling the Live Switcher interface.
| Maximum bitrate | 50 Mbps |
|---|---|
| Maximum frame rate | 60 fps |
| Audio Inputs | 2 x XLR/TRS combo |
| Recording Formats | MP4, MOV |
| Streaming Protocols | RTMP, RTSP, HLS, SRT |
| Storage | Internal SSD |
| Network Connectivity | Gigabit Ethernet, Wi-Fi |
| Power Supply | 100–240 VAC, 50/60 Hz |
| USB Ports | 2x USB 3.0 |