EasyManuals Logo
Home>Epson>Printer>L310

Epson L310 Service Manual

Epson L310
78 pages
To Next Page IconTo Next Page
To Previous Page IconTo Previous Page
Page #51 background imageLoading...
Page #51 background image
L365/L366,L360/L362,L310/L312,L220/L222,L130/L132 Series Revision A
Disassembly/Reassembly Routing FFCs/cables 51
Confidential
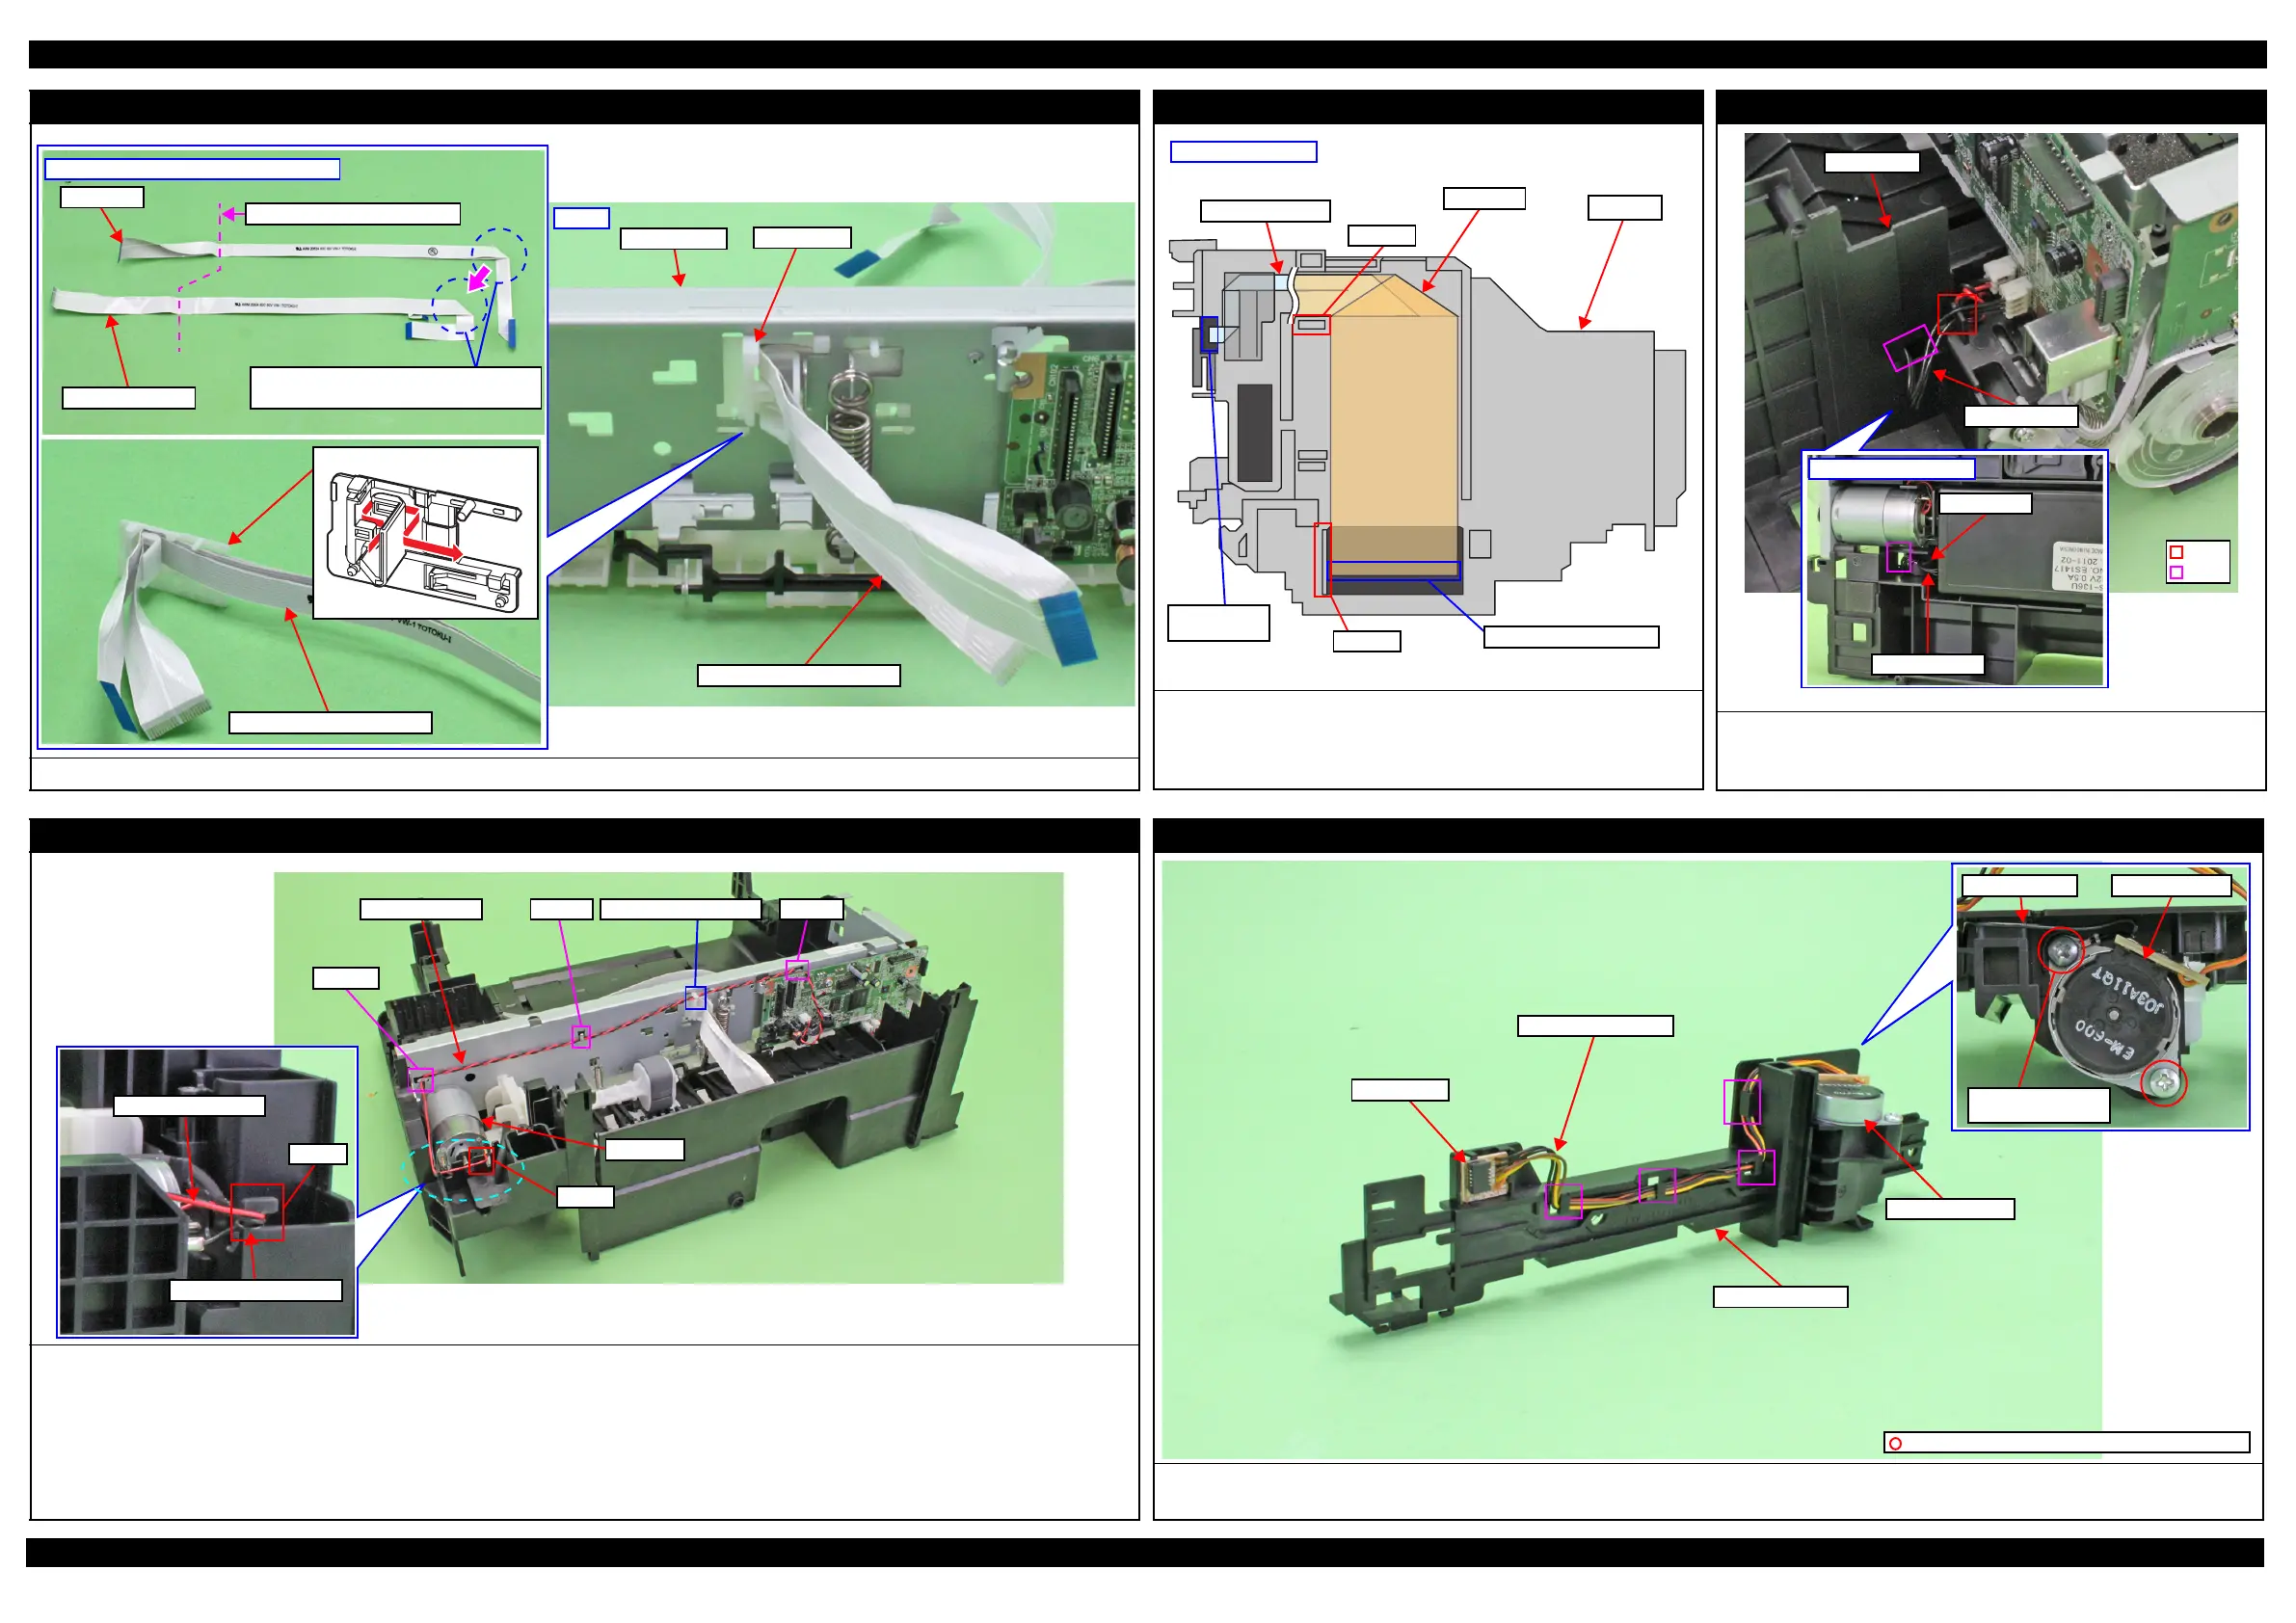
Head FFC (Routing on the Main Frame)
Align the Head FFC and CR Encoder FFC, and then route them through the FFC Holder as shown in the figure above.
Aligning Head FFC with CR Encoder FFC
Head FFC
CR Encoder FFC
Stack the Head FFC over the CR Encoder
FFC to keep the Head FFC on top.
Fold here inside FFC Holder
Rear
FFC Holder
Main Frame
FFC Holder
Head FFC/CR Encoder FFC
Head FFC (Routing on the CR Unit)
Route the CR Encoder FFC along the Rib A and connect it to the
connector of the CR Encoder.
Route the Head FFC through the rib B and C, and then connect it to the
connector of the Printhead.
Connector of Printhead
Left side of CR Unit
Connector of
CR Encoder
Rib A
Head FFC
CR Unit
Rib B
CR Encoder FFC
PS Unit
Pull out the PS Unit cable from the hole of the Frame Base first, and then
route it through the rib of the Frame Base.
Put the ferrite core into the position shown in the figure above.
Hole
Rib
PS Unit cable
Bottom of Frame Base
PS Unit cable
Ferrite core
Frame Base
CR Motor
Route the CR Motor cable as follows before installing the Shield Plate.
1. Route the CR Motor cable (black) around the rib A of the Frame Base (two turns).
2. Route the CR Motor cable (red) through the rib B of the Frame Base, and then route it through the rib A taking care not to let the CR Motor cable (red)
come over the CR Motor cable (black).
3. Twist the CR Motor cable (black) and CR Motor cable (red) twice, and then route them through the hook C of the Main Frame.
4. Route the CR Motor cable (black) and CR Motor cable (red) in the order of hook D of the Main Frame, groove of the FFC Holder, and hook E of the Main
Frame.
CR Motor
Hook C
Hook EGroove of FFC HolderCR Motor cable Hook D
Rib A
CR Motor cable (black)
CR Motor cable (red)
Rib B
Scanner Motor (L365/L366,L360/L362,L220/L222 Series)
Route the Scanner Motor cable through the hooks (x4) of the Scanner Motor as shown above.
Secure the grounding wire of the Relay Board and the Scanner Motor together with the screw as show above.
Relay Board
Scanner Motor cable
C.B.P-TITE SCREW 3x10 F/ZN-3C (5 ± 1 kgf·cm)
Grounding wire
Scanner Motor
Screw it with
grounding terminal
Scanner Motor
Scanner Carriage

Other manuals for Epson L310

Questions and Answers:

Question and Answer IconNeed help?

Do you have a question about the Epson L310 and is the answer not in the manual?

Epson L310 Specifications

General IconGeneral
ColorYes
Maximum resolution5760 x 1440 DPI
Print speed (color, draft quality, A4/US Letter)15 ppm
Print speed (black, normal quality, A4/US Letter)33 ppm
Paper input typePaper tray
Total input capacity100 sheets
Total output capacity30 sheets
Total number of input trays1
Photo paper sizes (imperial)10x15 \
Maximum ISO A-series paper sizeA4
AC input voltage110 - 240 V
AC input frequency50 - 60 Hz
Power consumption (off)0.3 W
Power consumption (standby)2.2 W
Power consumption (printing)10 W
Sustainability certificatesENERGY STAR
Sound pressure level (printing)39 dB
Product colorBlack
Built-in displayNo
Market positioningHome & office
Standard interfacesUSB 2.0
USB 2.0 ports quantityUSB 2.0 ports have a data transmission speed of 480 Mbps, and are backwards compatible with USB 1.1 ports. You can connect all kinds of peripheral devices to them.
Mac operating systems supportedMac OS X 10.7 Lion, Mac OS X 10.8 Mountain Lion, Mac OS X 10.9 Mavericks, Mac OS X 10.6 Snow Leopard
Windows operating systems supportedWindows 7 Enterprise, Windows 8, Windows Vista Home Premium, Windows 7 Enterprise x64, Windows 8 Enterprise, Windows Vista Home Premium x64, Windows 7 Home Basic, Windows 8 Enterprise x64, Windows Vista Ultimate, Windows 7 Home Basic x64, Windows 8 Pro, Windows Vista Ultimate x64, Windows 7 Home Premium, Windows 8 Pro x64, Windows XP Home, Windows 7 Home Premium x64, Windows 8 x64, Windows XP Home x64, Windows 7 Professional, Windows 8.1, Windows Vista Business, Windows XP Professional, Windows 7 Professional x64, Windows 8.1 Enterprise, Windows Vista Business x64, Windows XP Professional x64, Windows 7 Starter, Windows 8.1 Enterprise x64, Windows Vista Enterprise, Windows 7 Starter x64, Windows 8.1 Pro, Windows Vista Enterprise x64, Windows 7 Ultimate, Windows 8.1 Pro x64, Windows Vista Home Basic, Windows 7 Ultimate x64, Windows 8.1 x64, Windows Vista Home Basic x64
Weight and Dimensions IconWeight and Dimensions
Depth222 mm
Width482 mm
Height130 mm

Related product manuals