L365/L366,L360/L362,L310/L312,L220/L222,L130/L132 Series Revision A
Adjustment Required Adjustments 58
Confidential
Part Name
Paper Guide
Upper Assy
Remove
--- --- --- --- --- --- --- --- --- --- --- --- --- --- --- --- ---
Replace
--- --- --- --- --- --- --- --- O --- O O O --- --- --- ---
CR Unit
Remove
--- --- --- --- --- --- --- --- --- --- --- --- --- --- --- --- ---
Replace
O------------------OOOO---O------------
CR Timing
Belt
Remove
--- --- --- --- --- --- --- --- --- --- --- --- --- --- --- --- ---
Replace
--- O
*4
--- --- --- ------ --- --- --- --- --- --- --- --- --- --- ---
Frame Base
Assy
Replace
--- O
*3
--- --- --- --- --- --- --- --- --- --- --- --- --- --- ---
PF Roller
Unit
Remove
--- O
*3
--- --- --- --- --- --- --- --- --- --- --- --- --- --- ---
Replace
--- O
*3
--- --- --- --- --- O O --- O O O --- --- --- ---
PF Motor
Assy
Remove
--- O
*3
--- --- --- --- --- --- --- --- --- --- --- --- --- --- ---
Replace
--- O
*3
--- --- --- --- --- --- O --- --- O O O --- ---
Frame Base Replace
--- O
*3
--- --- --- --- --- --- --- --- --- --- --- --- --- O ---
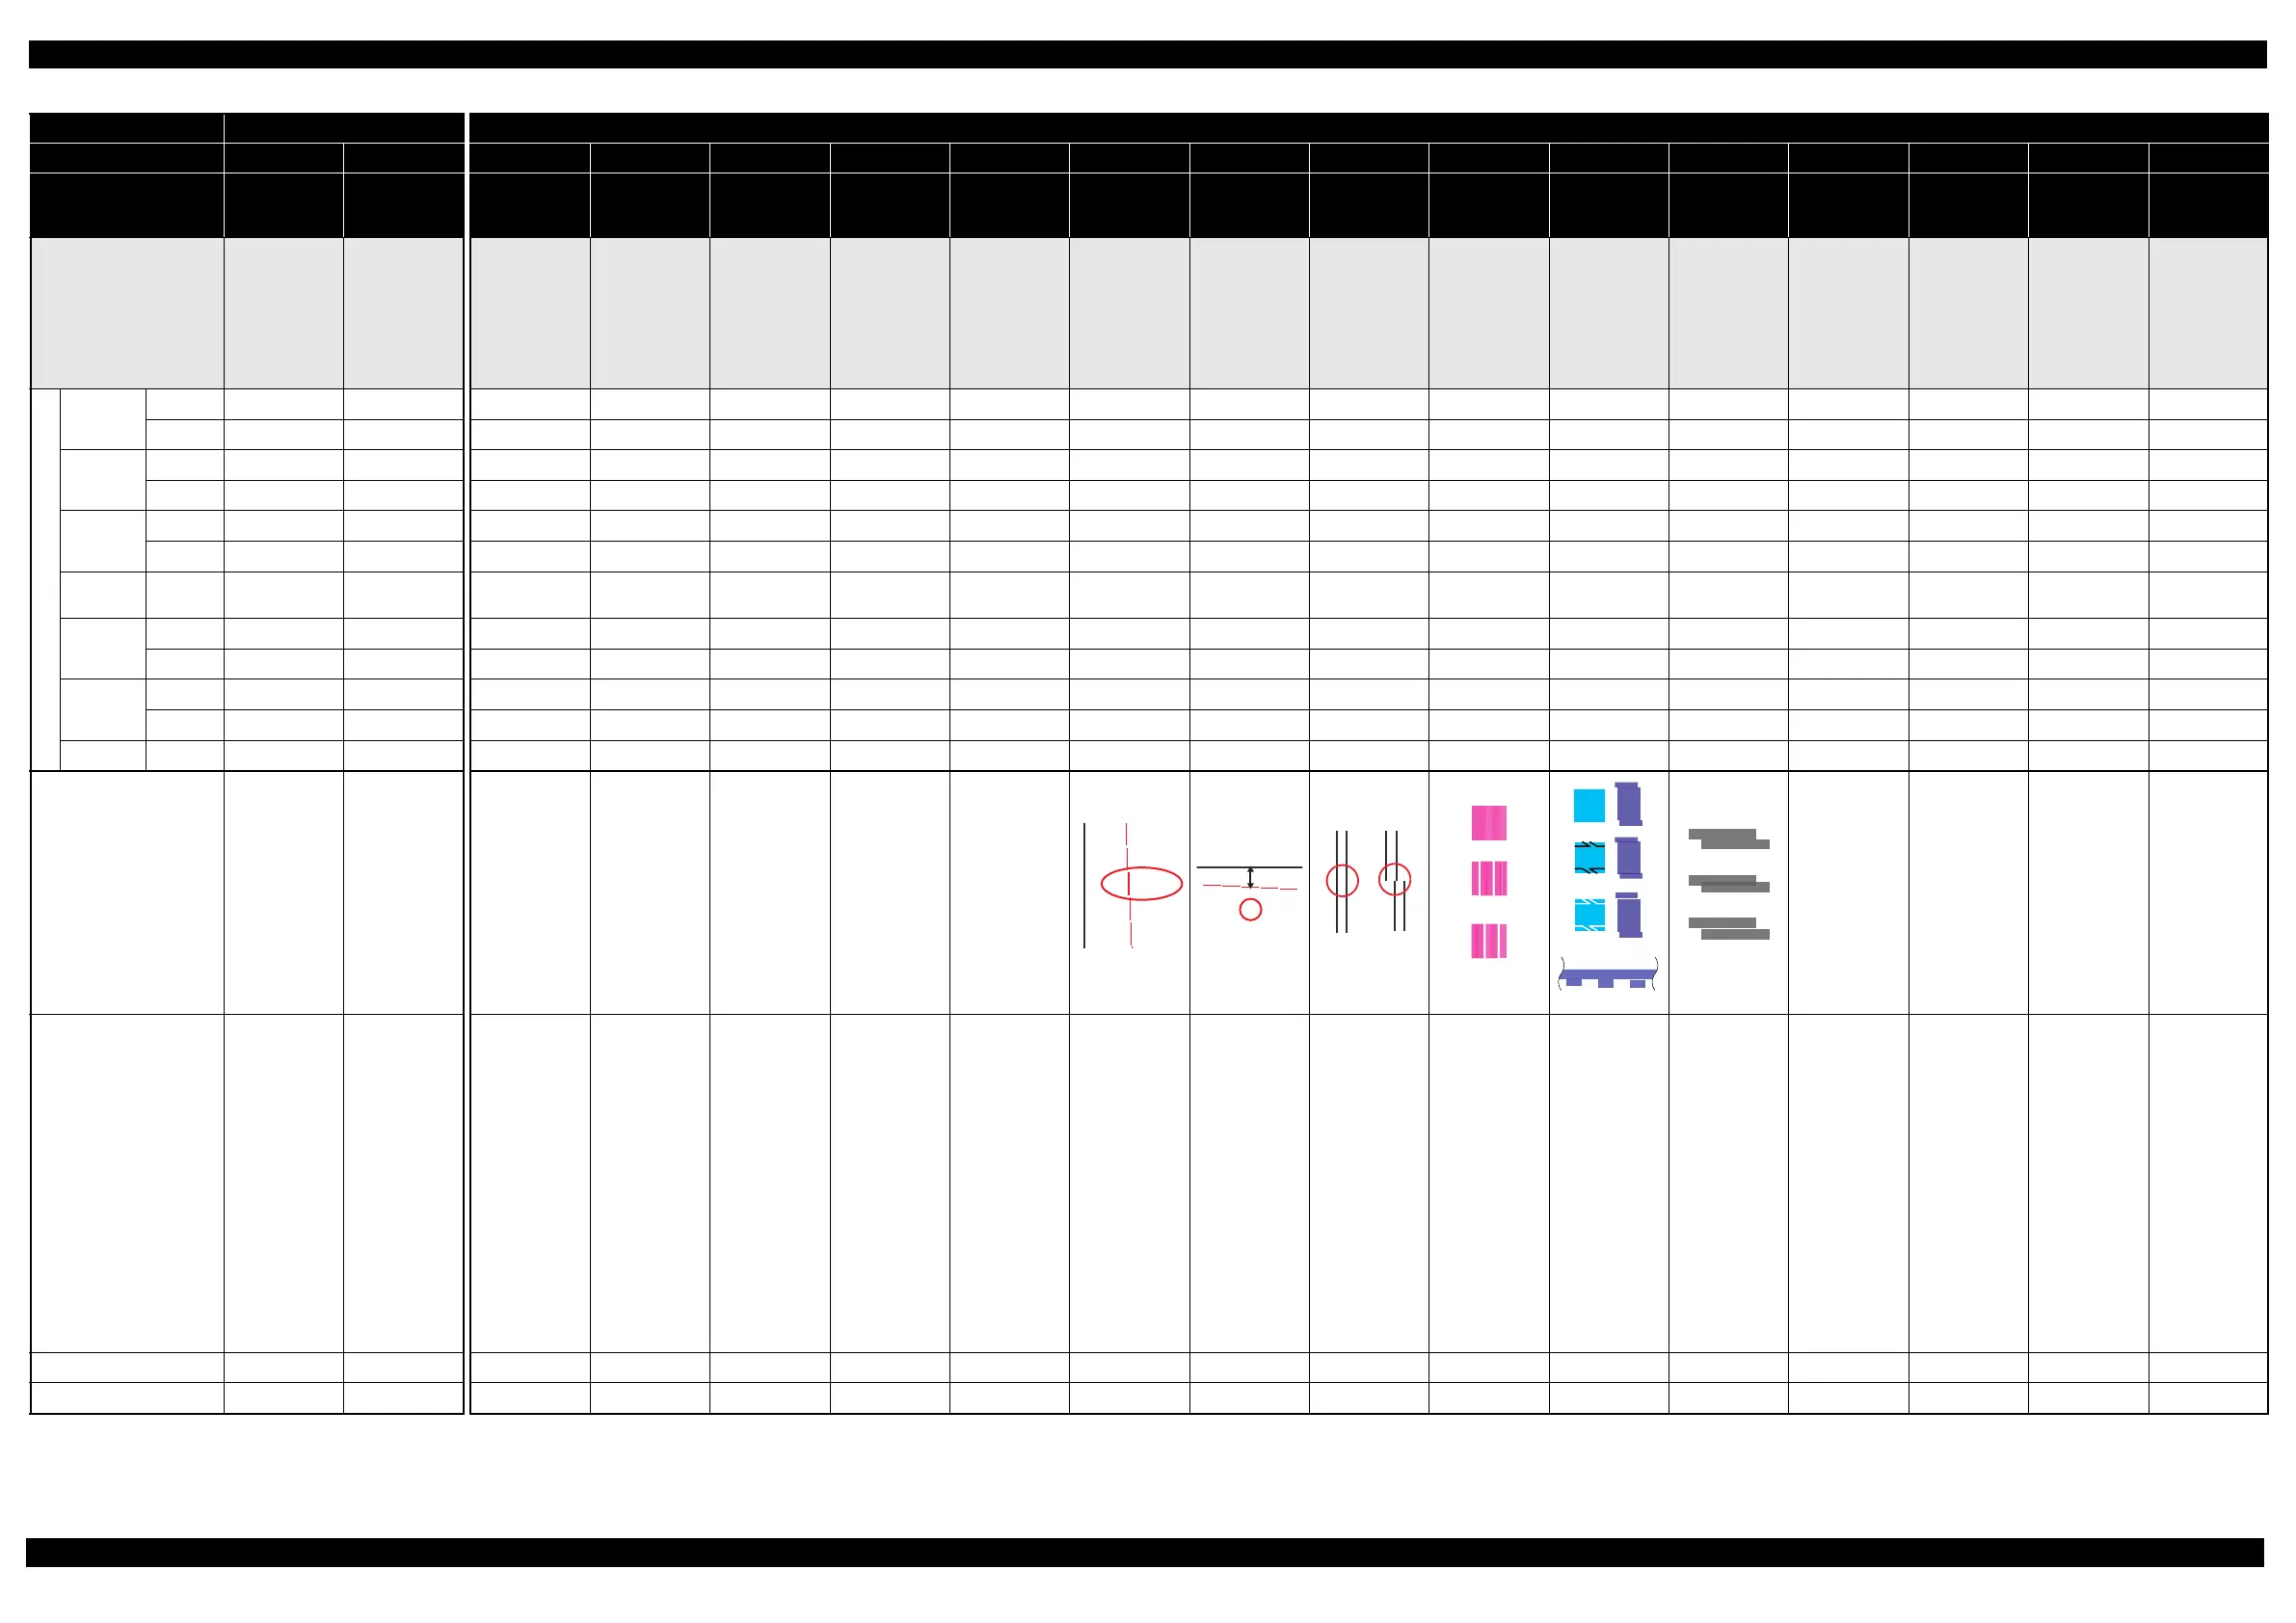
Table 3-1. Required Adjustment List
Adjustment Type Mechanism adjustment Adjustment using the Adjustment Program
Priority 1 2 3 4 5 6 7 8 9 10 11 12 13 14 15 16 17
Adjustment Item
Checking the
Platen Gap
CR/PF Belt
tension check
EEPROM
data copy
Initialize Setting Head ID input Ink charge
Maintenance
counter
First dot
position
adjustment
TOP margin
adjustment
Head angular
adjustment
Bi-D adjustment
PF/EJ
adjustment
PF band
adjustment
PF deterioration
offset
CR motor heat
protection
control
PF motor heat
protection
control
Scanner motor
heat protection
control
Purpose
Check if the PG is
within the
standard.
Check the tension
of the CR Timing
Belt and PF
Timing Belt.
To copy
adjustment values
or the like stored
on the old Main
Board to the new
board when the
Main Board needs
to be replaced.
To write sale-
destination-specific
settings and the
serial number into
the Main Board
after replacing it.
And also to set the
MAC address as
necessary.
To correct
characteristic
variation of the
replaced
Printhead by
entering its
Printhead ID
(Head ID).
To fill ink inside
the new Printhead
to make it ready
for print after
replacing the
Printhead.
To reset the waste
ink counter after
replacing the
Waste Ink Pad
Assy.
To correct the
print start position
in the CR Unit
moving direction
through software
control.
This corrects top
margin of printout.
To correct tilt of
the Printhead
caused at the
installation
through software
control.
To correct print
start timing in
bidirectional
printing through
software control.
To correct
variations in paper
feed accuracy to
achieve higher
print quality.
To correct
variations in paper
feed accuracy to
achieve higher
print quality in
band printing.
To reset the
counter or set it to
its maximum
according to the
replaced parts.
To measure and
correct the
electrical
variation of the
motor and the
power supply
board.
To measure and
correct the
electrical
variation of the
motor and the
power supply
board.
To measure and
correct the
electrical
variation of the
motor.
Printout pattern
--- --- --- --- --- --- --- --- --- --- ---
How to judge
See " 3.3.1
Checking the
Platen Gap (p61)"
for the details.
See " 3.3.2 CR/PF
Belt Tension
Check (p63)" for
the details.
--- --- --- --- ---
Examine the
misaligned lines
printed on the left
side of the paper,
and enter the
number beside the
line that is exactly
5 mm away from
the paper edge.
Examine the
misaligned lines
printed on top of
the paper, and
enter the number
beside the line
that is exactly 5
mm away from
the paper edge.
Enter the values
of the most
straight lines.
Examine the
printout patterns
for each of the
four modes, and
enter the value for
the pattern with
no gap and
overlap for each
mode.
Normal area
pattern
Examine the
printout patterns
and enter the
value for the
pattern with
fewest lines.
Bottom area
pattern
Examine the
printout patterns
and enter the
value for the
pattern with no
overlap and gap
between the two
rectangles.
Examine the
printout patterns
and enter the
value for the
pattern with no
overlap and gap
between the two
rectangles.
---
See " 3.2.2.1 CR
Motor Heat
Protection Control
/ PF Motor Heat
Protection Control
(p59)" for the
details.
See " 3.2.2.1 CR
Motor Heat
Protection Control
/ PF Motor Heat
Protection Control
(p59)" for the
details.
See " 3.2.3
Scanner Motor
Heat Protection
Control (p60)" for
the details.
Adjustment program
------ OOOOOOOOOOOOOOO
Tool
See p61 See p63
--- --- --- --- --- Ruler Ruler --- --- --- --- --- --- --- ---
Note "*1": Necessary when the part is replaced at a point in the disassembly procedures other than specified in this manual.
"*2": Replacement of Waste Ink Pad Assy is necessary.
"*3": Perform PF Belt tension check only.
"*4": Perform CR Belt tension check only.
-2
-1
0
1
2
-2-1012
NGOK
OK
NG
NG
OK NGNG
OK
N
NG
OK
NG
NG