EasyManuals Logo

Epson L495 User Manual

Epson L495
4 pages
To Next Page IconTo Next Page
Page #1 background imageLoading...
Page #1 background image
Start Here
11 Raise the control panel and turn on the product, then
follow steps 12, 13, and 14 to continue ink charging.
Note: If an error message appears, turn off the product and
check that no protective material has been left inside the product.
Caution: Do not lower the control panel without first squeezing
the release bar underneath or you may damage the product.
12 To select your language, press or to select it, then
press the OK button.
Note: You can change the language later using the product’s
control panel. For more information, see the online User’s Guide.
13 Press and hold the OK button for 3 seconds when the
message to see the setup manual is displayed on the LCD
screen.
3 seconds
14 Press the button to start charging the ink. Ink charging
takes approximately 20 minutes. Ink charging is complete
when the power light stops flashing.
20 minutes
Note: The ink bottles included with the printer are designed
for printer setup and not for resale. After some ink is used for
charging, the rest is available for printing.
Caution: Do not turn off the product or load paper while the
product is charging or you’ll waste ink.
3
Load paper
1 Make sure the product is not charging. Then flip the
feeder guard forward, raise the paper support, and tilt it
backwards slightly.
Read these instructions before using your product.
1
Unpack
Note: Do not open the ink bottles until you are ready to fill the ink
tanks. The ink bottles are vacuum packed to maintain reliability. Ink
bottle design may vary.
1 Remove all protective materials from the product.
2 Lift up the scanner unit and remove all protective materials
from inside the product.
Caution: Do not touch the flat white cable or the ink tubes and
their translucent cover.
3 Lower the scanner unit.
2
Fill ink tanks
Note: This product requires careful handling of ink. Wear disposable
gloves and place a sheet of paper or plastic under the ink tank when
you fill or refill the ink tanks, as ink may splatter. If ink spills, wipe it off
immediately with a damp towel to avoid permanent stains. If ink gets on
your clothes or belongings, it may not come off.
Warning: Keep the ink bottles out of the reach of children and do not
drink the ink.
1 Open the ink tank cover, then remove the cap for the black
ink tank and attach it to its holder.
2 Unpack the black ink bottle.
3 Depending on the ink bottle included with your product,
snap off the bottle tip or unscrew the lid.
4 Remove the bottle cap. Carefully remove the protective
seal (avoid touching the ink underneath the seal), then
close the bottle cap tightly.
Caution: Be sure to close the bottle cap tightly, or ink may leak.
5 Fill the tank using all of the ink in the bottle.
Note: Refer to the color coded sticker on the ink tank to identify
the color of each tank.
Caution: Be sure to fill each tank with the correct ink color.
6 Carefully seal the bottle using the reverse side of the
bottle tip or screw on the lid for proper disposal.
7 Replace the ink tank cap securely.
8 Repeat the previous steps for the remaining bottles.
9 Close the ink tank cover.
10 Connect the power cord to the back of the product and to
an electrical outlet.
Caution: Do not connect to your computer yet.
L495

Questions and Answers:

Question and Answer IconNeed help?

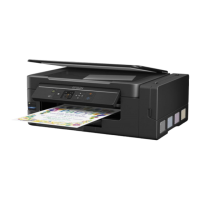
Do you have a question about the Epson L495 and is the answer not in the manual?

Epson L495 Specifications

General IconGeneral
ColorYes
Maximum duty cycle7500 pages per month
Page description languages-
Print technologyInkjet
Maximum resolution5760 x 1440 DPI
Print speed (black, normal quality, A4/US Letter)33 ppm
Maximum copy resolution- DPI
FaxingNo
Mobile printing technologiesApple AirPrint
DisplayLCD
Product colorBlack
Display diagonal1.44 \
Market positioningHome & office
Standard interfacesUSB 2.0
AC input voltage110 V
Power consumption (average operating)- W
Windows operating systems supportedWindows 10 Education, Windows 10 Education x64, Windows 10 Enterprise, Windows 10 Home, Windows 10 Home x64, Windows 10 IOT Core, Windows 10 Pro, Windows 10 Pro x64, Windows 7 Enterprise, Windows 7 Enterprise x64, Windows 7 Home Basic, Windows 7 Home Basic x64, Windows 7 Home Premium, Windows 7 Home Premium x64, Windows 7 Professional, Windows 7 Professional x64, Windows 7 Starter, Windows 7 Starter x64, Windows 7 Ultimate, Windows 7 Ultimate x64, Windows 8, Windows 8 Enterprise, Windows 8 Enterprise x64, Windows 8 Pro, Windows 8 Pro x64, Windows 8 x64, Windows 8.1, Windows 8.1 Enterprise, Windows 8.1 Enterprise x64, Windows 8.1 Pro, Windows 8.1 Pro x64, Windows 8.1 x64, Windows Vista Business, Windows Vista Business x64, Windows Vista Enterprise, Windows Vista Enterprise x64, Windows Vista Home Basic, Windows Vista Home Basic x64, Windows Vista Home Premium, Windows Vista Home Premium x64, Windows Vista Ultimate, Windows Vista Ultimate x64, Windows XP Home, Windows XP Home x64, Windows XP Professional, Windows XP Professional x64
Sustainability certificatesENERGY STAR
Total input capacity- sheets
ISO A-series sizes (A0...A9)A4, A5, A6
ISO B-series sizes (B0...B9)B5
Maximum ISO A-series paper sizeA4
Internal memory- MB
Compatible memory cardsMicroSD (TransFlash), MicroSDHC, MicroSDXC, MiniSD, MiniSDHC, SD, SDHC, SDXC
Weight and Dimensions IconWeight and Dimensions
Depth304 mm
Width445 mm
Height169 mm

Related product manuals