Operang Manual
Radiator Thermostat
Model M
CC-RT-M-EQ
Documentaon © 2018 eQ-3 AG, Deutschland
All rights reserved. Translaon from the original version in German.
153852
Version 1.0 (05/2018)
1. Informaon about this manual
Please read this manual completely and carefully before starng to
use the device. The manual contains important informaon about the
intended use of the device. Especially observe the safety notes. Keep
the manual for later consultaon. If you hand over the device to an-
other person for use, please hand over the operang manual as well.
Symbols used:
Aenon!
This indicates a hazard.
Note.
This secon contains important addional informaon.
2. Package contents
1x radiator thermostat
1x adapter Danfoss RA
1x adapter Danfoss RAV
1x spigot extension Danfoss RAV
1x adapter Danfoss RAVL
1x support ring
1x nut M4
1x cylinder head screw M4 x 12 mm
2x 1.5 V mignon/LR6/AA
2x operang manual (English and German)
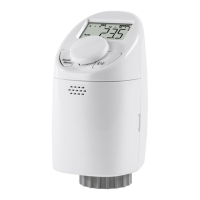
3. Operaon and display
Mode
Menu
A
B
C
D
E
H
G
F
A Bar chart of programmed heang phases
B ( ) Eco/comfort temperature, ( ) open-window funcon,
(Manu) manual mode, (Auto) auto mode
C ( ) Holiday funcon, week day, ( ) empty baery symbol
D Mode/Menu buon: Switch between auto mode, manu mode and
holiday funcon (press buon briey); open setup menu (press
buon for at least 3 seconds)
E Control wheel: Change sengs, e.g. temperature / Menu choic-
es (aer pressing (E) (turn the control wheel)), acvate the boost
funcon and conrm/save sengs in the menu (by pressing con-
trol wheel briey)
F Union nut for ng on the heang valve
G
Display of temperature, me and date, menu opons
, funcons
H buon: Switch between eco and comfort temperature
4. Funcon
With the Radiator Thermostat Model M you can convenient-
ly regulate the room temperature. Thanks to pre-programmed
or individually tailored heating and non-heating phases the de-
sired temperature can be comfortably adjusted. The device
moves a valve to control the flow of heat to the radiator. The
radiator thermostat ts to all common radiator valves and is easy to
install without having to drain any water or intervene in the heang
system. The addional boost funcon enables quick, short-term ra-
diator heang by opening the valve for 5 minutes. This immediately
brings a comfortable warmth to the room.
5. Safety instrucons
The device is not a toy; do not allow children to play with it.
Do not leave packaging material lying around, as it can be dan-
gerous in the hands of a child.
Do not open the device: it does not contain any components
that can be serviced by the user. In the event of failure, please
return the device to our service department.
6. Disposal instrucons
Do not dispose of the device with regular domesc waste.
Electronic devices must be disposed of in accordance with
the Waste Electrical and Electronic Equipment Direcve via
local disposal points for electronic waste.
The CE sign is a free trading sign addressed exclusively to the
authories and does not include any warranty of any prop-
eres.
Used baeries should not be disposed of with regular do-
mesc waste! Instead, take them to your local baery
disposal point.
7. Inserng (replacing) baeries
Upon delivery, the baeries are already inserted with an insu-
laon strip. For the device to funcon, please remove this strip.
To replace the baeries, please proceed as follows:
• Press the baery compartment cover on both sides with your n-
gers and pull it away from device body.
• Insert 2 new LR6 (mignon/AA) baeries in the baery compart-
ment, making sure they are the right way round.
• Reaach the baery compartment cover and latch it into place.
The service life of new alkaline baeries is approximately 3
years. A baery symbol ( ) on the display indicates that the
baeries need to be replaced. Aer removing the empty bat-
teries, wait approximately 1 minute before inserng the new
ones. This device does not support operaon with rechargea-
ble baeries.
Never recharge standard baeries. Doing so will present a risk
of explosion. Do not throw the baeries into a re. Do not
short-circuit baeries.
8. Set date and me
Aer inserng baeries, the date and me is automacally request-
ed aer a brief display of the rmware version number and short mo-
tor run (“INS”).
• Set the year, month, day, hour and minute with the control wheel
and conrm by pressing the control wheel briey (E).
You can also adjust the me and date in the menu under “DAT”.
The motor moves the control pin backwards during the seng of
date and me.
• If “INS” and the rotang acvity symbol “ ” are displayed, the mo-
tor is sll reversing. When only “INS” is shown in the display, the
radiator thermostat can be installed on the valve.
• The week program and other sengs can be adjusted before instal-
laon. Press the Mode/Menu buon for this, while “INS” is shown
in the display. You will nd further informaon in chapter “11. Set-
ng week program”.
• Aer the programming has been completed, “INS” is shown again
in the display and installaon can take place.
9. Installaon on the radiator
The radiator thermostat is easy to install where thermostac valves
have previously been ed, and can be done without draining heat-
ing water or intervening in the heang system. No special tools are
required, and the heang does not have to be switched o.
It is recommended to install the device while radiators / pipes
are not hot.
The union nut aached to the radiator thermostat can be used uni-
versally and without accessories for valves of the most popular man-
ufacturers with a thread size of M30 x 1.5 mm.
9.1 Removing the old dial
• Rotate your exisng thermostat dial to the maximum value (an-
-clockwise). The thermostat dial then no longer presses against
the valve spindle, making it easier to remove.
• Now remove the thermostat dial.
• If required, x one of the supplied adapters. Aerwards, the adap-
on run can be iniated (see chapter „10. Adapon run“).
9.2 Adapters for Danfoss valves
By means of the adapters included in the package, the device can be
installed on radiator valves of types Danfoss RA, RAV and RAVL.
The assignment of the suitable adapter ring to the relevant valve can
be found in the following illustraons.
The Danfoss valve bodies have elongated notches (I) around their cir-
cumference (see arrow), which also ensure that the adapter is prop-
erly seated when it snaps on.
If required, place the provided support ring (L) into the ange
before installing the radiator thermostat.
During installaon, please ensure that the pins inside the adapt-
er (J) are lined up with the notches (I) on the valve. Ensure that
the adapter is properly clipped on.
Take care during installaon that you do not trap your ngers
between the two halves of the adapter!
The RA and RAV adapters have been manufactured with pre-tension
in order to provide a beer seat. Use a screwdriver during installaon
if necessary, and bend it open slightly in the vicinity of the screw. Af-
ter clipping onto the valve body, please aach the adapter using the
provided screw and nut.
I
The spigot extension (K) must be ed to the valve pin of RAV valves
prior to installaon.
The adapter RAVL does not have to be screwed.
Support ring
The valves from dierent manufacturers may have tolerance uctu-
aons that make the radiator thermostat more loosely seated on the
valve. In this case, the provided support ring (L) should be placed into
the ange before installing the radiator thermostat.
L
10. Adapon run
After the batteries have been inserted the motor reverses.
Meanwhile, “INS” and the activity symbol ( ) are displayed.
As soon as “INS” is displayed without the activity symbol
( ), the radiator thermostat can be installed. This is followed by an
adapng run (“AdA”) to adapt the thermostat to the valve.
• Aach the radiator thermostat to the valve.
• Tighten the union nut.
• Press the control wheel briey when “INS” is displayed.
It is now that the radiator thermostat performs the adapon run. “AdA”
and the acvity symbol ( ) are displayed. During this me, no other
operaon is possible.
EN