This is a smart high-frequency charger. Suitable for lead batteries, among which AGM and Gel.
Connecting and disconnecting the charger to the battery
Warning: Please connect or disconnect the charger to the battery as is described in the sequences below:
Charging of a separate lead-acid battery:
1. Connect the red clamp to the positive pole (+) of the battery.
2. Connect the black clamp to the negative pole (-) of the battery.
3. Insert the mains plug into AC source socket.
4. For disconnecting: pull out the mains plug from the AC source socket and then disconnect the clamps from the battery poles.
Charging of vehicle-mounted lead-acid battery:
Vehicle chassis negative grounded:
1. Connect the red clamp to the positive pole (+) of the battery.
2. Connect the black clamp to the vehicle chassis. Keep away from the fuel pipe and the battery.
Vehicle chassis positive grounded:
1. Connect the black clamp to the negative pole (-) of the battery.
2. Connect the red clamp to the vehicle chassis. Keep away from the fuel pipe and the battery.
3. Insert the mains plug into AC source socket.
4. For disconnecting: first of all pull out the mains plug from the AC source socket.
5. Then disconnect the black clamp before the red clamp. If the battery’s positive pole is grounded, then disconnect the red clamp
before the black clamp.
Connection Protection
The protection function prevents damage to the battery caused by wrong connecting.
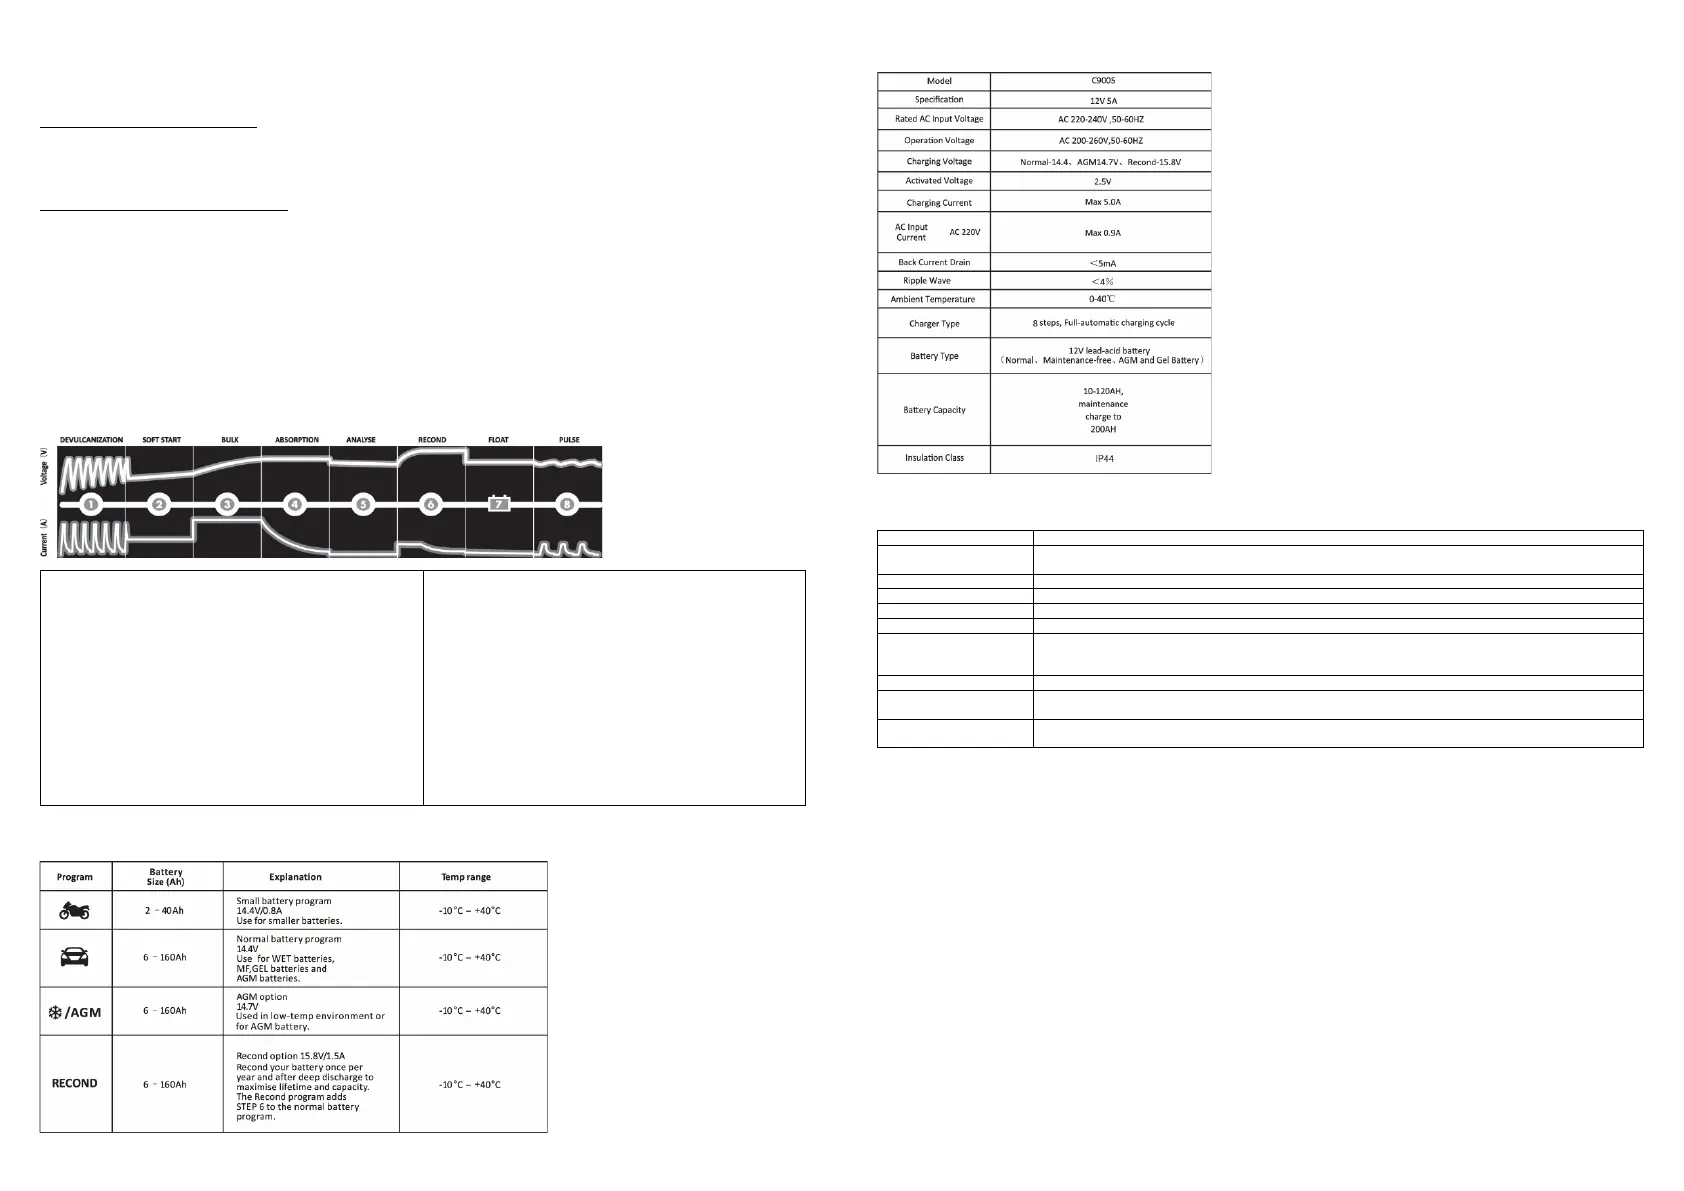
Charging steps
Detects and partially removes lead-sulfide from the lead plates of
the battery, restoring the battery capacity.
Step 2: Soft start
Before charging the battery is tested if it can accept charge. This
step is to prevent charging of a defect battery.
Step 3: Bulk-charging
Charging with maximum current until approximately 80% of the
battery capacity has been charged.
Step 4: Absorption
Charging with declining current to maximize up to 100% battery
capacity.
Testing the quality of the battery by measuring if it can hold charge.
Step 6: Recond
This step will only start if it is selected. During this step voltage
increases to create controlled generation of gas in the battery.
Generation of gas mixes the battery acid, which results in a higher
capacity of the battery.
Step 7: Floating-Charging
Maintaining the battery voltage at maximum level by providing a
constant voltage charge.
Step 8: Pulse
Maintaining the battery at 95-100% capacity. The charger monitors
the battery voltage and gives a pulse when necessary to keep the
Charging program and status
The charger is programmed for car batteries by default. This can be changed by pressing the ‘MODE’ button.
Technical specifications
Indicator light status
Constant on: AC electricity connected
Constant on: Battery pole reverse connection
Blinking: Battery voltage too low or too high
Constant on: detecting vulcanization. Cleaning program is automatic
Constant on: test if the battery can accept charge
Constant on: charging with maximum current to 80% of the battery capacity
Constant on: charging with declining current to maximize up to 100% battery capacity
Constant on: tests if the battery can hold charge
If ‘Fault’ lamp blinks red, this battery cannot hold charge. The battery needs to be replaced or select ‘Recond’
with the ‘MODE’ button, to check if the battery condition can be improved.
Constant on: select the ‘Recond’ program with the ‘MODE’ button, to improve the battery capacity.
Constant on: maintaining the battery voltage at maximum level by providing a constant voltage charge. If the
battery voltage is too low, the charging cycle starts anew.
Constant on: maintaining the battery at 95-100% capacity. If the battery voltage is too low, the charging cycle
starts anew.
Safety matters
⋅ The charger is designed for charging of 12V lead-acid batteries. Do not use the charger for any other purpose.
⋅ Check the charger cables prior to use, and replace them when they are not in good condition.
⋅ Never charge a damaged battery.
⋅ Never charge a frozen battery.
⋅ Never place the charger on top of the battery which is being charged.
⋅ Always provide for proper ventilation during charging.
⋅ Avoid covering the charger during charging.
⋅ A battery being charged could emit explosive gasses. Prevent sparks close to the battery.
⋅ When batteries are reaching the end of their lifecycle, internal sparks may occur.
⋅ Ensure that the cabling does not jam or comes into contact with hot surfaces or sharp edges.
⋅ Battery acid is corrosive. Rinse immediately with water if acid comes into contact with skin or eyes and seek immediate medical advice.
⋅ Batteries consume water during use and charging. When possible, check the water level regularly and add distilled water as described
in the instruction manual of the battery supplier.
⋅ This appliance is not designed for use by young children.
 Loading...