This document is a user manual for the Erbesi "Nido LB" cot, a piece of nursery furniture designed for infants. The manual provides instructions for assembly, safety guidelines, and a comprehensive list of components.
Function Description
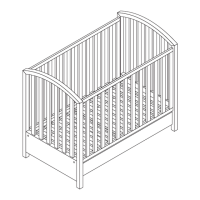
The Erbesi "Nido LB" is a baby cot designed to provide a safe and comfortable sleeping environment for infants. It features a mattress base that can be adjusted to two different heights: a lower position for younger babies and a higher position for older infants who are not yet able to climb out. The cot also includes a movable side, which can be lowered to facilitate placing and retrieving the child, and a drawer for storage beneath the mattress base. The design emphasizes safety, with specific instructions to prevent suffocation, strangulation, and falls.
Important Technical Specifications
The cot conforms to the safety regulations EN 716-1:2008 + A1:2013, ensuring it meets European safety standards for children's cots and folding cots for domestic use.
Mattress Base Positions:
- Lowest Position: The distance between the mattress surface and the top of the cot sides must be at least 500 mm. This is the safest position and should be used as soon as the baby can sit up.
- Highest Position: The distance between the mattress surface and the top of the cot sides must be at least 200 mm.
Mattress Requirements:
- The minimum distance between the mattress and the cot sides must be less than 30 mm.
- Only one mattress should be used in the cot.
Materials:
- Headboard/Footboard (Testiera/Pediera): Solid beechwood + particleboard/MDF, paper/wood coated.
- Cot Sides (Sponde): Solid beechwood.
- Mattress Base (Rete): Solid beechwood.
- Drawer Front Panel (Pannello frontale cassetto): MDF/particleboard, PVC coated.
- Drawer Back Panel (Pannello posteriore cassetto): Particleboard, PVC coated.
- Drawer Side Panels (Pannello sinistro/destro cassetto): Particleboard, PVC coated.
- Drawer Center Partition (Divisorio centrale cassetto): Particleboard, PVC coated.
- Drawer Bottom Panels (Fondi cassetto): MDF.
Hardware Components:
- Screws for mattress base (Viti per rete): Metal.
- Washers (Rondelle): Plastic.
- Barrel nuts (Barilotti): Metal.
- Caster metal pins (Perni per ruote): Metal.
- Casters (Ruote): Plastic (2 without brake, 2 with brake).
- Screws for sides (Viti per sponde): Metal.
- Washers thickness (Rondelle spessore): Plastic.
- Eccentric for drawer (Eccentrico per cassetto): Metal.
- Guy for drawer (Tirante per cassetto): Metal.
- Mattress base supports (Supporti rete): Plastic.
- Pin (Perno): Metal.
- Drawer glides (Guide cassetto): Plastic.
- Allen wrench (Chiave a brugola): Metal.
Usage Features
Assembly:
The manual provides step-by-step visual instructions for assembling the cot.
- Step 1: Attaching the drawer glides (U) to the headboards/footboards (A).
- Step 2a (Low Position): Assembling the mattress base (C) to the headboards/footboards (A) using screws (J), washers (K), and barrel nuts (L). This position is recommended for safety once the baby can sit up.
- Step 2b (High Position): Assembling the mattress base (C) to the headboards/footboards (A) using pins (T, T1), screws (J), washers (K), and barrel nuts (L). If the mattress base is in the high position, both sides of the cot must be fixed using bolts Q (Step 5). The supports T must be removed before reusing the bed with the mattress base in its lowest position.
- Step 3: Preparing the movable side by unscrewing screws "C" (not explicitly listed in the parts list, but shown in the diagram) by one and a half turns using the Allen wrench (V) to ensure proper functioning.
- Step 4: Inserting the cot sides (B) into the headboards/footboards (A). The upper part of the side should be aligned with the joint between the headboard/footboard and its leg. The lower part of the side is inserted into the guide by pressing the appropriate pistons.
- Step 5: Fixing the stationary side using screws (Q) and washers (Q1) for proper operation of the movable side. Short screws "Q" must be used exclusively with washer thickness "Q1".
- Step 6: Attaching the casters (N, P) to the headboards/footboards (A) using metal pins (M). Two casters have brakes (P) and two do not (N).
- Step 7: Assembling the drawer hardware, including eccentrics (R) and guy wires (S).
- Step 8: Assembling the drawer panels.
- Step 9: Inserting the assembled drawer into the cot.
Adjusting the Movable Side:
- To lower the side: Take the side with both hands at its ends. Simultaneously, push the bottom part of the side towards the inside of the bed with your leg. Then, let the side go down to the lower position.
- To raise the side: Take the side with both hands at its ends. Simultaneously, push the bottom part of the side towards the inside of the bed with your leg. Then, raise the side to the upper position until you hear a click.
Safety Warnings:
- Never leave anything in the cot that could trap feet, provide a foothold for climbing out, or pose a risk of suffocation or strangulation.
- Do not place the cot near heat sources (gas or electrical appliances) to avoid fire hazards.
- Do not use the cot if any part is damaged or broken.
- Do not use the cot when the child is able to climb over the sides to prevent falls.
- Always ensure the movable side is raised when the child is left alone in the cot.
- Regularly check that all screws are properly tightened to prevent snagging or hooking of clothing, chains, etc., which could lead to strangulation.
Maintenance Features
Cleaning:
- Use specific wood products and a soft cloth for cleaning.
Parts Replacement:
- Only use spare parts approved by the manufacturer.
Regular Checks:
- Periodically check that all screws are well tightened. If not, tighten them completely.
- The company reserves the right not to replace items free of charge if they were assembled despite being found damaged, or if damage was caused by incorrect assembly or misuse of the product. It is therefore recommended to carefully check all elements before assembly.