WARRIORTECHUserManual
Information manual for the WARRIOR TECH welder protective helmets complying with Par. 1.4 of Appendix ll of the EC regulations. The WARRIOR TECH welding helmets are high quality products that contribute
to the comfort and safety of the welder. WARRIOR TECH welding helmets may be used only in connection with arc welding. The chart below shows how to choose the most suitable shade level:
Information
WARRIOR TECH welding helmets afford reliable protection for the eyes whilst electric arc welding. They offer
permanent protection against UV/IR rays, heat & sparks in any state from the clear to dark. The
protection shades of the WARRIOR TECH welding helmets have been chosen to avoid eye damage
caused by the welding arc.
Do not look directly at welding rays with unprotected eyes when the arc strikes. This can cause a painful
WARRIOR TECH welding helmets allow the welder to see the point of arc strike more precisely. This leads
are kept free and because of the helmets light weight fatigue is reduced.
Rangeofapplication:
The WARRIOR TECH welding helmets can be used for the following applications:
Electrode
MIG
Mag
Tig (>=5A)
They are not suitable for use with laser systems and oxy-acetylene (gas welding) applications.The
Operation
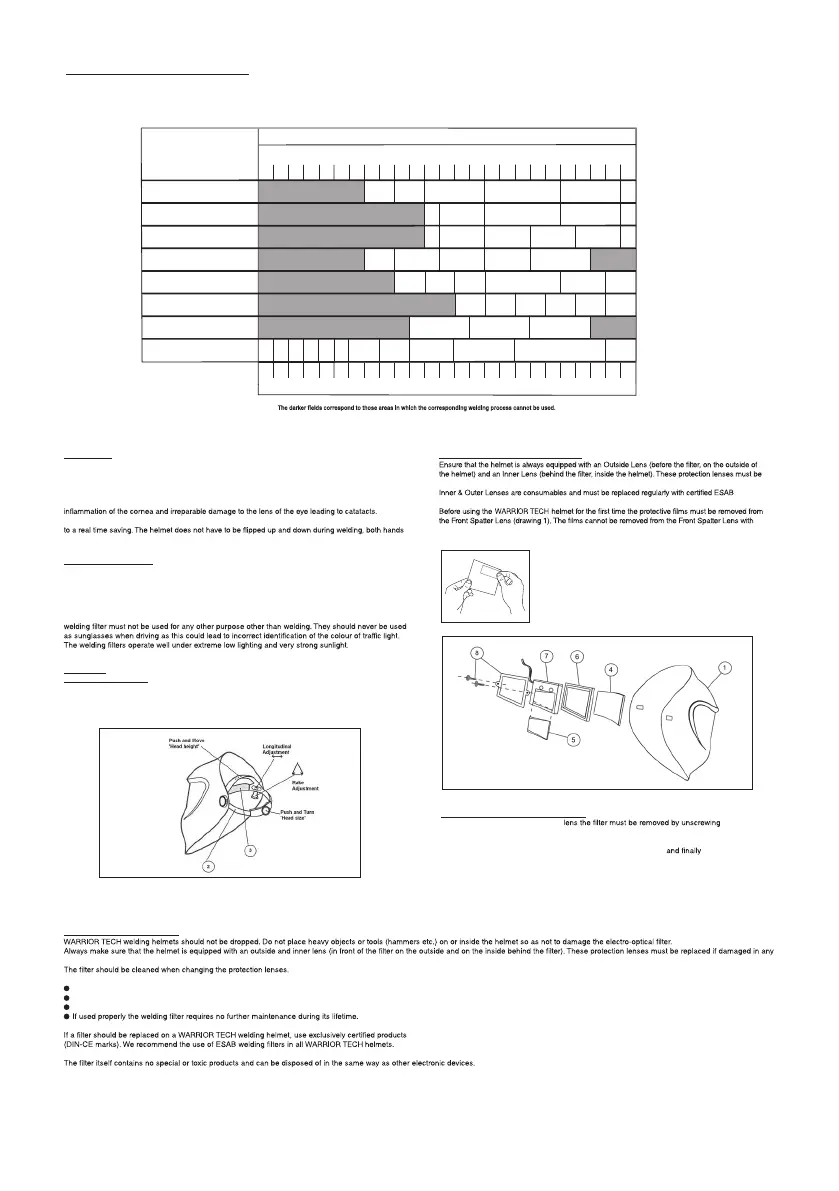
Adjustment of headgear:
WARRIOR TECH welding helmets are equipped with a comfortable headgear that can be adjusted in
three different ways
Weldingprocess
Orrelatedtechniques
Currentinternallyinamperes
0.52.510204080125175225275350450
15153060100150200250300400500
Emanual
Fluxcoreelectrodes
Fluxedstickelectrodes
MIG/Metal-Inert-GasArgon(Ar/He)
Steels,alloyedsteels,
Copper&itsalloysetc.
MIG/Metal-Inert-GasArgon(Ar/He)
Aluminium,copper,nickel
Andotheralloys.
TIG/Tungsten-InertGasArgon(Ar/H2)(Ar/He)
Allweldablemetalssuchas:steels,aluminium,
Copper,nickelandtheiralloys.
MAG/Metal-activeGas(Ar/Co2O2)(Ar/Co2/He/H2)
ConstructionSteel,hardened&temperedsteels
Cr-Ni-steel,Cr-steel&otheralloyedsteels.
Electricarccompressedairjoining
(Meltjoining)carbonelectrodes(O2)
Flamegroovingcompressedair(O2)
Plasmacutting(fusioncutting)
AllweldablemetalsseeWIG
Centreandoutergas:Argon(Ar/H2)(Ar/He)
Plasmacutting(Fusioncutting)
Micro-plasmawelding
Centreandoutergas:Argon(Ar/H2)(Ar/He)
0.52.510204080125175225275350450
15153060100150200250300400500
9
10 11
12
13
14
10 11
12 13 14
10
10
10
10
10
11
11
11
11
11
11
12
12
12
12
12
12
13
13
13 14
13
13
13
14
15
14
15
14
15
15
9
8765
2.5
4
9
Dependingupontheapplicationconditions,thenexthighestornextlowestprotectionlevelcanbeused.
Servicingandmaintenance
way (see overleaf). They are consumables and should checked and replaced regularly.
This can be done by any of the following ways:
Wipe with a clean, dry piece of cloth.
Clean with a piece of smooth cloth moistened with pure alcohol.
Clean with a commercial disinfectant
ReplacingtheOuterSpatterLens:
replaced if broken, damaged or covered with welding spatter to such an extent that vision is impaired.
spare parts (CE marked).
the Lens in place, Please follow the instructions below to remove the Spatter Lens.
Drawing1
Drawing2
Insertingandremovinganewprotectionlens:
To insert the new outer protection
➃
the two retaining screws
➇
from the inside of the helmet
➀. The old protection lens
can then be removed and the new lens inserted followed by the light seal cradle
➅,
ADF➆,
inner protection lens
➄
and then the ADF retaining frame
➇
replace the two retaining screws (see drawing 2).
HL: V
oor gebruik folie verwijderen!!
D
: Vor Gebrauch
Schutz
folie entfernen!!
F: Enlever le film protect
eur ava
nt utilisatio
UK
: Befor
e use rem
ove p
rotect
ive coating!!
I: Pr
ima de’l
l us
o togliere l
a prote
zione
in p
LA
N 1F DINplus G
S 0196 CE
 Loading...