English
Deutsch
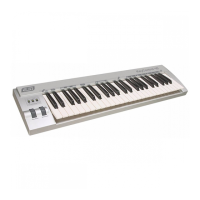
Thank you for choosing KeyControl 49 - a cost effective MIDI keyboard for your home studio.
Connection / Power Supply / Controls
KeyControl 49 gets connected via the included USB cable to your computer. This connection powers the keyboard and is used to transfer
the MIDI data to your computer. In addition, the MIDI data is sent out via the MIDI output port that you can connect to other devices such
as a sound module. Just connect KeyControl 49, launch and configure your favorite audio software and start playing!
KeyControl 49 can also be used standalone when connected to an optional 9V DC power supply (not included). In this case the MIDI data
will only be sent out via the MIDI output port.
KeyControl 49 provides three buttons on the left side (Edit, Down, Up), two wheels (Pitch Bend, Modulation) and 49 full size velocity-
sensitive keys that can be used as additional control keys when in edit mode.
Octave Change
The keyboard range can be moved two octaves lower or higher using the Down and Up buttons when the Edit LED is off. The Down
LED blinks when the octave range is moved down twice, it is on when the range is moved down once. The Up LED blinks when the
octave range is moved up twice, it is on when the range is moved up once. Press the Down and Up buttons simultaneously to reset to the
default octave range (then both LEDs are on).
Quick Program Change
Press the Edit button. The LED will light up. Now you can step through the program numbers with the Down and Up buttons.
Panic / Reset
Press Edit, Down and Up simultaneously to send MIDI note-off messages to every note on every channel to restore order to the system.
MIDI Channel
1. Press and hold the Edit button for 1.5 seconds to enter the edit mode. The LED will blink.
2. Press the Ch. key. The Edit and Down LED will blink.
3. Enter the MIDI channel value with the numeric keys (0-9) and confirm it with Enter.
Wheel Assignment
1. Press and hold the Edit button for 1.5 seconds to enter the edit mode. The LED will blink.
2. Press the Wheel Assign key. The Edit and Down LED will blink.
3. Enter the MIDI controller number with the numeric keys (e.g. 7 for MIDI volume) and confirm it with Enter.
Bank Select
1. Press and hold the Edit button for 1.5 seconds to enter the edit mode. The LED will blink.
2. Press the LSB key for a LSB Bank Select (#32) or the MSB key for a MSB Bank Select (#0). The Edit and Down LED will blink.
3. Enter the desired bank number with the numeric keys and confirm it with Enter.
Numeric Program Change
1. Press and hold the Edit button for 1.5 seconds to enter the edit mode. The LED will blink.
2. Press the PROG key. The Edit and Down LED will blink.
3. Enter the program number with the numeric keys and confirm it with Enter.
Velocity Curve
1. Press and hold the Edit button for 1.5 seconds to enter the edit mode. The LED will blink.
2. Press the Velocity Curve key. The Edit and Down LED will blink.
3. Enter 0 or 1 with the numeric keys to select one of the two available velocity curves and confirm it with Enter.
Transpose
1. Press and hold the Edit button for 1.5 seconds to enter the edit mode. The LED will blink.
2. Press Transpose- or Transpose+ to transpose the keyboard by one half step down or up. You can reset to the default with Transpose 0.
Reset
1. Press and hold the Edit button for 1.5 seconds to enter the edit mode. The LED will blink.
2. Press the Reset key and then press Enter. KeyControl 49 will restore all values to factory defaults.
More Information
KeyControl 49 can be used standalone (with optional power supply), connected via USB to a PC running Windows XP or a Macintosh
running Mac OS X. If you want to use KeyControl 49 with Windows 2000 or Windows ME you need to download a special driver from the
ESI website (
www.esi-pro.com) where you can also find more information about KeyControl 49, our other products and about technical
support.
Vielen Dank für den Kauf von KeyControl 49 - ein extrem preisgünstiges MIDI-Keyboard für Ihr Heimstudio.
Anschluss / Stromversorgung / Steuerelemente
KeyControl 49 wird über das mitgelieferte USB-Kabel mit dem Rechner verbunden. Über die Verbindung wird das Keyboard mit Strom
versorgt und es werden die MIDI-Daten an den Rechner geschickt. Zusätzlich werden die MIDI-Daten auch über den MIDI-Ausgang am
Keyboard ausgegeben, so ist z.B. der Anschluss eines Soundmoduls möglich. Sie müssen KeyControl 49 nur anschließen, Ihre be-
vorzugte Software starten und schon können Sie loslegen!
Wenn Sie KeyControl 49 ohne Computer einsetzen (mit optionalem 9V Netzteil), werden die Daten nur über den MIDI-Ausgang ausgegeben.
KeyControl 49 bietet drei Taster im linken Bereich (Edit, Down, Up), zwei Drehräder (Pitch Bend, Modulation) und 49 anschlagdynamische
Tasten in voller Größe, die im Editiermodus ebenfalls zur Steuerung eingesetzt werden können.
Änderung der Oktavlage
Der Keyboardbereich kann über die Down und Up Taster je zwei Oktaven nach unten und nach oben verschoben werden, wenn das Edit
LED aus ist. Das Down LED blinkt, wenn die Oktavlage zweifach nach unten verschoben wurde, es leuchtet durchgehend, wenn sie einfach
verschoben wurde. Das Up LED blinkt, wenn die Oktavlage zweifach nach oben verschoben wurde, es leuchtet durchgehend, wenn sie
einfach verschoben wurde. Durch Drücken von
Down und Up gleichzeitig, wird die Oktavlage zurückgestellt (beide LEDs sind dann aktiv).
Schneller Programmwechsel (Program Change)
Drücken Sie Edit. Das LED leuchtet. Nun können Sie mit den Down und Up Tastern durch die Programme schalten.
Panic / Reset
Drücken Sie Edit, Down und Up gleichzeitig, um ein MIDI Note-Off Befehl an alle Noten zu senden, um so das System zurückzusetzen.
MIDI Kanal
1. Drücken und halten Sie Edit für 1.5 Sekunden, um in den Editiermodus zu gelangen. Das LED blinkt.
2. Drücken Sie die Ch. Taste. Das Edit und Down LED blinkt.
3. Geben Sie den MIDI Kanal mit den Nummerntasten (0-9) ein und bestätigen Sie mit Enter.
Zuweisung der Drehräder (Wheels)
1. Drücken und halten Sie Edit für 1.5 Sekunden, um in den Editiermodus zu gelangen. Das LED blinkt.
2. Drücken Sie die Wheel Assign Taste. Das Edit und Down LED blinkt.
3. Geben Sie die Nummer des MIDI Controllers mit den Nummerntasten ein (z.B. 7 = MIDI Lautstärke) und bestätigen Sie mit Enter.
Bankwechsel (Bank Select)
1. Drücken und halten Sie Edit für 1.5 Sekunden, um in den Editiermodus zu gelangen. Das LED blinkt.
2. Drücken Sie die LSB Taste (LSB Bank Select = 32) oder die MSB Taste (MSB Bank Select = 0). Das Edit und Down LED blinkt.
3. Geben Sie die gewünschte Banknummer mit den Nummerntasten ein und bestätigen Sie mit Enter.
Numerischer Programmwechsel (Program Change)
1. Drücken und halten Sie Edit für 1.5 Sekunden, um in den Editiermodus zu gelangen. Das LED blinkt.
2. Drücken Sie die PROG Taste. Das Edit und Down LED blinkt.
3. Geben Sie die gewünschte Programmnummer mit den Nummerntasten ein und bestätigen Sie mit Enter.
Anschlagdynamik (Velocity Curve)
1. Drücken und halten Sie Edit für 1.5 Sekunden, um in den Editiermodus zu gelangen. Das LED blinkt.
2. Drücken Sie Velocity Curve Taste. Das Edit und Down LED blinkt.
3. Wählen Sie 0 oder 1 (Nummerntasten) um eine der beiden Anschlagkurven auszuwählen und bestätigen Sie mit Enter.
Transponierung
1. Drücken und halten Sie Edit für 1.5 Sekunden, um in den Editiermodus zu gelangen. Das LED blinkt.
2. Über Transpose- / Transpose+ wird der Bereich um je einen halben Schritt nach unten / oben transponiert. Transpose 0 setzt die Werte zurück.
Reset
1. Drücken und halten Sie Edit für 1.5 Sekunden, um in den Editiermodus zu gelangen. Das LED blinkt.
2. Drücken Sie die Reset Taste und dann Enter. KeyControl 49 wird nun alle Einstellungen auf die Vorgaben zurücksetzen.
Weitere Informationen
KeyControl 49 kann Standalone (mit optionalem Netzteil) eingesetzt werden oder zusammen mit einem PC (mit Windows XP) oder
Macintosh (mit Mac OS X) über eine USB-Verbindung. Wenn Sie KeyControl 49 unter Windows 2000 oder ME einsetzen möchten,
benötigen Sie einen speziellen Treiber, den Sie über die ESI Webseite (
www.esi-pro.de) bekommen. Dort finden Sie auch weitere
Informationen zu KeyControl 49 sowie zu unserem technischem Support.