Thank you for purchasing ESPERIA product.
Please read this owner’s manual carefully before operating this unit.
Store it in safe place with this manual.
Memorizing radio station to the memory
1. Select the desired band FM1, FM2, FM3, or MW.
2. Then search the desired station by the seek or the manual tuning.
3. Press any button (from ① to ⑥) for 3 seconds or longer.
4. The preset channel number will be indicated on the display.
5. ON each band ( FM1, FM2, FM3, and MW ), 1station can be put on the memory on each of the button
from ① to ⑥.
Auto Store Memory (SCAN)
During the radio mode, by pressing and releasing SCAN Button will automatically store a strong signal station
in memory from the channel 1 to the channel 6.
NOTE :
By this operation, the current data in the memory will be erased.
When the expected radio station is not be able to store in the memory by the SCAN function, Please store
the radio station in the memory manually.
Owner’s manual
KRH-M202
12/24V Bluetooth®/USB/MP3/WMA
AM/FM Stereo Radio
USB
24V/12V
MP3/WMA
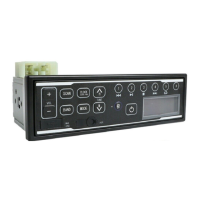
Operational Panel
② LCD (Liquid Crystal Display)
The receiving band and frequency or the current time will be indicated on the display.
④ Scan (SCAN) Button
By pressing and releasing the button the scan tuning will start automatically and the strong signal are
memorized on memory.
③ Clock (CLOCK) Button
On the Radio Mode, pressing this button will indicate the current time and pressing it again will
resume frequency display.
After 3 seconds, the time display will automatically change to the frequency display.
Press and hold to enter in Clock Adjustment Mode.
⑤ Tuning Buttons (TUNE∧,∨)
By pressing TUNE∧ or TUNE∨ button the receiving frequency will be up or down.
By pressing the button more than 2 second, the seek tuning will start.
When the strong signal station is received the seek will stop.
Please press the button again if you want to stop the seek tuning.
① Power Button
Press the Button to power ON. Press again to power OFF.
⑥ Preset Memory Button(①~⑥)
On each band (FM1,FM2,FM3 AND MW), One station is memorized on the memory from the channel 1
to the channel 6.
Refer to the section “Memorizing radio station to the memory”
⑦ Bands Select Button
By pressing the button, the receiving band will be selected as shown.
FM1→FM2→FM3→MW
The receiving band and frequency will be indicated on the display.
⑧ Volume Control Button (VOL+,-)
By pressing the VOL+ button, the sound volume will increase.
By pressing the VOL– button, the sound volume will decrease.
⑨ Bluetooth Button (B)
By pressing the Bluetooth Button to connect to the paired Bluetooth device.
Press and Hold the button for 2 seconds or longer to disconnect the Bluetooth device, and
enter to the "pairing mode".
⑪ Mode Select Button (MODE)
Pressing the button, a source will be selected as shown.
If USB memory is not connected, USB mode will skip after any seconds.
FM or MW → USB → Bluetooth → AUX
⑫ AUX-IN Jack(Auxiliary Audio In Put)
Open the rubber cap and connect the portable audio device by the cable the stereo mini plug(3.5mm)
Please cover the AUX-IN jack with the rubber cap dustproof or waterproof, when you do not need
to connect the portable audio device.
Setting the Clock
Press and hold to enter in Clock Adjust Mode and the display flashes.
Pressing the TUNE button ∧ to adjust hour.
Pressing the TUNE button ∨ to adjust minute.
⑬ USB Input Terminal
Open the rubber cap and connect a USB storage device.
Please cover the USB input terminal with the rubber cap for dustproof or water proof, when you
do not need to connect the USB storage device.
Listening the radio
1. Press MODE Button to Radio mode.
2. Select the desired band FM or MW by the BAND Button.
3. Select the desired station by a ① to ⑥ button or a TUNE Button.
4. Adjust the desired volume level by the VOL+ or VOL– Button.
Manual tuning
SEEK tuning
Press the TUNE∧ or TUNE∨ Button, the received frequency shifts one step.
Pressing the TUNE Button for 2 second or longer, the seek tuning will be start and stop at the available
frequency.
Specifications
General
Power Source :DC12V~24V
Power Consumption :Less than 2A
Rated Output Power :16W + 16W(4Ω)
Normal Output Power:14W + 14W(10%TDH,4Ω)
Dimension :179(w)×50(H)×91(D)mm
FM section
Receiving Frequency Range: 87.5~108.0MHz(EU)
87.9~108.0MHz(USA)
Usable Sensitivity : 3µV(S/N 30dB)
S/N Ratio : 50dB
MW section
Receiving Frequency Range: 531~1602kHz(EU)
530~1710kHz(USA)
Usable Sensitivity :20µV(S/N 20dB)
AUX section
AUX IN :Stereo mini jack(φ3.5),
Rated Input Power :1V
Normal Input Power :90mV
Bluetooth
Specification :Ver2.1+EDR
Bluetooth Class:Class2
(Maximum Distance 10m)
Frequency Range:2.4GHz~2.48GHz
Profile :HFP V1.5,A2DP V1.2,AVRCP V1.0
USB
Specifications:USB2.0/1.0
Support Format
・MP3:MPEG1,2,2.5
Audio Layer 2,3
・WMA:Windows Media
TM
Audio
Support File System
:FAT16/FAT32 File system
Maximum Current Supply:0.5A
FM Mode
※Preset the frequency
by each 6ch.
Preset Memory Channel
It is displayed while receiving in stereo.
■General
USB :USB Playback Mode
BT :Bluetooth Mode
AUX :AUX Mode
※For USB Mode or Bluetooth Mode only
Volume Level
Audio Operation
■Radio mode
Radio function
FM1
FM2
FM3
MW :AM mode
Stereo
Frequency / Clock
Function
USB Operations
Connect a USB storage device to USB socket on the this unit.
Press the MODE Button and select the USB Playback Mode.
During the USB Playback Mode. “USB”will be indicated on the display.
During playback, follow the instruction below to control playback.
NOTE : ・Please connect/uncomment the USB storage device in a other than USB mode.
・ESPERIA does not guarantee compatibility with all USB storage device
・Be sure to use the extension cable for the USB socket.
・Please do not connect other than USB memory device. Can not charge the smartphone.
・ESPERIA cannot be liable for any data loss or damage and improper access of USB storage
device.
① Previous Track( )Button
Skip to the previous track. Press and hold this button to rewind fast-rewind.
② Play/Pause( ) Button
Pause or resume playback.
③ Stop ( ) Button
Stop playback.
Press the Play Button, playback starts at the top of current track
④ Next Track( )Button
Skip to the next track. Press and hold this button to rewind fast-forward.
⑤ Repeat ( ) Button
Repeat the current track and Press the Repeat Button again, turn off the
Repeat Mode.
⑩ Bluetooth LED
When this LED lights up, the Bluetooth device is connected. Flashes in pairing standby mode.
AUXIN