EasyManua.ls Logo

Estes PORTA-PAD II User Manual

Estes PORTA-PAD II
2 pages
To Next Page IconTo Next Page
Page #1 background imageLoading...
Page #1 background image
PARTS / PARTES / PIÈCES
HUB PARTS /
PARTES DEL PIVOTE /
PIÈCES DU PIVOT :
®
PORTA-PAD
®
II MODEL ROCKET LAUNCH PAD INSTRUCTIONS
INSTRUCCIONES DE PLATAFORMA DE LANZAMIENTO
PORTA-PAD
®
II PARA COHETES MODELO
INSTRUCTIONS POUR LE BASE DE LANCEMENT
DE FUSÉE MODÈLE PORTA-PAD
®
II
1. Join launch rod pieces together. /
Unir las piezas de la vara de lanzamiento. /
Joindre les pièces de la tige de lancement.
3. Sand joints and both
ends smooth, if
necessary. /
Lijar todas las
uniones y ambos
extremos hasta que
queden lisos, si
fuese necesario. /
Poncer les joints et
les deux extrémités
pour les rendre
lisses, si nécessaire.
2. Drop one end repeatedly
on concrete floor until
joints are tight. / Dejar
caer un extremo una y
otra vez sobre un piso de
concreto hasta que todas
las uniones queden
apretadas. / Laisser
tomber une extrémité sur
un sol de béton de façon
répétée jusqu'à ce que les
joints soient serrés.
Wing nut /
Tuerca de
mariposa /
Écrou à oreilles
swivel mounts /
suportes giratorios /
montants pivotants (2)
Swivel discs /
Discos giratorios /
Disques pivotants (2)
Hex head screw /
Tornillo de cabeza
hexagonal /
Vis à tête hexagonale
Blast deflector plate /
Placa deflectora de explosión /
Plaque déviatrice de jet
Launch rod /
Vara de lanzamiento /
Tige de lancement
Stand-off stem /
Vástago vertical /
Tige verticale
Hub /
Pivote /
Pivot
Legs /
Patas /
Pieds (3)
Launch rod cap /
Tapa de Barra de
lanzamiento /
Tige de lancement
capuchon
KEEP FOR FUTURE REFERENCE • GUÁRDALAS PARA FUTURA REFERENCIA • À CONSERVER POUR RÉFÉRENCE ULTÉRIEURE
estesrockets.com
NOTE: / NOTA: / REMARQUE:
A rough or uneven joint will reduce performance of your rocket. /
Una unión áspera o dispareja reducirá el funcionamiento de su cohete. /
Un joint rugueux ou inégal réduira la performance de votre fusée.
NOTE: / NOTA: / REMARQUE:
Assembly remains the same for a two piece or three piece launch rod. /
El ensamblaje es el mismo para la vara de lanzamiento de dos o de tres piezas. /
L'assemblage reste le même pour une cosse de lancement en deux ou trois pièces.
CONCRETE FLOOR /
PISO DE CONCRETO /
SOL EN BÉTON
ASSEMBLE LAUNCH ROD / ENSAMBLAR LA VARA DE LANZAMIENTO / ASSEMBLER LA TIGE DE LANCEMENT
Question and Answer IconNeed help?

Do you have a question about the Estes PORTA-PAD II and is the answer not in the manual?

Estes PORTA-PAD II Specifications

General IconGeneral
BrandEstes
ModelPORTA-PAD II
CategorySports & Outdoors
TypeLaunch Pad
MaterialPlastic
Recommended UseModel Rocket Launching
Compatible Rod Size1/8 inch
Weight1.5 lbs

Summary

Launch Rod Assembly Instructions

Join Launch Rod Pieces

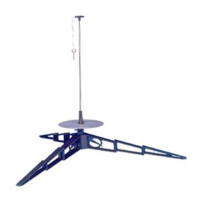
Connect the individual pieces of the launch rod together to form a single unit.

Tighten Launch Rod Joints

Drop one end repeatedly on a concrete floor to ensure all joints are securely tightened.

Smooth Launch Rod Joints

Sand all joints and both ends smooth if necessary for better performance.

Attach Launch Stand-Off

Attach Blast Deflector Plate

Slide the blast deflector plate over the stand-off stem until it is in place.

Secure Stand-Off Stem

Turn the stand-off stem a quarter turn until it snaps securely into position.

Attach Launch Pad Legs

Connect Legs to Hub

Attach the launch pad legs to the launch pad hub, ensuring the tops are aligned.

Attach Launch Rod and Blast Deflector Plate

Insert Launch Rod

Insert the launch rod into the small hole and tighten the wing nut securely.

Mount Blast Deflector

Slide the blast deflector with the stand-off over the launch rod.

Place Launch Rod Cap

Place the protective cap on top of the launch rod when assembly is complete.

Safety Notes

Use Safety Cap

Always replace the safety cap on the launch rod when it is not in use to prevent injury.

Avoid Standing Over Pad

Never stand directly over the launch pad during launch operations for safety.