GB
GB - 25
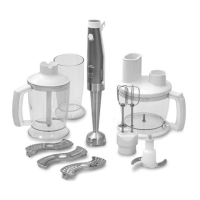
F – small chopping container 500 ml (only for type ETA 3016, ETA 6016)
F1 – central shaft F3 – container lid
F2 – sickle-shaped knife F4 – hole for drive connection
F5 – anti-slip base
G – large chopping container 1250 ml (only for type ETA 3016/010 and ETA 6016)
G1 – central shaft G3 – container lid
G2 – sickle-shaped knife G4 – hole for drive connection
G5 – anti-slip base
H – multi-purpose container 1250 ml (only for type ETA 6016)
H1 – central shaft H7 – anti-slip base
H2 – lid lock button H8 – sickle-shaped knife
H3 – container lid H9 – graters holder
H4 – hole for drive connection H10 – cutting grater
H5 – lling hole H11 – slicing grater
H6 – pusher H12 – tearing grater
III. PREPARATION FOR USE
Remove all packing material and take out the hand blender and the accessories. Remove all
possible adhesion foils, stick-on labels or paper from the appliance. Before the rst use, wash the
parts that will be in contact with food in hot water with a detergent, rinse thoroughly with clean
water and wipe till dry, or let dry (see V. MAINTENANCE). Put the hand blender with the selected
accessories on a at, stable, smooth and clean work surface at the height of at least 85 cm, out
of reach of children and incapacitated people (see par. I. SAFETY WARNING). Make sure that
the power cord is not damaged and that it does not lead through any sharp or hot surfaces. Plug
power supply fork A6 to the electric power and control light A4 will come on. Choose the amount
of the processed food so that the maximum volume of the containers marked with the gauge line
is not exceeded. Bigger amount of processed food has to be divided into several doses and the
volume of the containers has to be checked regularly. Any time you work with the appliance, do not
forget to put an anti-slip base under container E, F, G, H. We recommend stopping work from time
to time, switching off the appliance and removing possible food that was stuck onto the blending/
beating adapter, the sickle-shaped knife, graters, containers or the lid (see I. SAFETY WARNING).
Food preparation (processing) times are only approximate, they depend on the amount, the kind
and the quality of used ingredients and they range in seconds to minutes (see the table). After
nishing work, disconnect the appliance from power supply by taking the connector of power cord
A6 out of the electric socket. Container E is suitable for use in a microwave oven.
Switch (A1)
Start the drive by pushing the switch (the motor runs only for the time when the switch is pushed
and at the output set by the electric regulation).
Electronic revolutions regulation (A2)
It enables setting optimum revolutions for the selected chopping, blending, mixing, beating, cutting
and grating adapter. By turning the regulator from - to + you can continuously change the speed
of the motor revolutions (Fig. 2). The set speed value (1 to 8) is shown at display A3.
According to the method of use of the accessories we recommend the following speed
setting:
Blending adapter 1 – 8
Beating adapter 3 – 8
Sickle-shape knives 1 – 8
Graters 1 – 8


 To Next Page
 Loading...