Do you have a question about the ETNA Tucana Small Instant and is the answer not in the manual?
Introduces the user manual and its purpose for operating the machine safely.
Details pictograms and safety symbols used on the machine itself for hazard identification.
Explains the pictograms and safety symbols used within the technical manual for warnings and guidance.
Defines conventions for directional terms and terminology used throughout the document.
Provides information on how to obtain assistance and what details to provide to dealers.
Describes how to find machine identification details such as model, serial number, and voltage on the exterior.
Details how to locate machine identification information on the inside of the machine's frame.
Offers guidance on recycling and disposing of used machinery and its parts environmentally.
Outlines essential safety rules, restrictions, and user responsibilities for operating and maintaining the machine.
Lists the documentation available for the machine, including user and technical manuals.
Provides a general overview of the machine's function in preparing and dispensing hot drinks.
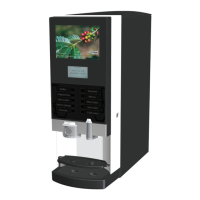
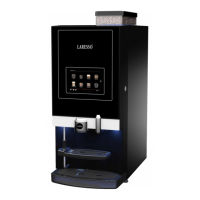
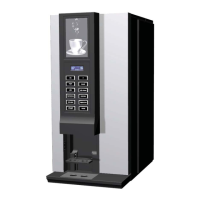
Identifies and describes the main components visible from the front of the machine.
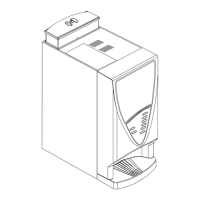
Identifies and describes the main components visible from the interior of the machine.
Details the different types of containers fitted to various machine models.
Explains the step-by-step process of how the machine mixes water and ingredients to dispense drinks.
Describes the procedure for powering the machine on and off using the main switch.
Explains how to select and adjust the strength of the dispensed drink.
Details the procedure for using the jug function to dispense multiple cups simultaneously.
Explains how the machine enters and exits standby mode.
Provides comprehensive safety guidelines for operating the machine, covering inspection, environment, and usage.
Explains the procedures for filling the machine's ingredient containers, both inside and outside the unit.
Outlines safety precautions and general rules to follow before performing maintenance or cleaning tasks.
Provides guidelines on handling perishable ingredients, including compliance with use-by dates.
Describes the service panel that becomes visible when the door is opened and its functions.
Emphasizes the importance of regular maintenance for drink quality and machine operation.
Details the daily tasks required for maintaining the machine, including checking containers and cleaning.
Provides instructions for cleaning the drip tray, noting it should not be washed in a dishwasher.
Explains the procedure for cleaning the machine's valves and rinsing the mixers.
Details how to clean the exterior of the machine, focusing on specific areas.
Outlines the weekly tasks for machine maintenance, including cleaning mixer components.
Provides detailed steps for cleaning the various mixer parts, including extractors and blades.
Mentions that stickers with maintenance overviews are affixed on the inside of the door.
Describes fault messages on the LCD and the functions of the selection panel in programming mode.
Presents the detailed electrical circuit diagram for the Dorado Small Instant machine.
Details the electrical specifications of the machine, including voltage, frequency, capacity, and fuse rating.
Specifies the water system requirements, including connection type, minimum, and maximum water pressure.
States the sound level of the machine during operation according to DIN standards.
Specifies the recommended ambient temperature range for operating the machine and a warning about freezing.
Provides the physical dimensions (height, width, depth) and weight (empty and full) of the machine.
Explains the different software levels (User, Service engineer) and their access pin codes.
Provides step-by-step instructions for updating the machine's firmware and user interface software.
Details the procedure to enable and disable the machine's demo mode for demonstration purposes.
Explains how to copy recipe lists from one machine to another using a USB-stick.
Guides the user through the initial setup steps, including connecting water, power, and software readiness.
Explains how to access and adjust the machine's valve using an Allen key.
Outlines essential safety precautions to be taken before performing any part replacement procedures.
Provides general safety steps for repairs, including disconnecting power and water supply.
Details the procedure for safely emptying the machine's boiler, including precautions for hot parts.
Describes the steps required to restart the machine after part replacement or maintenance, including checks and software readiness.
Explains how to access and replace the drink selection labels on the machine's door.
Provides step-by-step instructions for replacing the machine's inlet valve.
Details the procedure for removing and replacing the machine's boiler, including safety warnings and reassembly.
Provides instructions for replacing the boiler sensor, including safety precautions for hot parts.
Details the procedure for replacing the heating element, with safety warnings for hot parts.
Explains how to replace a valve in the machine, including safety steps and electrical disconnection.
Guides the user through replacing the extraction ventilator, involving disconnection and reassembly.
Details the steps for replacing the mixer engine, including motor removal and wiring disconnection.
Provides instructions for replacing the drip tray sensor, both in the machine and console.
Explains how to remove and fix the top door plate, with warnings about ESD sensitivity.
Details the procedure for replacing the cup sensor, including ESD precautions.
Provides instructions for replacing the LCD display and the display PCB, with ESD warnings.
Guides the user through replacing the illumination panel, including ESD precautions.
Details the procedure for replacing the power supply unit, including ESD precautions.
Explains how to replace the on/off switch, involving connector disconnection and reconnection.
Provides instructions for removing and replacing the service panel, including cleaning the door plate.
| Brand | ETNA |
|---|---|
| Model | Tucana Small Instant |
| Category | Coffee Maker |
| Language | English |