EasyManua.ls Logo

Eureka NEC101 Series - User Manual

Eureka NEC101 Series
17 pages
Print Icon
To Next Page IconTo Next Page
Loading...
Thank you for purchasing your new Eureka vacuum!
Important instructions
For easy assembly, please take a few
moments to read this owners guide.
If you have questions about your new
vacuum, please contact our customer
service HELPLINE at 1-800-282-2886.
Eureka stands by our
Clean Promise seal.
Learn more at
www.eureka.com/cleanpromise
www.eureka.com
Owner’s Guide
NEC101 series
Cordless stick vacuum cleaner; household type
Question and Answer IconNeed help?

Do you have a question about the Eureka NEC101 Series and is the answer not in the manual?

Summary

Where to Find Important Vacuum Information

Keep this information

Record model, type, serial numbers, and purchase date for service.

Product Registration and Inspection

Register your product online and inspect for shipping damage.

Important Safeguards

General Safety Warnings

Critical safety precautions for using the vacuum cleaner to prevent hazards.

What Comes in the Carton

Included Parts and Hardware

List and identification of all items included in the vacuum package.

Charging the Stick Vacuum Cleaner

Charging Procedure and Indicators

Steps to connect the charger, understanding charging status lights.

Easy Assembly

Assembling and Disassembling the Vacuum

Instructions for connecting and detaching the hand vacuum, extension pole, and floor nozzle.

How to Use the Stick Vacuum Cleaner

Power Settings and Operation

Using Max and Eco modes, power button, and stroke technique.

Using Attachments

How to attach and use the crevice tool and floor nozzle.

How to Maintain Your Vacuum Cleaner

Emptying the Dust Cup

Procedure for holding the dust cup over a bin and releasing debris.

Cleaning Dust Cup and Filters

Steps to detach, clean, and reassemble the dust cup, sponge filter, and filter assembly.

Cleaning Floor Nozzle and Roller Brush

Cleaning the Roller Brush

Steps to remove tangled hair and debris from the roller brush.

Clearing Blockages and Storage

Checking for Obstructions

How to check and clear blockages in the dust cup, filters, and wand.

Storage Guidelines

Safe methods for storing the vacuum using the wall mount or in a cupboard.

Troubleshooting and Support

Installing the Wall Mount Bracket

Instructions for choosing a location and attaching the wall mount bracket.

Common Problems and Solutions

Addresses issues like no power, poor suction, or motor stopping.

Thermal Cut-off Procedure

What to do if the vacuum suddenly shuts off due to overheating.

Product Warranties

1.5 Year Limited Vacuum Warranty

Details coverage, exclusions, and limitations of the vacuum warranty.

12 Month Limited Battery Warranty

Explains coverage, exclusions, and limitations for the battery module.

Discarding the Vacuum and Battery Pack

Battery Disposal Information

Guidelines for environmentally safe disposal of the lithium-ion battery.

Order Genuine Eureka Accessories and Replacement Parts

Available Parts and Accessories

Catalog of replacement parts with part numbers and images.

Overview

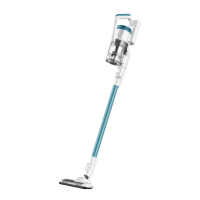
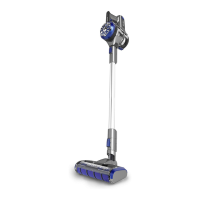
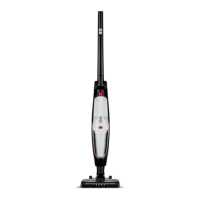
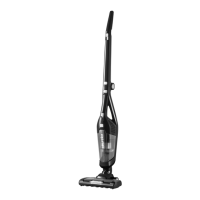
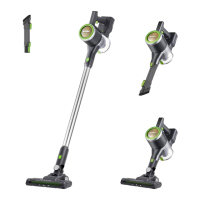
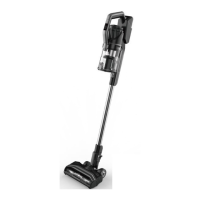
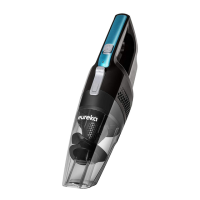
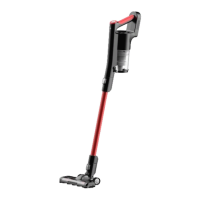
The Eureka NEC101 series is a cordless stick vacuum cleaner designed for household use. It offers a versatile cleaning experience, functioning as both a full-sized stick vacuum and a handheld unit with various attachments.

Function Description:

The primary function of the Eureka NEC101 series is to provide cordless vacuuming for general household cleaning. It is designed to pick up dry debris from various surfaces, including floors and elevated areas, using its different configurations. The vacuum features two power settings: "Max mode" for higher suction and shorter runtime (approx. 15 minutes), and "Eco mode" for lower suction and longer runtime (approx. 30 minutes). It always starts in Max mode. The device includes a floor nozzle for general floor cleaning, an extension pole for extended reach, and a crevice tool for detailed cleaning in tight spaces. The hand vacuum can be detached for portable use with or without attachments.

Important Technical Specifications:

While specific technical specifications like motor wattage or battery voltage are not explicitly detailed, the manual indicates a lithium-ion battery. The charging time for a full charge is up to six hours. The product is designed to function within a temperature range of 40°F - 104°F. The included charger is model MC2805A. The wall mount bracket requires M3.530mm screws and 630mm drywall anchors for installation.

Usage Features:

  • Cordless Operation: Provides freedom of movement without being tethered to a power outlet.
  • Two Power Modes: "Max mode" for intensive cleaning and "Eco mode" for extended cleaning tasks.
  • Convertible Design: Easily transforms from a stick vacuum to a hand vacuum for versatile cleaning.
  • Attachments: Comes with a crevice tool for reaching narrow areas and an extension pole for high-level cleaning or floor vacuuming.
  • Charge Indicator Lights: Two small lights on the handle indicate charging status and battery level. They flash during charging, show solid for half-charged, and turn off after 10 minutes when fully charged. When the battery is low during use, the top light flashes, and the vacuum automatically switches off after approximately 10 seconds.
  • Easy Assembly: Components like the extension pole and hand vacuum click into place for quick setup. Disassembly is also straightforward using release buttons.
  • Wall Mount Storage: Includes a wall mount bracket for convenient and secure storage, preventing the product from falling over.
  • Thermal Cut-off: A safety feature that shuts off the vacuum in case of motor overheating, protecting the unit from damage.

Maintenance Features:

  • Dust Cup Emptying: The dust cup (O) should be emptied after each use by pushing the dust release latch (J) over a household bin. It is important not to overfill the dust cup beyond the MAX level marker.
  • Filter Cleaning: The vacuum includes a circular sponge filter (Q) and a filter assembly (M).
    • Dust Cup and Filter Assembly Removal: The dust cup is removed by pressing the dust cup removal button (N). The circular sponge filter (Q) is removed by pinching its ribbon material and pulling upwards. The filter assembly (M) is removed by pinching its sides and pulling upwards.
    • Dust Removal: Excess dust from the filter assembly can be removed using a soft brush or by tapping it gently over a bin. The filter assembly can be broken down into three parts for thorough cleaning.
    • Washing: The dust cup, filter assembly parts, and circular sponge filter (Q) can be rinsed under warm water until the water runs clear. They must be left to dry for 24 hours before reassembly.
    • Recommended Cleaning Schedule: The filter assembly (M) should have debris shaken out when the dust cup is emptied and rinsed under warm water once a month or more often if required. The circular sponge filter (Q) should have dust/debris removed as necessary and can also be rinsed under warm water once a month.
  • Brushroll Maintenance:
    • Debris Removal: If the brushroll becomes tangled, the vacuum will shut off due to the thermal cut-out. To clear debris, the floor nozzle should be turned face down, and scissors can be used to cut heavy threads or strings.
    • Brushroll Removal: For more stubborn debris, the brushroll can be removed by locating and opening the brushroll release tab on the right side of the floor nozzle.
    • Reassembly: To reassemble, align one end of the brushroll with the floor nozzle gear, press the other end into the slot, and replace the brushroll release tab until it clicks into place.
  • Blockage Clearing: In case of blockages, check and empty the dust cup, clean the filters, and detach the floor nozzle or crevice tool from the hand vacuum or extension pole to check for obstructions. A broom handle can be used to clear blockages in the extension pole.
  • Battery Disposal: The product contains a lithium-ion battery that must be disposed of properly in an environmentally safe manner, not with regular household trash. A helpline is provided to find disposal locations.

The Eureka NEC101 series emphasizes ease of use and maintenance to ensure prolonged product life and optimal cleaning performance.

Eureka NEC101 Series Specifications

General IconGeneral
BrandEureka
ModelNEC101 Series
CategoryVacuum Cleaner
LanguageEnglish

Related product manuals