FR EN NL
www.ewt-france.com
www.ewt-france.com
12
SPECIFICATIONS
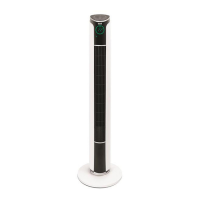
Model ZEPHYR
LEDscreen Yes:touchcontrol
Modes 4(Normal,Natural,
Night,ChildSecurity)
Temperaturedisplay Yes
Ionictechnology Yes
Remotecontroltidy Yes
Aromadiffusercase Yes
Speednumber 3
Oscillation Yes:automatic
SMARTtilting Yes:manual
Handle Yes
Timer 12H
Remotecontrol Yes–(Includedbatteries–CR2025)
Power 45W
Voltage 220-240V~
Frequency 50HZ
Productdimensions(LxWxH) L31xW31xH107,5
Productweight 4,30kg
ASSEMBLY
Thestand(4and5)fortheuprightcomesintwopartswhich
can beveryeasily tted around thebase of theappliance.
Onepartofthestand(4)shouldbeplacedonthefrontofthe
appliancebaseandthesecondsectionofthestand(5)-the
onewiththeopeningontheoutsidefortheelectricalcable
(6)-shouldbeplacedattheback.
STEP 1 :
Firstly,attachthefrontpartofthestand(4),makingsurethat
theelectricalcable(6) goesthroughthe centralopeningof
thestand.Lineuptheholesintowhichthefasteningscrews
willbeinsertedonthestandabovethebaseoftheupright.
STEP 2 :
Secondly,slotthebacksectionofthestand(5)intothefront
sectionofthe stand(4). Tightenthe fourfastening screws
(7)rmly.
Ensurethattheelectricalcable(6)goesthroughthecentral
holeinthestandandthatitgoesthroughtheopeningatthe
backofthestandwhentheapplianceisplaceduprightona
atoor.
INSTRUCTION FOR USE
1.Please read theseinstructionscarefully before usingthe
applianceandkeepthemincaseoffutureuse.
2.Makesurethatthevoltageofyourlocalelectricitynetwork
correspondstotheonewhichappearsontheappliance.
3. Beforeusing it for the rsttime, remove the appliance’s
protective tabs and stickers.
Placeyour applianceon aatoorandplug theappliance
intotheelectricalsupply(220-240V,50Hz)usingtheelectrical
cable.
You can control your appliance by using the touchscreen
controlpanel(1)locatedatthetopofthestandorbyusing
theremotecontrol.
TheLED displayscreencan betemporarilyswitchedoffby
pressing the LED screen On/Off button (F) on the remote
controlorbypressingtheventilationspeedcontrolbutton(E)
formorethan3secondsonthecontrolpanel.
A.ApplianceOn/Off
B.Ventilationmodecontrol
C.OscillationOn/Off
D.Timer
E.Ventilation speed control
F.LEDscreenOn/Off
G.IonicfunctionOn/Off
Appliance On/Off (A)
Switch the appliance on by pressing the button and switch it
off by pressing the button a second time.
M
Ventilation mode control (B)
Normal Mode: The indicator will light up when Normal
Mode is switched on.
When the appliance is switched on, the ventilation mode will
be set to Normal mode by default. The ventilation speed will
be regular according to the speed selected.
Natural Mode: The indicator will light up when Natural
Mode is switched on.
When this mode is switched on, the appliance will alternate
between the different ventilation speeds - Fast, Medium, Low
-for periods of 15 seconds for each speed.
Night Mode: The indicator will light up when Night
Mode is switched on.
When this mode is selected and the appliance is set to Fast
speed, the appliance will remain at this speed then switch to
Medium speed before nishing on Low speed. Each of these
stages will last for 30 minutes. The appliance will therefore
stop functioning after 1 hour and 30 mins when set to Night
mode on Fast speed, 1 hour when set to Medium speed and
30 minutes when set to Low speed.
When this mode is activated, you can deactivate oscillation
by pressing the button (C) while leaving Child mode on.
Child Mode: The indicator will light up when Child
Mode is switched on.
The timer will be automatically programmed to stop after
3 hours and will automatically activate oscillation of the
appliance. The appliance will activate a ventilation speed
cycle by setting to Fast speed, Medium speed then Low
speed, each for a period of 15 minutes.
Oscillation On/Off (C)
Press the button once to begin oscillation then press it a
second time to stop oscillation of the appliance.
The ventilation direction of the appliance can be adjusted
manually. To incline the appliance, simply push the top of the
appliance backwards. The angle of incline is adjustible up to
around 7°. To put the appliance back into a verticle position,
simply push the top of the appliance forwards.
Timer (D)
The appliance is equipped with a timer, allowing you to
programme the length of time ventilation will last for between
1 and 12 hours. When you press the button once, the timer
will be set to stop the appliance after 1 hour.
Every time you press the button, 1 hour will be added.
In order to deactivate the timer, keep pressing the button until
Zephyr.indd 12 26/11/18//48 12:26
 Loading...